Hemudu HD04B-002
HEMUDU Dual Monitor Articulating Desk Mount Arm Stand
Model: HD04B-002 | Brand: Hemudu
1. Introduction
This instruction manual provides detailed guidance for the installation, operation, and maintenance of your HEMUDU Dual Monitor Articulating Desk Mount Arm Stand. This stand is designed to support two computer monitors in a vertical stack configuration, enhancing your workspace ergonomics and efficiency.
The mount is compatible with screens ranging from 13 to 34 inches in size, with a maximum weight capacity of 44 pounds per monitor. It supports VESA mounting patterns of 75x75mm and 100x100mm.
2. Safety Information
- Read all instructions carefully before assembly and installation.
- Ensure your desk surface is strong enough to support the combined weight of the mount and two monitors.
- Do not exceed the maximum weight capacity of 44 pounds per monitor.
- Verify that your monitors have compatible VESA mounting patterns (75x75mm or 100x100mm).
- Keep small parts away from children.
- Tighten all screws firmly, but do not overtighten to avoid stripping threads.
- If you experience any difficulties or have questions, contact Hemudu customer support.
3. Package Contents
Please verify that all components are present and undamaged before proceeding with installation. While specific part names may vary, your package should generally include:
- Main support pole
- Two VESA monitor mounting plates
- C-clamp assembly
- Grommet mounting hardware
- Cable management clips
- Assorted screws and washers for monitor attachment
- Hex keys (Allen wrenches) for assembly
4. Setup and Installation
4.1 Choose Installation Method
Your monitor mount offers two installation options: C-Clamp or Grommet Mounting. Both methods are suitable for desks up to 2.9 inches thick.
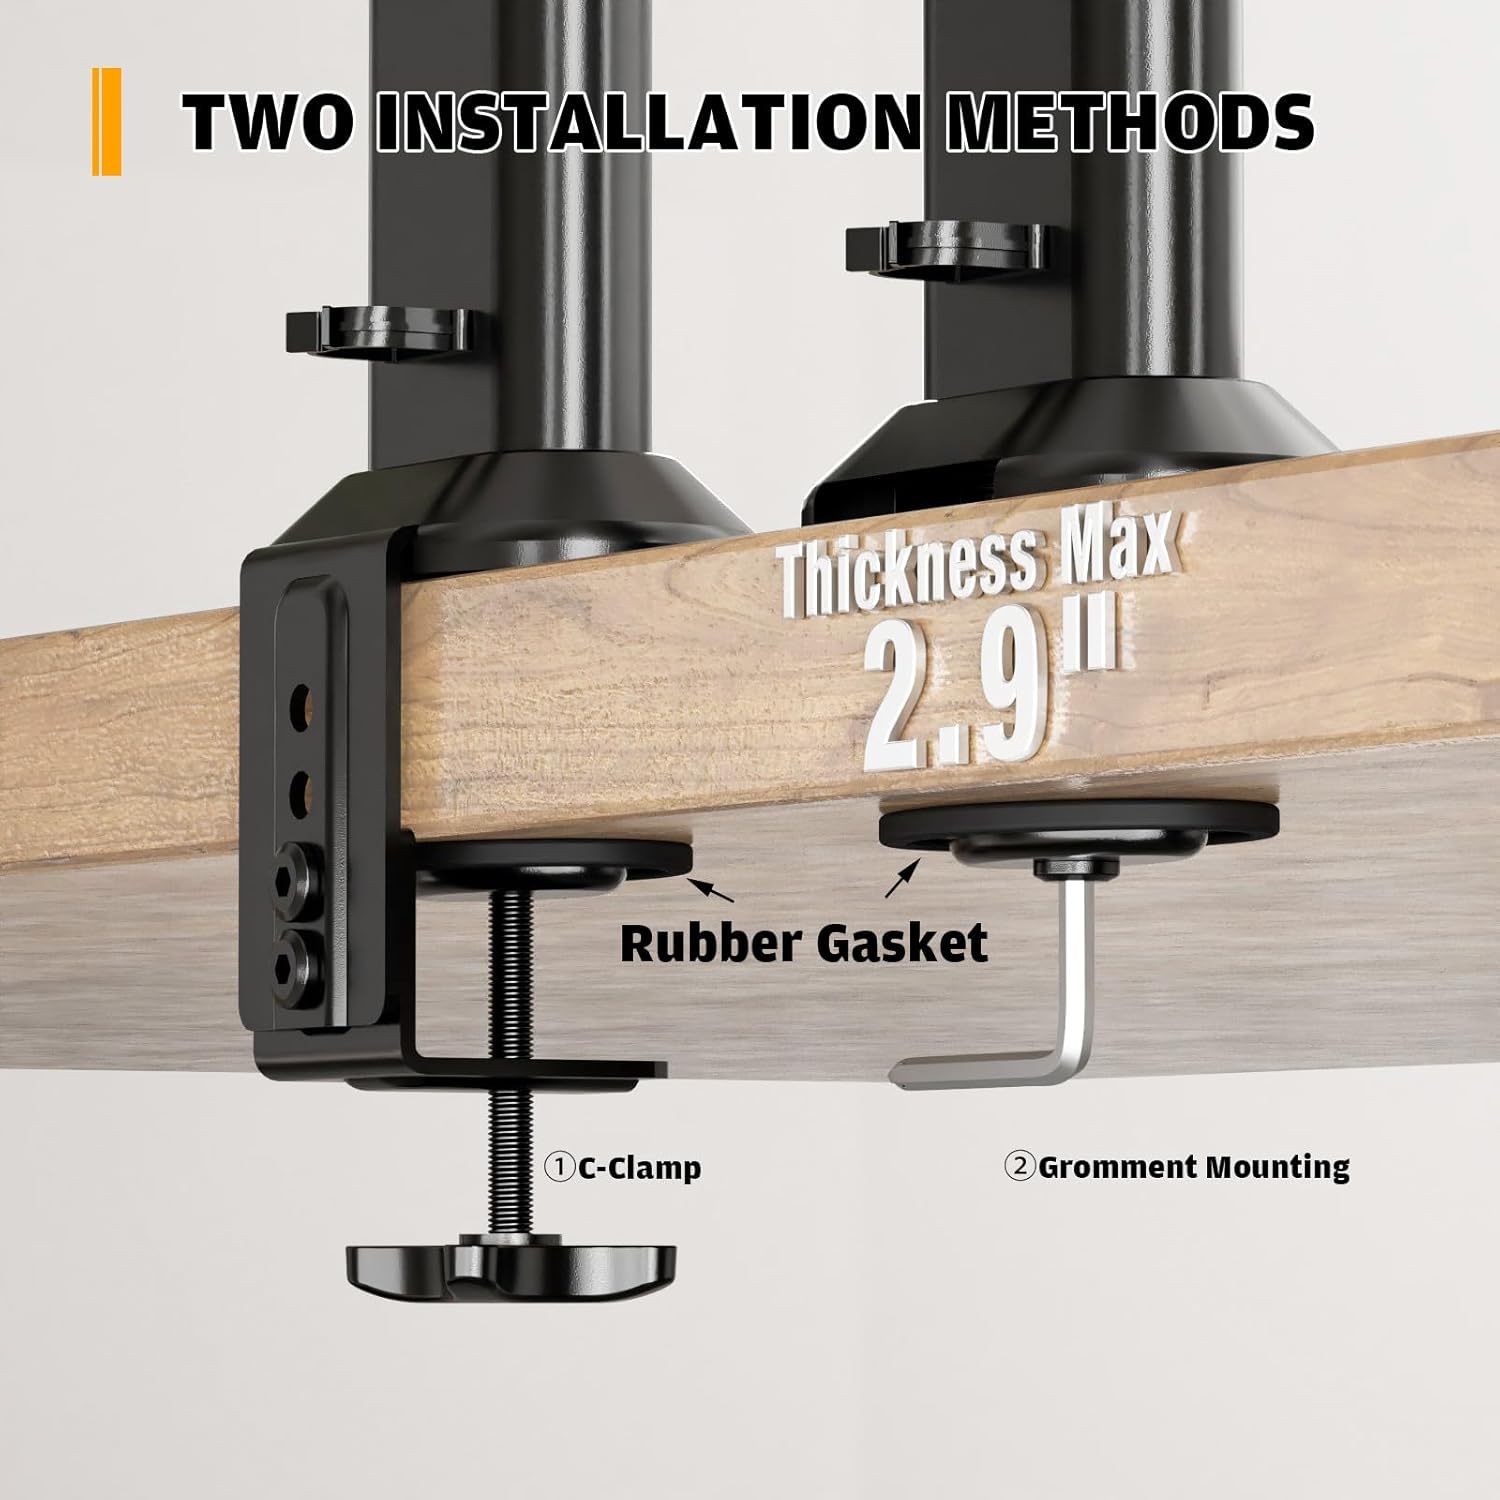
Image: Illustration showing the C-Clamp and Grommet mounting options for the desk mount. The C-Clamp secures to the edge of the desk, while the Grommet mount uses a hole in the desk surface.
C-Clamp Installation:
- Attach the C-clamp base to the bottom of the main support pole.
- Position the C-clamp on the edge of your desk.
- Tighten the C-clamp screw until the mount is securely fastened to the desk. Ensure a rubber gasket is used to protect the desk surface.
Grommet Mounting:
- If your desk has a grommet hole, insert the grommet base through the hole.
- Secure the grommet base from underneath the desk using the provided hardware. Ensure a rubber gasket is used to protect the desk surface.
- Attach the main support pole to the secured grommet base.
4.2 Attach VESA Plates to Monitors
Before mounting, ensure your monitors are compatible with VESA 75x75mm or 100x100mm patterns.

Image: Diagram illustrating the VESA mounting hole patterns (50mm, 75mm, 100mm) on the back of a monitor, indicating where the mounting plate attaches.
- Carefully place each monitor face down on a soft, clean surface to prevent scratches.
- Align the VESA mounting plate with the screw holes on the back of your monitor.
- Secure the plate to the monitor using the appropriate screws provided in the hardware kit. Do not overtighten.
4.3 Mount Monitors to Arm

Image: The HEMUDU dual monitor stand with two monitors attached in a vertical stack, showcasing the overall setup and the C-clamp base.
- With the VESA plates attached to your monitors, carefully slide each monitor onto the designated slots on the main support pole.
- Ensure the monitors are securely seated on the pole. Use the reinforcement knobs or screws to lock them in place at the desired height.
4.4 Cable Management
To maintain a clean and organized workspace, utilize the integrated cable management clips.

Image: A close-up view of the cable management clips located on the central pole of the monitor stand, showing cables neatly routed through them.
- Route your power and display cables (HDMI, DisplayPort, etc.) along the main support pole.
- Use the detachable cable clips to secure the cables neatly to the pole, preventing clutter and tangles.
5. Operating Adjustments
The HEMUDU monitor stand offers multiple adjustment options to achieve an ergonomic viewing experience.
5.1 Height Adjustment
Adjust the height of your monitors along the central pole to achieve optimal eye level.
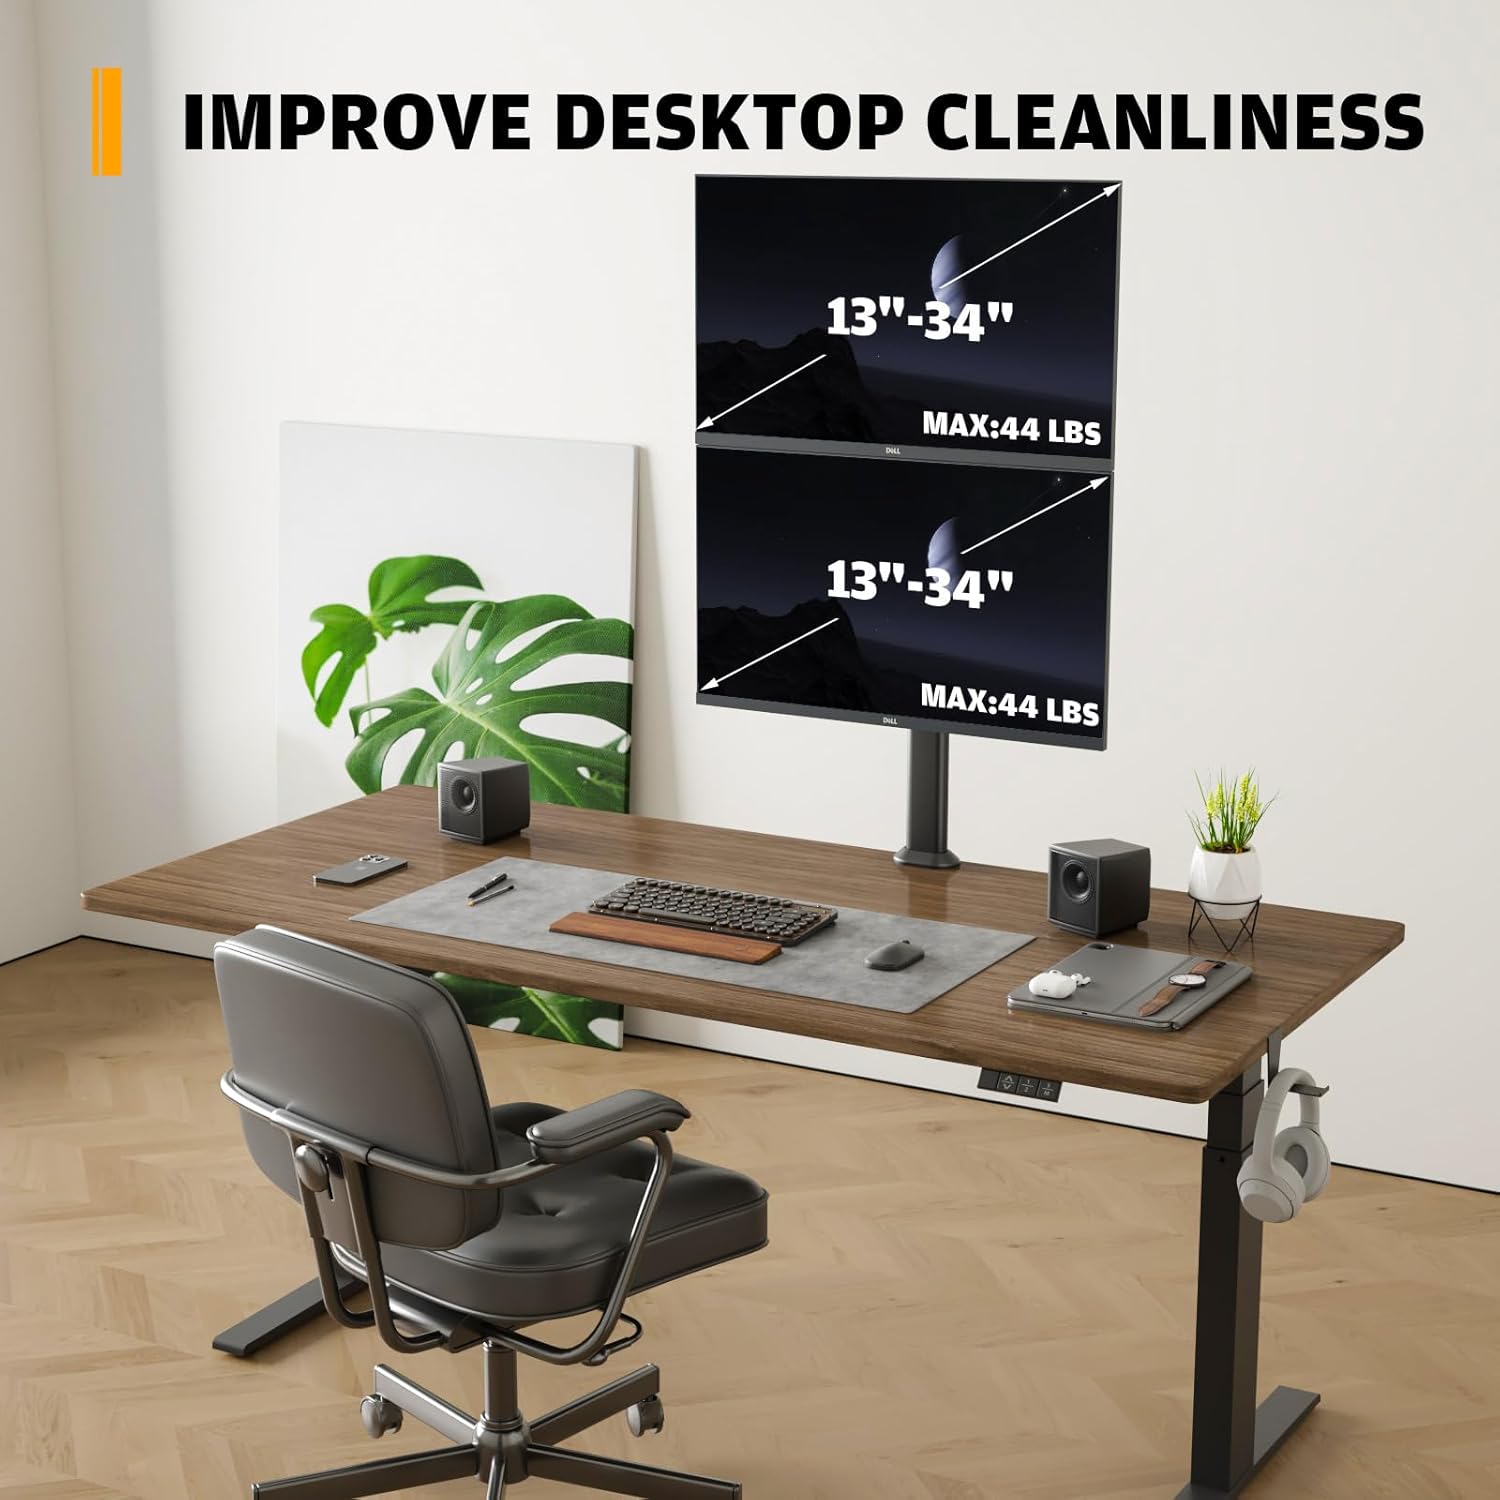
Image: A diagram illustrating the various height adjustment levels available on the monitor stand, showing both 4-level and 8-level sections for precise positioning.
- Loosen the reinforcement knobs or screws on the VESA mounting plates.
- Slide the monitors up or down the pole to the desired height. The pole offers 4+8 distinct height levels for precise positioning.
- Tighten the knobs/screws to secure the monitors in place.
5.2 Tilt Adjustment
Adjust the vertical angle of your monitors to reduce glare and improve viewing comfort.

Image: A woman sitting at a desk, demonstrating the tilt adjustment feature of the monitor stand, with arrows indicating the -15° to +10° tilt range for both monitors.
- The monitor brackets allow for a tilt range of -15° (downward) to +10° (upward).
- Gently tilt your monitor to the desired angle. Some models may require loosening a knob or screw on the VESA plate before tilting and retightening afterward.
5.3 Swivel Adjustment
Rotate your monitors horizontally to share your screen or adjust viewing angles.

Image: An overhead view of a monitor on the stand, with arrows indicating the 100-degree swivel range (+50° to -50°) of the monitor arm.
- The monitor brackets offer a swivel range of -50° to +50°.
- Gently rotate your monitor to the left or right as needed.
5.4 Rotation
Rotate your monitors 360° to switch between landscape and portrait orientations.
- Carefully rotate the monitor screen clockwise or counter-clockwise to achieve either portrait or landscape orientation.
6. Maintenance
- Cleaning: Wipe the mount with a soft, damp cloth. Avoid harsh chemicals or abrasive cleaners.
- Periodic Checks: Periodically check all screws and connections to ensure they remain tight and secure. Retighten if necessary.
- Lubrication: No lubrication is required for the moving parts.
7. Troubleshooting
| Problem | Possible Cause | Solution |
|---|---|---|
| Monitor sags or does not hold position. | Screws/knobs are loose; monitor weight exceeds capacity. | Ensure all adjustment screws and reinforcement knobs are tightened. Verify monitor weight is within the 44 lbs limit. |
| Mount is unstable on the desk. | C-clamp/Grommet base is not tightened sufficiently. | Retighten the C-clamp or grommet mounting hardware. Ensure the desk surface is flat and sturdy. |
| Monitors cannot be attached to VESA plate. | Incorrect VESA pattern; wrong screws used. | Confirm your monitor has VESA 75x75mm or 100x100mm pattern. Use the correct screws from the hardware kit that fit your monitor's VESA holes. |
8. Specifications

Image: A visual summary of the monitor stand's compatibility, including VESA 100x100, 13-34 inch screen size, and maximum 44 lbs weight capacity per monitor.
| Feature | Detail |
|---|---|
| Model Number | HD04B-002 |
| Screen Compatibility | Two screens, 13" to 34" each |
| Weight Capacity | Up to 44 lbs (20 kg) per monitor |
| VESA Compatibility | 75x75mm, 100x100mm |
| Tilt Range | -15° to +10° |
| Swivel Range | -50° to +50° |
| Rotation | 360° (for portrait/landscape orientation) |
| Height Adjustment | Multiple levels along the central pole |
| Mounting Options | C-Clamp, Grommet |
| Desk Thickness Compatibility | Up to 2.9 inches (7.3 cm) |
| Material | Alloy Steel |
| Color | Black |
| Item Weight | 6.18 pounds |
| Package Dimensions | 17.17 x 6.22 x 3.31 inches |
9. Warranty and Support
For warranty information or technical support, please refer to the product packaging or contact Hemudu customer service directly. Contact details can typically be found on the manufacturer's official website or through your point of purchase.
Related Documents - HD04B-002
 |
Hemudu HT05B-003 Computer Monitor Stand Assembly Instructions Assembly instructions for the Hemudu HT05B-003 Computer Monitor Stand. Includes parts list, step-by-step assembly guide, and specifications for tilt, swivel, and weight capacity. |
 |
Hemudu HT1001B TV Stand with Mount: Assembly and Safety Guide Comprehensive guide for assembling the Hemudu HT1001B TV Stand with Mount. Includes safety warnings, parts list, and step-by-step instructions for installation and use. |
 |
Bonntec MDM 002 Dual Monitor Desk Mount Installation Guide Comprehensive installation guide for the Bonntec MDM 002 dual monitor desk mount, covering unpacking, safety, parts list, and step-by-step assembly instructions for desk clamp and grommet base mounting. |
 |
DOUXE DXM-002 Dual Monitor Mount Installation Instructions Comprehensive installation guide for the DOUXE DXM-002 dual monitor mount. This document provides detailed steps for unpacking, safety precautions, and assembly using desk clamp or grommet base mounting options. Includes a complete parts list and adjustment procedures. |
Ask a question about this manual
Ask about setup, troubleshooting, compatibility, parts, safety, or missing instructions. Manuals+ will review the question and use this page’s manual context to help answer it.