Hemudu HD04B-001
HEMUDU Single Desk Monitor Arm Mount Stand
Model: HD04B-001
Brand: Hemudu
Introduction
This instruction manual provides detailed guidance for the installation, operation, and maintenance of your HEMUDU Single Desk Monitor Arm Mount Stand. Please read this manual thoroughly before installation and use to ensure proper setup and safe operation. This monitor arm is designed to enhance your workspace ergonomics and free up valuable desk space.

Image: The HEMUDU Single Desk Monitor Arm Mount Stand, showcasing its sleek design and sturdy construction.
Specifications
| Feature | Description |
|---|---|
| Model Number | HD04B-001 |
| Compatible Monitor Size | 13 inch to 32 inch (Flat or Curved) |
| Weight Capacity | Up to 77 lbs (35 kg) |
| VESA Compatibility | 75x75mm, 100x100mm |
| Tilt Angle | -15° to +10° |
| Swivel Angle | ±50° |
| Rotation | 360° (Portrait to Landscape) |
| Height Adjustment | 4 levels: 10", 11.4", 12.9", 14.3" |
| Desk Thickness Compatibility | Max 2.9 inches (for C-clamp and Grommet) |
| Material | Cold-rolled Steel / Metal |
| Color | Black |
| Item Weight | 3.87 pounds |

Image: Detailed diagram showing the monitor arm's dimensions, supported VESA patterns (75mm, 100mm), and maximum weight capacity of 77 lbs.
Package Contents
The HEMUDU Single Desk Monitor Arm Mount Stand package includes all necessary accessories for assembly and installation. Please verify that all components are present before beginning installation.
- Monitor Arm Pole
- VESA Plate
- C-Clamp Assembly
- Grommet Mounting Hardware
- All necessary screws, washers, and spacers for monitor attachment
- Hex Keys (Allen wrenches) for assembly and adjustments
- Instruction Manual
Safety Information
- Do not exceed the maximum weight capacity of 77 lbs (35 kg).
- Ensure your monitor's VESA pattern is compatible (75x75mm or 100x100mm).
- Verify that the desk surface can support the combined weight of the mount and monitor.
- Tighten all screws securely during installation. Loose connections can cause instability.
- Keep children and pets away during installation.
- If any parts are missing or damaged, do not proceed with installation. Contact customer support.
Setup and Installation
The HEMUDU monitor arm offers two installation methods: C-clamp and Grommet mounting. Choose the method that best suits your desk setup.
Pre-Installation Checks
- Confirm your monitor's weight is within the 77 lbs limit.
- Check your monitor's VESA pattern (75x75mm or 100x100mm).
- Measure your desk thickness to ensure it is no more than 2.9 inches.
- For VESA patterns, ensure the 'H' distance (distance from bottom VESA holes to bottom edge of monitor) is within the specified limits for optimal positioning: <11" for 100x100, <11.5" for 75x75, <12" for 50x50.

Image: A diagram illustrating how to measure the 'H' distance on your monitor for VESA compatibility and optimal mount placement.
Installation Methods
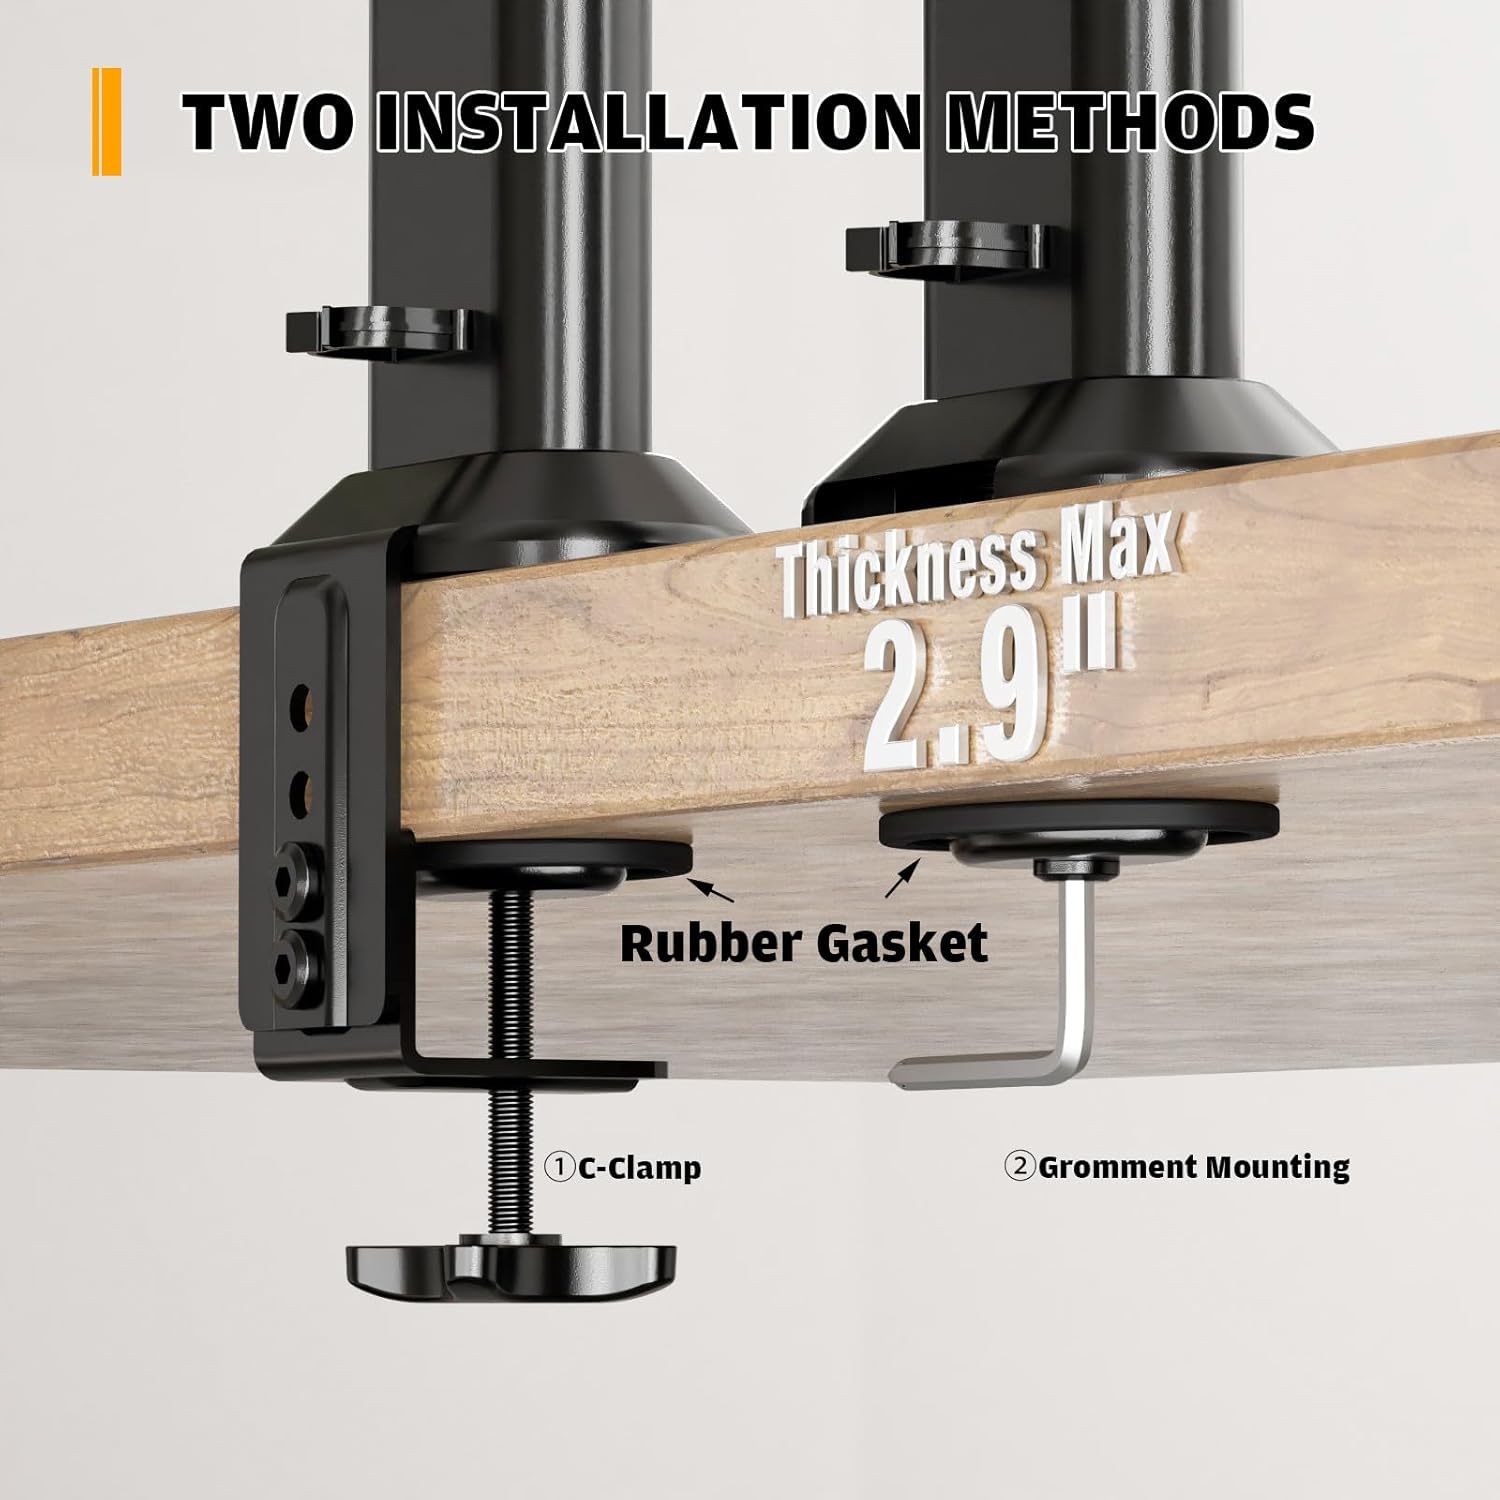
Image: Visual representation of the two installation options: C-Clamp for desk edges and Grommet Mounting for desks with existing holes, both supporting a maximum thickness of 2.9 inches.
Method 1: C-Clamp Installation
- Attach the C-clamp assembly to the bottom of the main pole.
- Position the clamp on the edge of your desk, ensuring the rubber gasket is between the clamp and the desk surface to prevent scratches.
- Tighten the C-clamp screw until the mount is securely fastened to the desk.
Method 2: Grommet Mounting
- If your desk has a grommet hole, disassemble the C-clamp and use the grommet mounting hardware.
- Insert the main pole through the grommet hole.
- Secure the mount from underneath the desk using the provided grommet plate and tightening knob.
Attaching the Monitor
- Attach the VESA plate to the back of your monitor using the appropriate screws and spacers.
- Carefully slide the monitor (with the attached VESA plate) onto the mounting head of the arm.
- Secure the monitor to the arm using the reinforcement knob or screws as indicated in the diagram.

Image: A close-up view demonstrating the use of strengthening screws to securely attach the VESA plate and monitor to the arm mount.
Operating and Adjustments
Your HEMUDU monitor arm allows for various adjustments to achieve an ergonomic viewing experience.
Height Adjustment
The monitor arm features 4 level height adjustments along the main pole. Loosen the securing knob on the pole, slide the monitor to your desired height (10", 11.4", 12.9", or 14.3"), and then re-tighten the knob to secure the position.
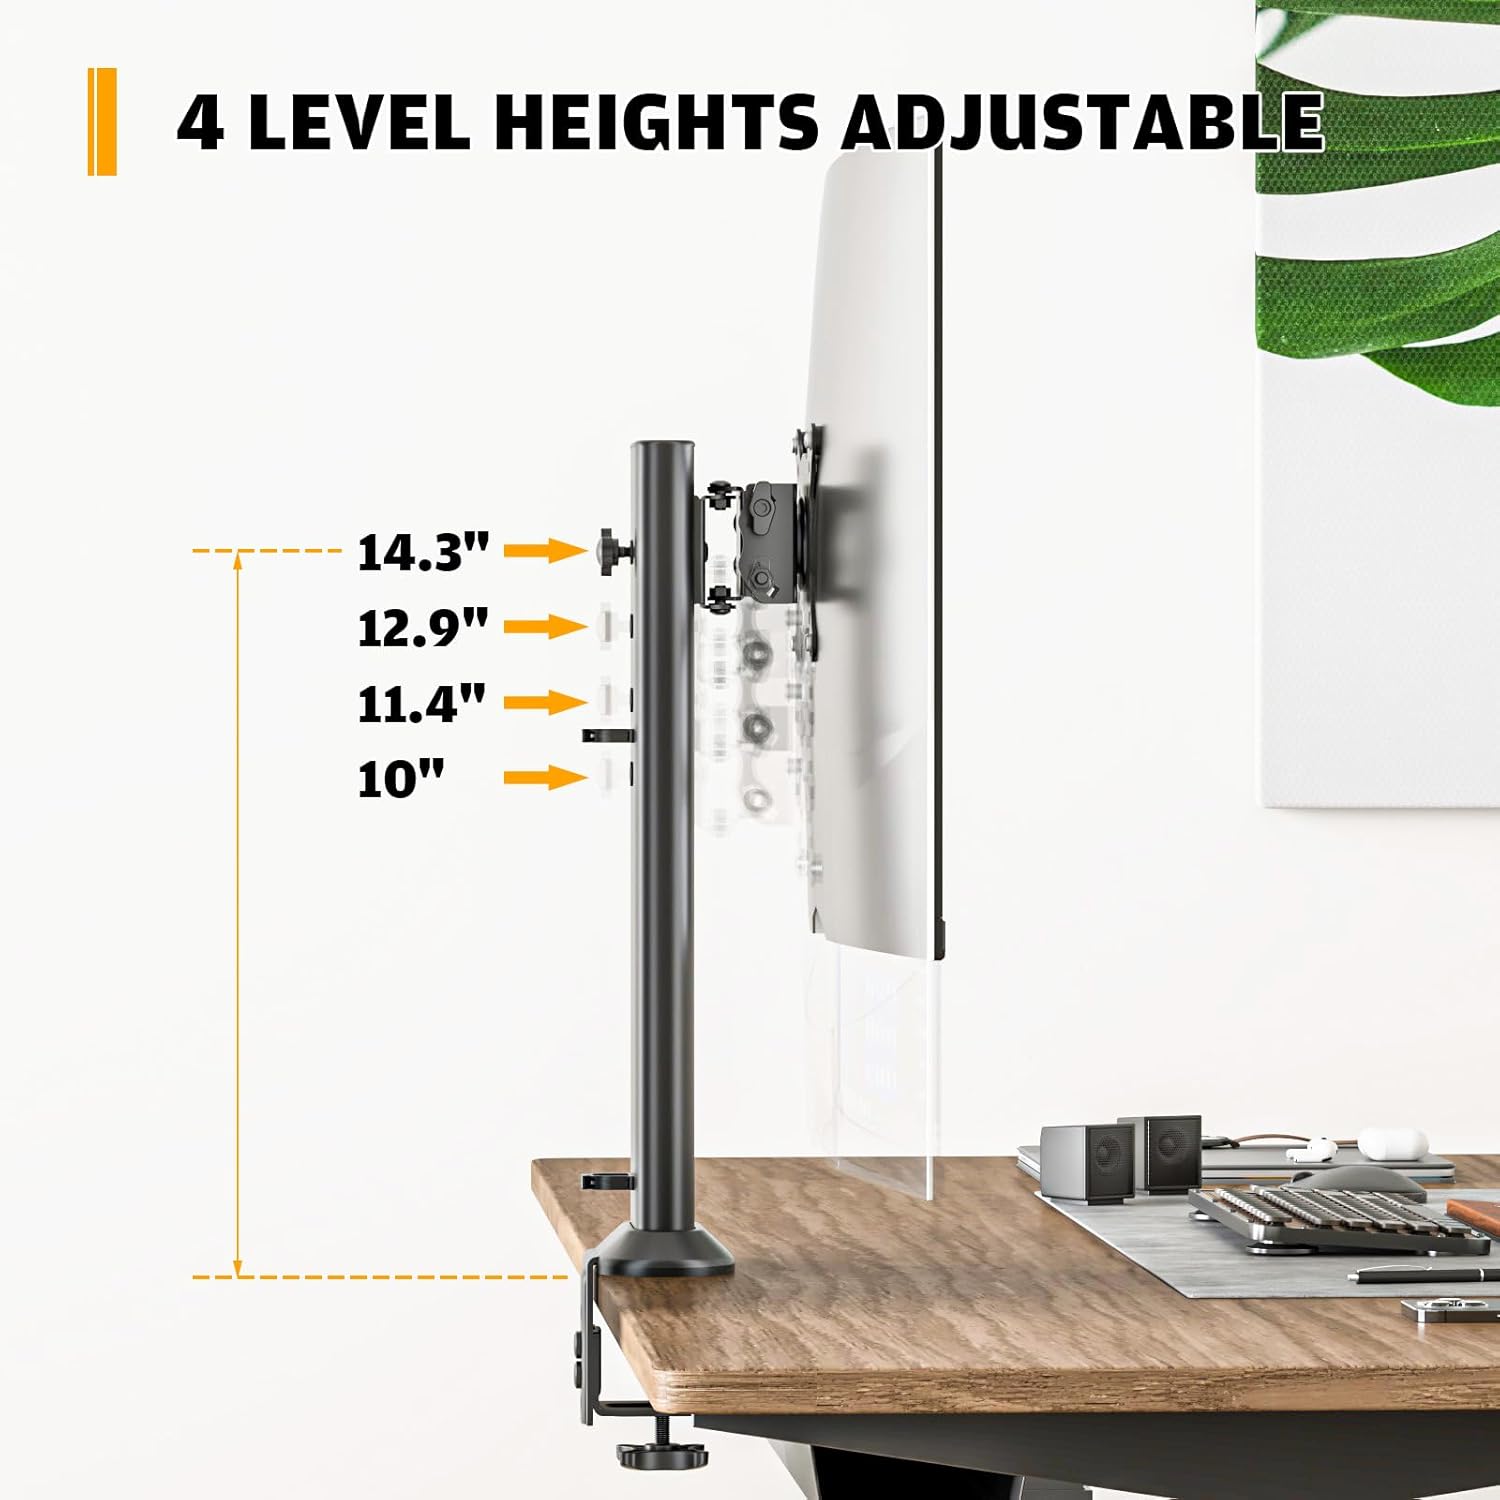
Image: A visual guide showing the four distinct height levels (10", 11.4", 12.9", 14.3") at which the monitor can be positioned on the arm.
Tilt Adjustment
Adjust the monitor's vertical angle from -15° (downward) to +10° (upward) to reduce glare and optimize your viewing comfort. Use the reinforcement knob on the VESA plate to set the desired tilt and secure it.
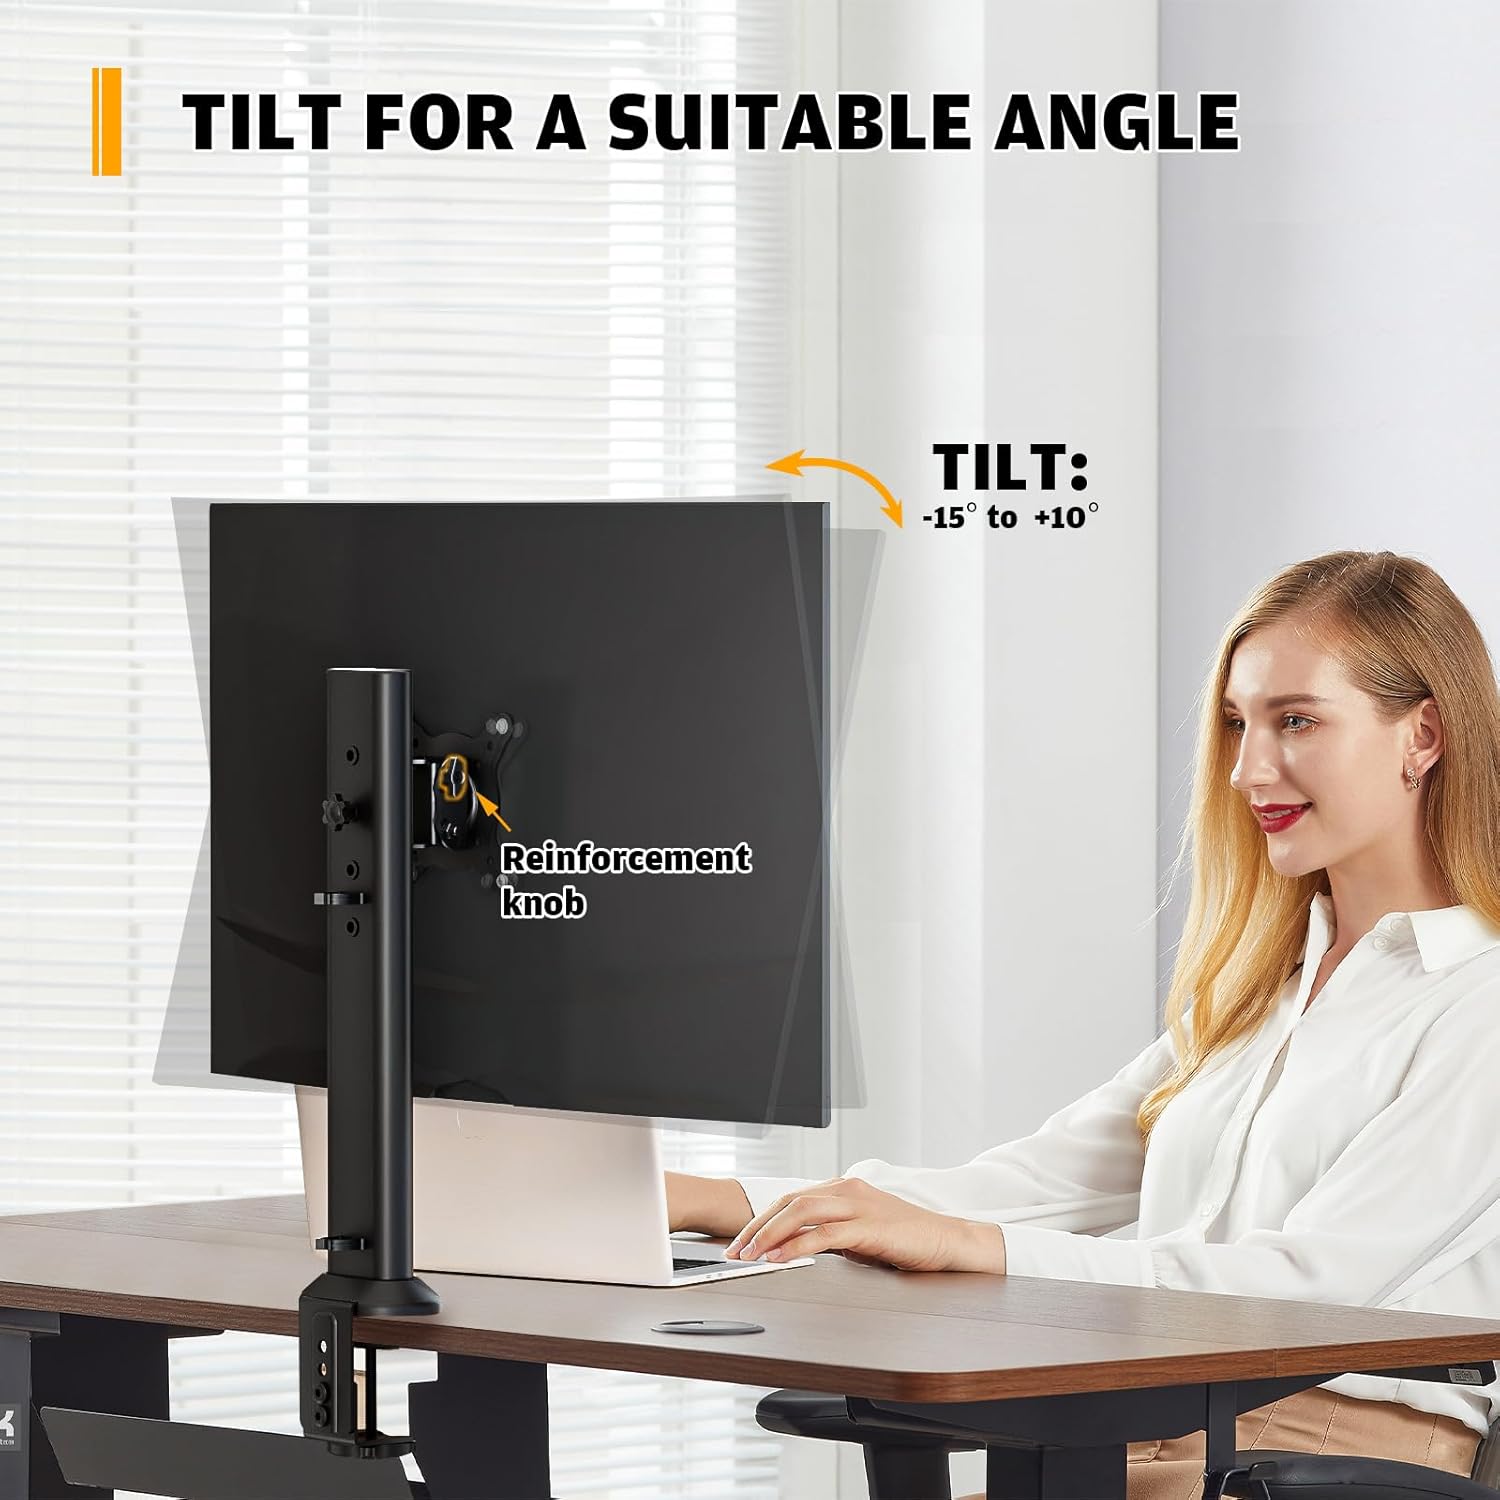
Image: A person adjusting the monitor's tilt, illustrating the range of motion from -15 degrees to +10 degrees for optimal viewing angle.
Swivel Adjustment
Swivel your monitor ±50° horizontally to share your screen with colleagues or adjust your viewing angle from different positions in the room.
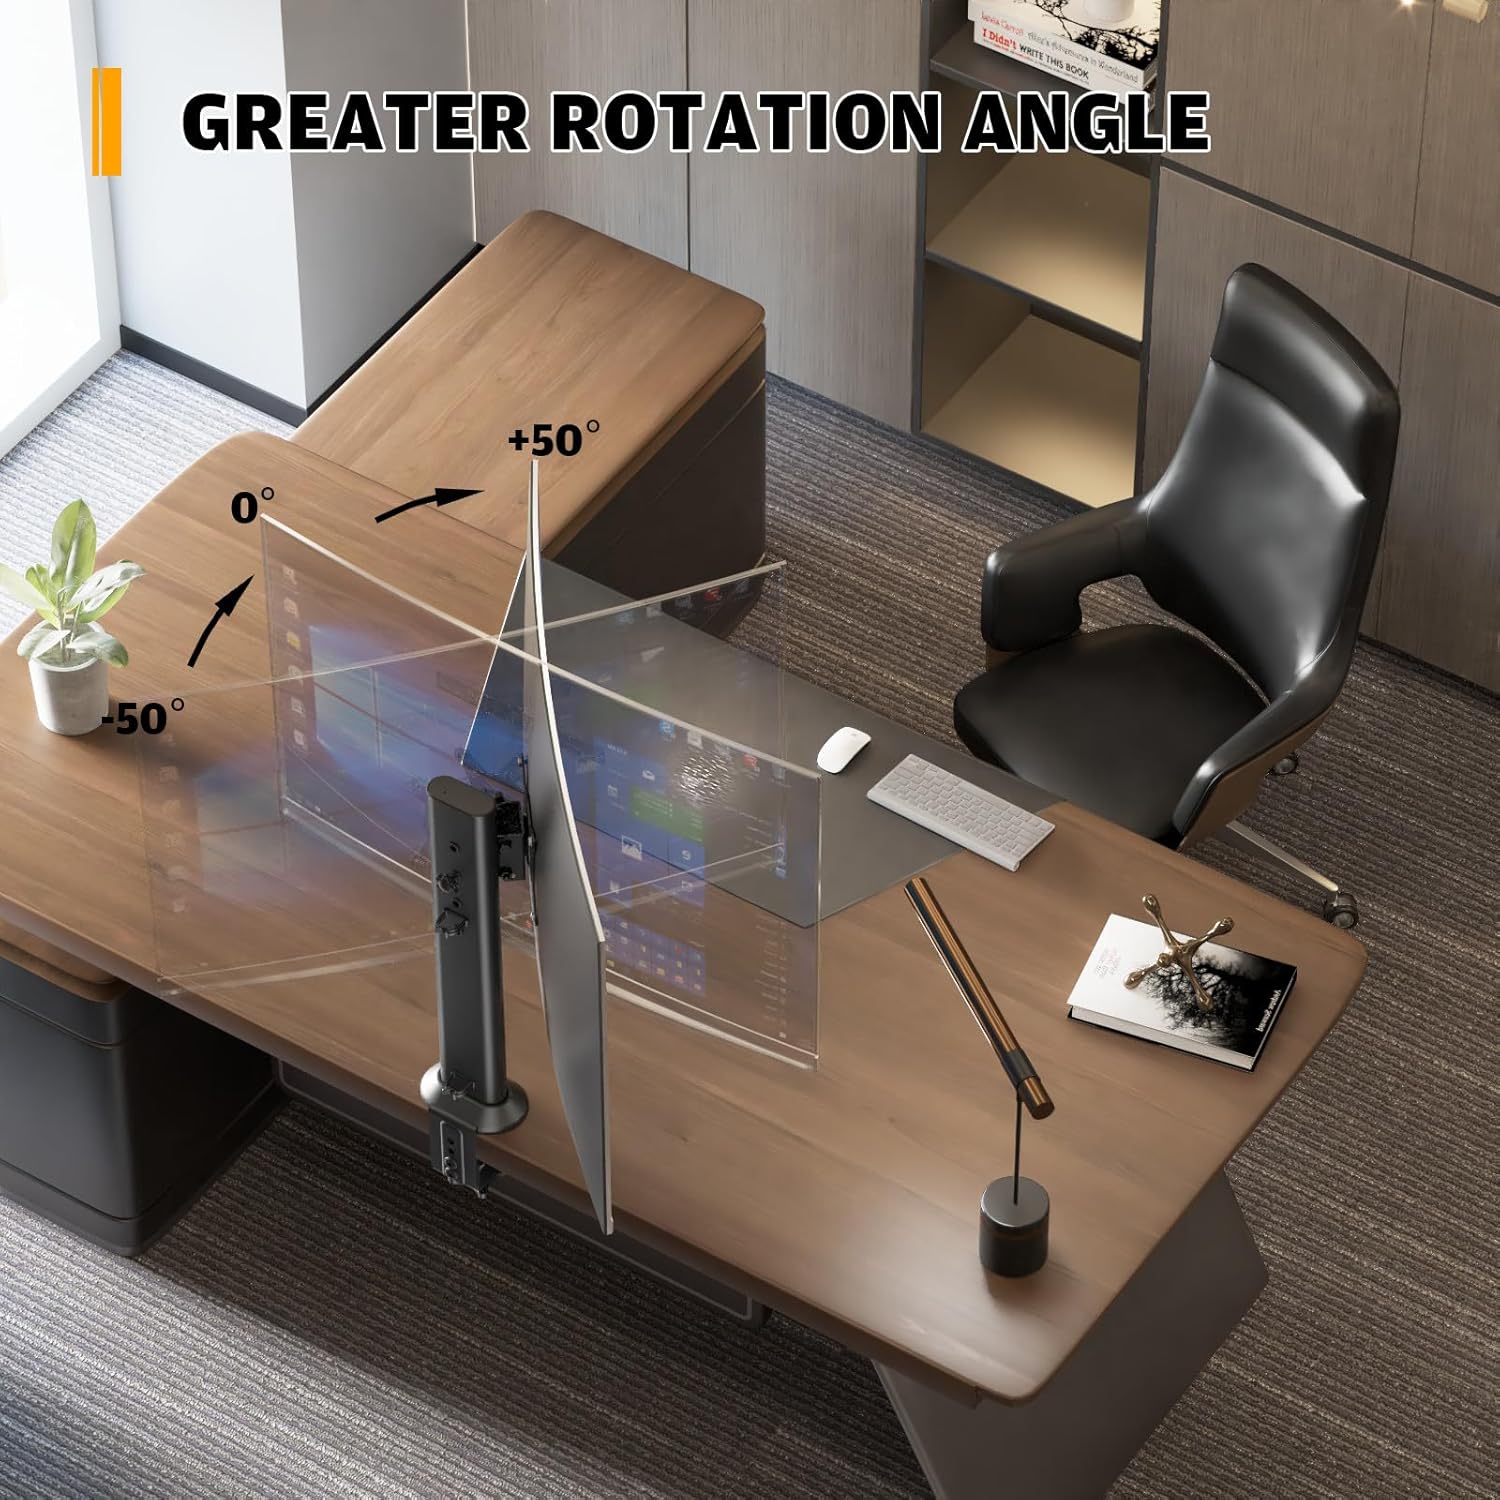
Image: A graphic demonstrating the monitor's swivel capability, allowing for a horizontal adjustment of ±50 degrees from the center position.
Rotation Adjustment
Rotate your monitor 360° to switch between landscape and portrait orientations, ideal for coding, document viewing, or specific applications.
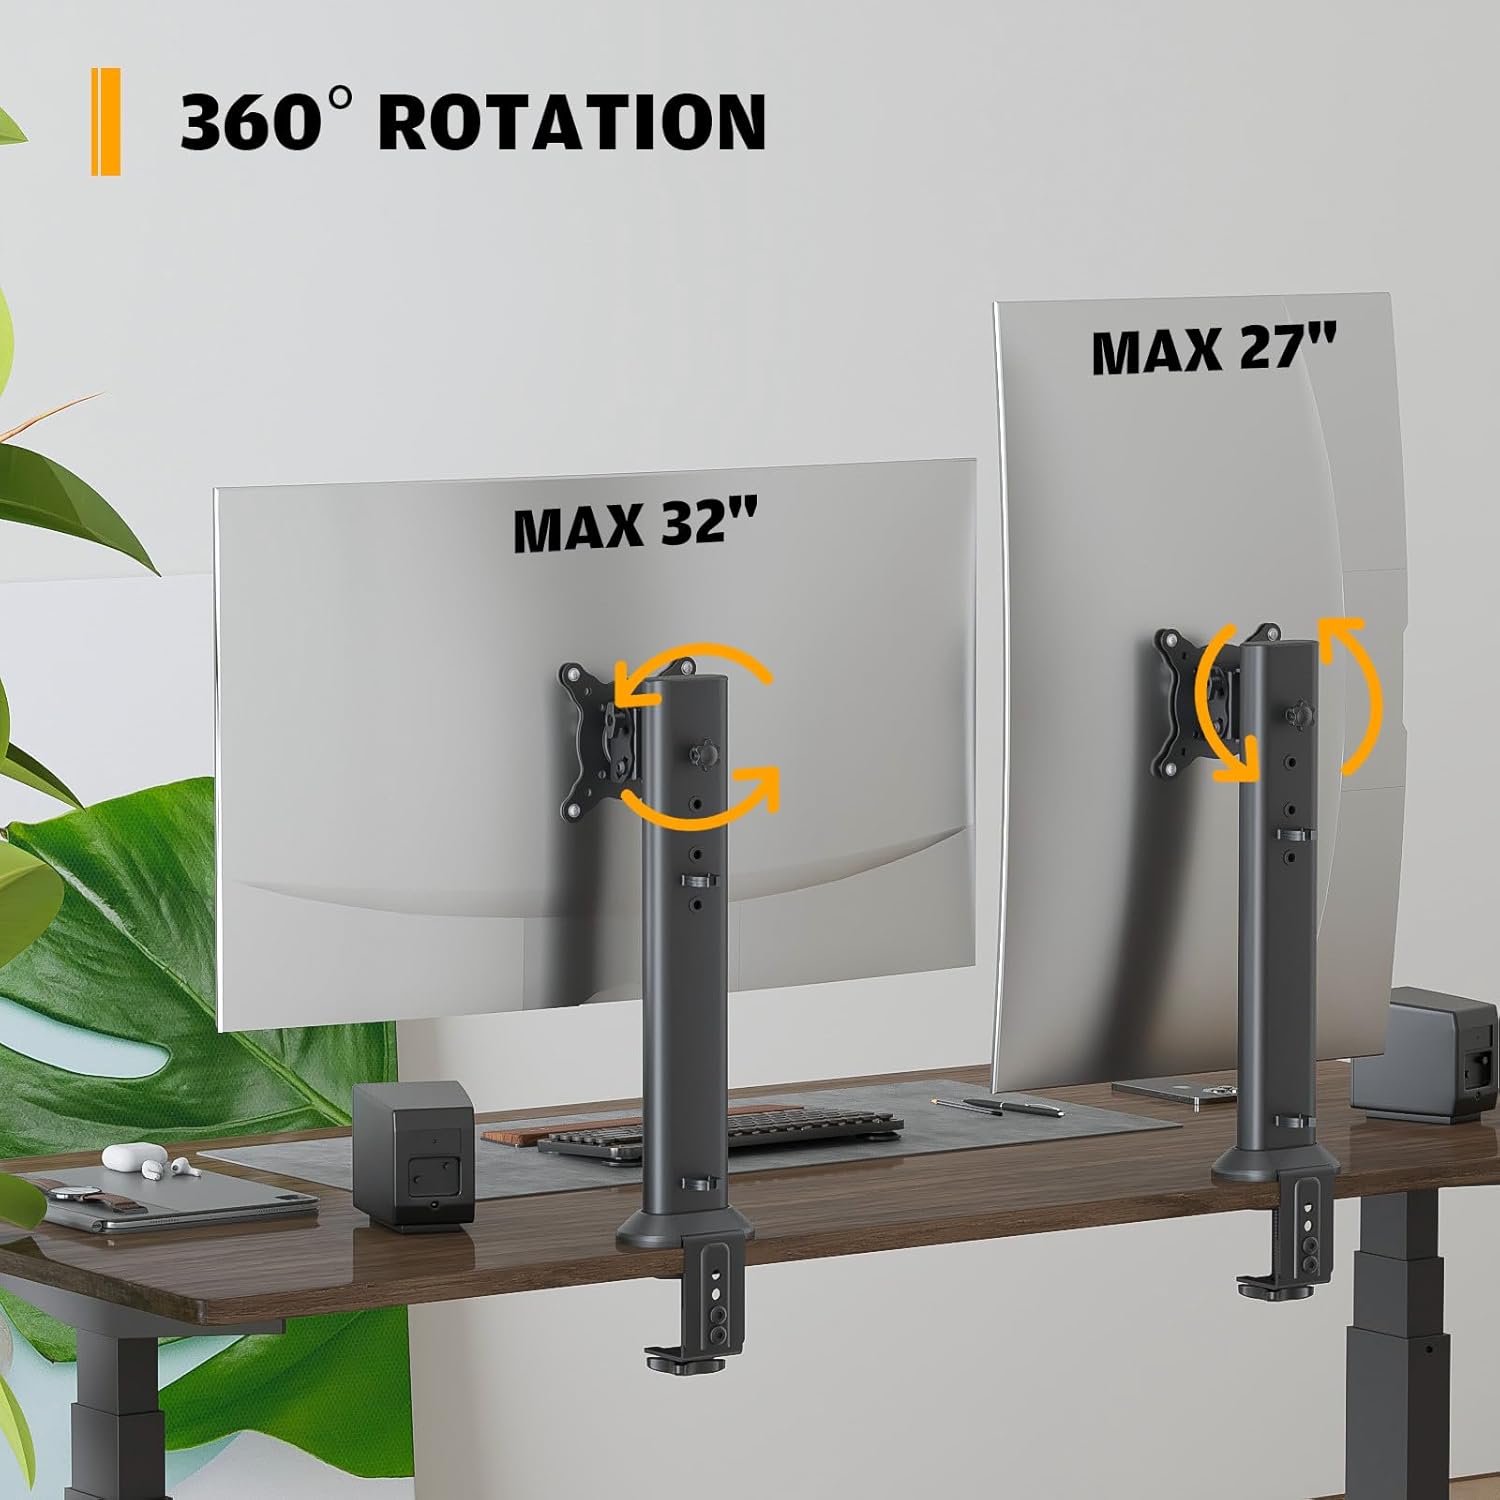
Image: Two monitors mounted on arms, one in landscape and one in portrait orientation, illustrating the 360-degree rotation capability of the mount.
Cable Management
The monitor arm features integrated cable clips to keep your wires organized and out of sight, contributing to a cleaner and more organized desktop.

Image: A close-up view of the monitor arm's pole, showing how cables can be neatly routed and secured using the integrated cable management clips.
Maintenance
Regular maintenance ensures the longevity and optimal performance of your monitor arm.
- Cleaning: Wipe the surface of the monitor arm with a soft, damp cloth. Avoid using abrasive cleaners or solvents that could damage the finish.
- Check Connections: Periodically check all screws and bolts to ensure they remain tight, especially the desk clamp/grommet and the VESA plate screws. Re-tighten if necessary.
- Lubrication: No lubrication is typically required for this type of monitor arm. If you notice any stiffness in movement, ensure no debris is obstructing the joints.
Troubleshooting
Here are solutions to common issues you might encounter:
Monitor is unstable or sags:
- Solution: Ensure the desk clamp/grommet mount is securely tightened to the desk. Verify that the monitor's weight does not exceed the 77 lbs capacity. Check that the VESA plate screws are fully tightened to the monitor and the arm.
Difficulty adjusting tilt/swivel/rotation:
- Solution: Some adjustments may require loosening a knob or screw slightly before repositioning, then re-tightening. Refer to the 'Operating and Adjustments' section for specific instructions on each movement. Ensure no cables are snagged or preventing movement.
Monitor does not fit the VESA plate:
- Solution: Double-check your monitor's VESA pattern. This mount supports 75x75mm and 100x100mm. If your monitor has a different pattern, it is not compatible.
Desk is scratched after installation:
- Solution: Ensure the rubber gaskets or protective pads were properly placed between the clamp and the desk surface during installation. These are designed to prevent scratches.
Warranty and Support
For warranty information or technical support, please refer to the product packaging or contact HEMUDU customer service directly. Contact details are typically provided on the manufacturer's website or included in the product's retail box.
You can also visit the Hemudu Store on Amazon for more information and support resources.
Related Documents - HD04B-001
 |
Hemudu HT05B-003 Computer Monitor Stand Assembly Instructions Assembly instructions for the Hemudu HT05B-003 Computer Monitor Stand. Includes parts list, step-by-step assembly guide, and specifications for tilt, swivel, and weight capacity. |
 |
Hemudu HT1001B TV Stand with Mount: Assembly and Safety Guide Comprehensive guide for assembling the Hemudu HT1001B TV Stand with Mount. Includes safety warnings, parts list, and step-by-step instructions for installation and use. |
 |
Humanscale eFloat One Assembly Instructions and Technical Data Comprehensive assembly instructions, safety guidelines, troubleshooting tips, and technical specifications for the Humanscale eFloat One electric height-adjustable desk. |
 |
Humanscale Float Assembly Instructions Detailed assembly instructions for the Humanscale Float height-adjustable desk, guiding users through setup, installation, and calibration for optimal workspace ergonomics. |
 |
BS-001 Barstool Assembly Instructions Detailed assembly instructions for the BS-001 barstool, including parts list, hardware, and step-by-step guidance. Learn how to assemble your Ebern Designs swivel bar stool. |
Ask a question about this manual
Ask about setup, troubleshooting, compatibility, parts, safety, or missing instructions. Manuals+ will review the question and use this page’s manual context to help answer it.