unbanded BOLY-4200-LP01
Wireless Lavalier Microphone System User Manual
Model: BOLY-4200-LP01 | Brand: unbanded
1. Introduction
This user manual provides comprehensive instructions for the setup, operation, and maintenance of your Wireless Lavalier Microphone System. This system is designed for professional audio capture in various settings, including live performances, theater, and church events, offering reliable wireless transmission and high-quality sound.
Please read this manual thoroughly before using the product to ensure proper operation and to maximize its performance and longevity.
2. Safety Information
- Do not expose the unit to rain or moisture to avoid fire or electric shock.
- Do not open the casing. There are no user-serviceable parts inside. Refer all servicing to qualified personnel.
- Ensure proper ventilation around the receiver unit.
- Use only the specified power adapter provided with the system.
- Dispose of batteries responsibly according to local regulations.
- Keep the system away from strong electromagnetic fields.
3. Package Contents
Verify that all items listed below are included in your package:
- (1) Four-channel UHF Diversity Receiver
- (4) Lavalier Microphones with Bodypack Transmitters
- (1) 1/4" Audio Cable
- (1) AC-CD 110V-240V Universal Power Adapter
- (1) User's Manual (this document)
4. Product Overview
The Wireless Lavalier Microphone System consists of a multi-channel receiver and four bodypack transmitters with lavalier microphones. It features a backlit LCD display on the receiver for monitoring RF level, AF level, channel frequency, and mute status.

Figure 4.1: Front view of the complete Wireless Lavalier Microphone System, including the four-channel receiver and four individual lavalier microphones with their respective bodypack transmitters.
4.1 Receiver Unit
The receiver unit is the central hub of the system, capable of simultaneously receiving signals from four bodypack transmitters. It features individual volume controls for each channel and offers both individual XLR outputs and a mixed 1/4" output.
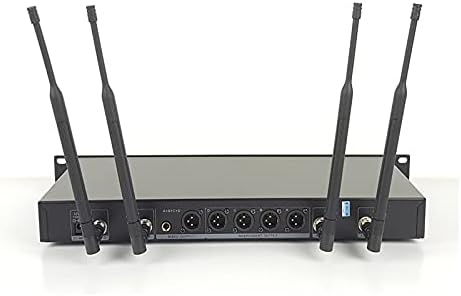
Figure 4.2: Rear view of the receiver unit, highlighting the four individual XLR outputs (CHANNEL A, B, C, D), the 1/4" mixed output, and the antenna input ports.
- Front Panel: Power button, LCD display for each channel, Channel Up/Down buttons, Volume knobs.
- Rear Panel: Antenna connectors, Four XLR individual outputs, One 1/4" Mixed output, DC power input.
4.2 Bodypack Transmitters & Lavalier Microphones
Each bodypack transmitter is compact and designed to be worn discreetly. It connects to a lavalier microphone, which is a small, unidirectional clip-on microphone ideal for speech and vocal performances.
- Bodypack: Power switch, Battery compartment (for AA batteries), Microphone input, Channel synchronization indicator.
- Lavalier Microphone: Unidirectional pickup pattern, Clip for attachment to clothing.
5. Setup Instructions
- Unpack and Inspect: Carefully remove all components from the packaging and inspect them for any signs of damage.
- Receiver Placement: Place the receiver unit on a stable, flat surface, preferably within a 19" rack if applicable. Ensure there is adequate ventilation around the unit. Position the antennas vertically for optimal signal reception.
- Connect Power to Receiver: Connect the provided AC-CD 110V-240V universal adapter to the DC power input on the rear of the receiver unit, then plug it into a suitable power outlet.
- Install Batteries in Transmitters: Open the battery compartment on each bodypack transmitter and insert two AA batteries, observing the correct polarity. Close the compartment securely.
- Connect Lavalier Microphones: Plug each lavalier microphone into the microphone input jack on its corresponding bodypack transmitter.
- Connect Audio Output:
- For individual channel output: Use XLR cables (not included) to connect the XLR outputs (CHANNEL A, B, C, D) on the receiver to your mixer or audio interface.
- For mixed output: Use the provided 1/4" audio cable to connect the MIXED OUT jack on the receiver to your mixer or audio interface.
- Power On: Turn on the receiver unit using the power button on the front panel. The LCD displays should illuminate.
- Synchronize Transmitters and Receiver:
- Select a desired frequency for each channel on the receiver using the Channel Up/Down buttons. The system offers 100 selectable frequencies per channel.
- Turn on each bodypack transmitter.
- Follow the receiver's instructions (typically an IR sync function) to automatically synchronize the transmitter's frequency with the selected receiver channel. Refer to the receiver's display for confirmation of successful synchronization (e.g., RF signal indicator).
6. Operating Instructions
- Microphone Placement: Clip the lavalier microphone to the user's clothing, approximately 6-8 inches below the chin, ensuring it is not covered by clothing or jewelry.
- Adjust Volume: Use the individual volume control knobs on the receiver's front panel to adjust the output level for each microphone channel. Start with the volume low and gradually increase it to avoid feedback or distortion.
- Monitor Performance: Observe the LCD display on the receiver for each channel:
- RF Level: Indicates the strength of the radio frequency signal from the transmitter. A strong, stable signal is desired.
- AF Level: Indicates the audio frequency level being received. This should fluctuate with speech or sound.
- Channel Frequency: Shows the current operating frequency.
- Mute Status: Indicates if the channel is muted.
- Frequency Selection: If you experience interference, you can change the operating frequency for a specific channel. Use the Channel Up/Down buttons on the receiver to select a new frequency, then re-synchronize the corresponding bodypack transmitter.
- Power Off: When finished, turn off each bodypack transmitter, then power off the receiver unit.
7. Maintenance
- Cleaning: Use a soft, dry cloth to clean the exterior surfaces of the receiver and transmitters. Do not use liquid cleaners or abrasive materials.
- Battery Replacement: Replace batteries in the bodypack transmitters when the low battery indicator appears or when audio quality degrades. Always use fresh AA batteries.
- Storage: When not in use for extended periods, remove batteries from the transmitters and store the system in a cool, dry place, away from direct sunlight and extreme temperatures.
- Antenna Care: Handle antennas carefully. Do not bend them excessively or apply undue force.
8. Troubleshooting
| Problem | Possible Cause | Solution |
|---|---|---|
| No sound from microphone. |
|
|
| Interference or static. |
|
|
| Weak or distorted audio. |
|
|
9. Specifications
| Model | BOLY-4200-LP01 |
| Frequency Range | UHF 530MHz - 580MHz |
| Frequency Response | 35Hz~18KHz |
| Number of Channels | 4 (100 selectable frequencies per channel) |
| Operating Range | Up to 300 feet (line of sight) |
| Transmitter Battery Life | Approx. 12 Hours (with AA batteries) |
| Microphone Type | Lavalier, Unidirectional |
| Receiver Outputs | 4 x XLR Individual Outputs, 1 x 1/4" Mixed Output |
| Rack Mountable | Yes, fits 19" rack |
| Power Supply | AC-CD 110V-240V Universal Adapter |
10. Warranty and Support
For warranty information and technical support, please refer to the warranty card included with your product or contact the seller/manufacturer directly. Contact details are typically provided on the product packaging or the seller's website.
If you have any questions or require assistance, please do not hesitate to contact customer support.