
1. Introduction
The ChefWave Milkmade Non-Dairy Milk Maker is a versatile appliance designed to simplify the creation of fresh, homemade plant-based milks. With its 6-in-1 functionality, you can easily prepare almond, oat, soy, cashew, coconut, and macadamia milk using one-touch digital presets. This manual provides essential information for safe operation, setup, usage, and maintenance of your Milkmade machine.
2. Important Safeguards
When using electrical appliances, basic safety precautions should always be followed to reduce the risk of fire, electric shock, and/or injury to persons, including the following:
- Read all instructions before operating the appliance.
- Do not touch hot surfaces. Use handles or knobs.
- To protect against electric shock, do not immerse the power cord, plugs, or the main unit in water or other liquid.
- Close supervision is necessary when any appliance is used by or near children.
- Unplug from outlet when not in use and before cleaning. Allow to cool before putting on or taking off parts.
- Do not operate any appliance with a damaged cord or plug, or after the appliance malfunctions or has been damaged in any manner. Contact the manufacturer for examination, repair, or adjustment.
- The use of accessory attachments not recommended by the appliance manufacturer may cause injuries.
- Do not use outdoors.
- Do not let cord hang over edge of table or counter, or touch hot surfaces.
- Do not place on or near a hot gas or electric burner, or in a heated oven.
- Always attach plug to appliance first, then plug cord into the wall outlet. To disconnect, turn any control to 'off', then remove plug from wall outlet.
- Do not use appliance for other than intended use.
- CAUTION: Steam can cause serious burns. Keep hands and face away from the steam outlet.
- DO NOT OPEN until blades stop and the appliance has cooled down.
3. Product Overview
Familiarize yourself with the components of your ChefWave Milkmade Non-Dairy Milk Maker.

Figure 1: Front view of the ChefWave Milkmade Non-Dairy Milk Maker.
Components:
- Main Unit: Houses the motor, heating element, and control panel.
- Grinding Chamber: Where ingredients are placed for processing. Features durable stainless steel blades.
- Water Reservoir: Located at the back, for adding water for milk production and cleaning cycles.
- Control Panel: Digital touch controls for selecting milk types, volume, and functions.
- Glass Pitcher (20 oz): Collects the freshly made milk.
- Waste Water Bin: Collects water from the auto-clean cycle.
4. Setup
4.1 Unpacking and Initial Cleaning
- Carefully remove all components from the packaging.
- Wash the glass pitcher and its lid with warm, soapy water. Rinse thoroughly and dry.
- Wipe the exterior of the main unit with a damp cloth. Do not immerse the main unit in water.
- Ensure the grinding chamber and blades are clean before first use.
4.2 Placement
Place the Milkmade machine on a stable, flat, heat-resistant surface, away from the edge of the counter. Ensure there is adequate ventilation around the unit.
5. Operation
5.1 Adding Water
Fill the water reservoir located at the back of the unit with clean, filtered water. The reservoir has markings for 10 fl. oz. and 20 fl. oz. to guide you.
5.2 Adding Ingredients
Open the lid of the grinding chamber and add your desired nuts, oats, or beans. The Milkmade machine works with raw or roasted ingredients, requiring no pre-soaking.

Figure 2: Adding ingredients to the grinding chamber.
5.3 Selecting Milk Type and Volume
Close the lid securely. Use the digital touch control panel to select your desired milk type (Almond, Oat, Soy, Cashew, Coconut, Macadamia) and the volume (10 oz or 20 oz).

Figure 3: Digital touch control panel with milk type selections.
5.4 Delay Start Function
The machine features a delay start option, allowing you to program milk production to begin at a later time.
5.5 Starting Production
Press the 'Start/Stop' button to begin the milk-making process. The machine will steam, heat, and blend the ingredients. Production time varies by milk type and volume, typically completing in minutes.

Figure 4: Fresh milk dispensing into the pitcher.
5.6 Customizable Flavors
After the milk production cycle is complete, you can customize your milk by adding flavorings such as vanilla, chocolate, or sweeteners. Stir well before serving.
5.7 Milk Combinations
The Milkmade machine supports various nut and seed combinations. Refer to the table below for popular options:
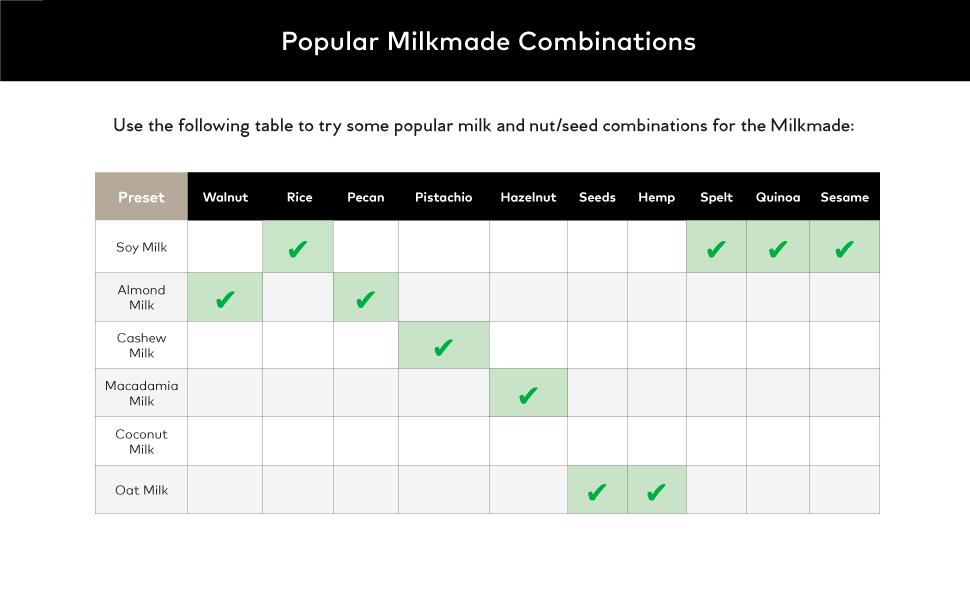
Figure 5: Popular milk and nut/seed combinations.
6. Maintenance & Cleaning
6.1 Auto-Clean Function
After each use, the machine automatically initiates a cleaning cycle. Ensure the water reservoir is filled for this process. The dirty water will be collected in the waste water bin.
6.2 Manual Cleaning
- Glass Pitcher: The included glass pitcher is dishwasher safe for easy cleaning.
- Grinding Chamber & Blades: For thorough cleaning, carefully wipe down the grinding chamber and blades with a damp cloth or sponge. Use caution around the sharp blades.
- Waste Water Bin: Empty and clean the waste water bin regularly.
- Exterior: Wipe the exterior of the main unit with a soft, damp cloth. Do not use abrasive cleaners.
7. Troubleshooting
- Machine is noisy: The blending process involves powerful blades and may produce noise comparable to a coffee grinder. This is normal operation.
- Milk is too thin/thick: Adjust the quantity of ingredients to achieve your preferred consistency. More ingredients will result in thicker milk.
- Error messages: If an error code appears on the display, refer to the full user manual for specific instructions. Ensure the water reservoir is adequately filled and all components are correctly assembled.
- Beeping sounds: The machine will beep to indicate the completion of a cycle or to alert you to an issue. Refer to the full user manual for specific beep patterns and their meanings.
8. Specifications
- Model Number: Milkmade
- Product Dimensions: 13.5"D x 6.5"W x 13"H
- Weight: Approximately 1 Pound (shipping weight may vary)
- Capacity: 10 oz and 20 oz batch sizes
- UPC: 840247777590
- Manufacturer: ChefWave
9. Warranty and Support
For warranty information and customer support, please refer to the documentation included with your product or contact ChefWave customer service directly. Keep your proof of purchase for warranty claims.

