Introduction
This manual provides comprehensive instructions for the setup, operation, and maintenance of your Hawks 555 Lux Digital Receiver. Please read this manual carefully before using the device to ensure optimal performance and longevity.
Product Overview
The Hawks 555 Lux is an advanced digital receiver designed for high-definition entertainment. It features 1GB RAM, 8MB internal flash memory, external Wi-Fi, and Bluetooth connectivity. It supports HD 1080 resolution and can store up to 8000 channels. Its robust design ensures durability and high utility.

Figure 1: Hawks 555 Lux Digital Receiver and its packaging.
Package Contents
Ensure all items are present in the package:
- Hawks 555 Lux Digital Receiver
- Bluetooth Remote Control
- Power Adapter (2 Amp)
- External Wi-Fi Adapter
- HDMI Cable (if included)
- User Manual (this document)

Figure 2: All components included in the Hawks 555 Lux package.
Setup Guide
1. Connecting the Receiver
- Power Connection: Connect the power adapter to the DC 12V port on the back of the receiver and plug it into a power outlet.
- Video Output: Connect an HDMI cable from the HD OUT port on the receiver to the HDMI input on your TV.
- Antenna/LNB Input: Connect your satellite dish LNB cable to the LNB IN port on the receiver.
- External Wi-Fi: Insert the external Wi-Fi adapter into one of the USB ports.
- Bluetooth Remote: Ensure the Bluetooth remote control is paired. Refer to the "Operating" section for pairing instructions if needed.
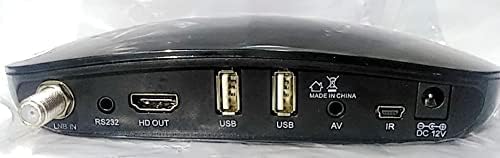
Figure 3: Rear panel connections of the Hawks 555 Lux receiver.
2. Initial Power On and Channel Scan
- Turn on your TV and select the correct HDMI input.
- The receiver will power on automatically. Follow the on-screen instructions for initial setup, including language selection and network configuration.
- Perform a channel scan to find available satellite channels. This process may take several minutes.
Operating Instructions
Remote Control Functions
The Hawks 555 Lux comes with a Bluetooth remote control. Ensure it is paired with the receiver for full functionality.
- Power Button: Turns the receiver on/off.
- Navigation Buttons (Up/Down/Left/Right/OK): Navigate menus and confirm selections.
- Volume +/-: Adjusts audio volume.
- Channel +/-: Changes channels.
- Menu Button: Accesses the main menu for settings and features.
- Exit Button: Returns to the previous screen or exits menus.
- Numeric Keypad: Direct channel input.
- Media Playback Buttons: Play, Pause, Stop, Fast Forward, Rewind for multimedia content.
Network Connectivity (Wi-Fi)
- Go to Menu > Network Settings > Wi-Fi.
- Select your Wi-Fi network from the list.
- Enter the password using the on-screen keyboard and confirm.
- Once connected, the receiver can access online features and updates.
Channel Management
- Adding/Editing Channels: Access the channel management menu to scan for new channels, edit existing ones, or delete unwanted channels.
- Favorite Lists: Create custom favorite channel lists for quick access to your preferred channels.
Maintenance
- Cleaning: Use a soft, dry cloth to clean the receiver's exterior. Do not use liquid cleaners or abrasive materials.
- Ventilation: Ensure the receiver has adequate ventilation. Do not block ventilation openings.
- Firmware Updates: Periodically check for firmware updates via the network settings to ensure optimal performance and access to new features.
- Storage: If storing the device for an extended period, disconnect it from power and store it in a cool, dry place.
Troubleshooting
| Problem | Possible Cause | Solution |
|---|---|---|
| No Power | Power cable disconnected; Power outlet issue. | Check power connections; Try a different outlet. |
| No Signal / Blank Screen | Incorrect HDMI input selected on TV; LNB cable disconnected; No channels scanned. | Select correct TV input; Check LNB connection; Perform channel scan. |
| Remote Control Not Responding | Batteries low/dead; Remote not paired. | Replace batteries; Re-pair Bluetooth remote (refer to Operating section). |
| Poor Picture Quality | Weak signal; Incorrect display settings. | Check LNB alignment; Adjust display settings in receiver menu. |
Specifications
| Brand | Generic |
| Model | h555lux |
| ASIN | B09K93WPX6 |
| RAM | 1 GB |
| Flash Memory | 8 MB (Internal) |
| Connectivity Technology | Bluetooth, External Wi-Fi |
| Video Output | HD 1080 (1 Total Video Output Port) |
| Audio Output Mode | Stereo or Surround |
| Supported Audio Formats | Dolby Digital, DTS, AAC, MP3, PCM |
| Current | 2 Amp |
| Compatible Devices | Television |
| Color | Black |
| First Available Date | October 25, 2021 |
Warranty and Support
For warranty information and technical support, please refer to the contact details provided by your retailer or the manufacturer's official website. Keep your purchase receipt as proof of purchase for warranty claims.
For further assistance, you may contact the seller through the Amazon platform or visit the product page for updated support information.