1. Introduction
This manual provides detailed instructions for the safe and effective operation of your Huepar B011R 2-Line Red Cross Line Laser Level. Please read this manual thoroughly before use and keep it for future reference.
2. Safety Information
Always follow basic safety precautions to reduce the risk of personal injury and damage to the product.
- Laser Safety: This product emits a Class II laser. Do not stare directly into the laser beam. Avoid direct eye exposure.
- Battery Safety: Ensure correct battery polarity when installing. Do not mix old and new batteries, or different types of batteries. Remove batteries if the device will not be used for an extended period.
- Environment: Use the device within its specified operating temperature range. Keep the device away from water and dust unless it is rated for such conditions.
- Maintenance: Do not attempt to disassemble or repair the device yourself. Refer to qualified service personnel.
3. Package Contents
Verify that all items are present upon unpacking:
- Huepar B011R 2-Line Red Cross Line Laser Level
- Magnetic Pivoting Base
- AA Batteries (2x)
- User Manual
- Portable Pouch

Figure 3.1: Included accessories with the Huepar B011R laser level.
4. Setup
4.1 Battery Installation
- Open the battery compartment cover.
- Insert two AA batteries, ensuring correct polarity (+ and - terminals match the markings inside the compartment).
- Close the battery compartment cover securely.

Figure 4.1: Correct battery installation.
4.2 Mounting the Device
The Huepar B011R features a 1/4-inch screw thread for versatile mounting options:
- Tripod Mounting: Attach the device to any standard tripod using the 1/4-inch thread on its base.
- Magnetic Pivoting Base: Use the included magnetic pivoting base to attach the laser level to metal surfaces. This allows for flexible positioning and angle adjustments.

Figure 4.2: Device mounted on a tripod using the 1/4-inch thread.
5. Operating Modes
The Huepar B011R offers two primary operating modes: Automatic Leveling Mode and Manual Tilt Mode.
5.1 Automatic Leveling Mode
This mode automatically levels the laser lines within a 4-degree range. It is ideal for tasks requiring precise horizontal and vertical alignment.
- Slide the pendulum lock to the unlocked position.
- Press the power button to turn on the device. The laser lines will self-level.
- If the device is tilted beyond 4 degrees, the laser lines will flash continuously to indicate it is out of self-leveling range. Adjust the device's position until the lines stop flashing.
5.2 Manual Tilt Mode
This mode allows you to project laser lines at any desired angle, useful for non-level applications like staircases or decorative patterns.
- Slide the pendulum lock to the locked position.
- Press the power button to turn on the device. The laser lines will be projected, but they will not self-level.
- The laser lines will flash every 3-5 seconds to remind you that the device is in manual mode and not self-leveling.
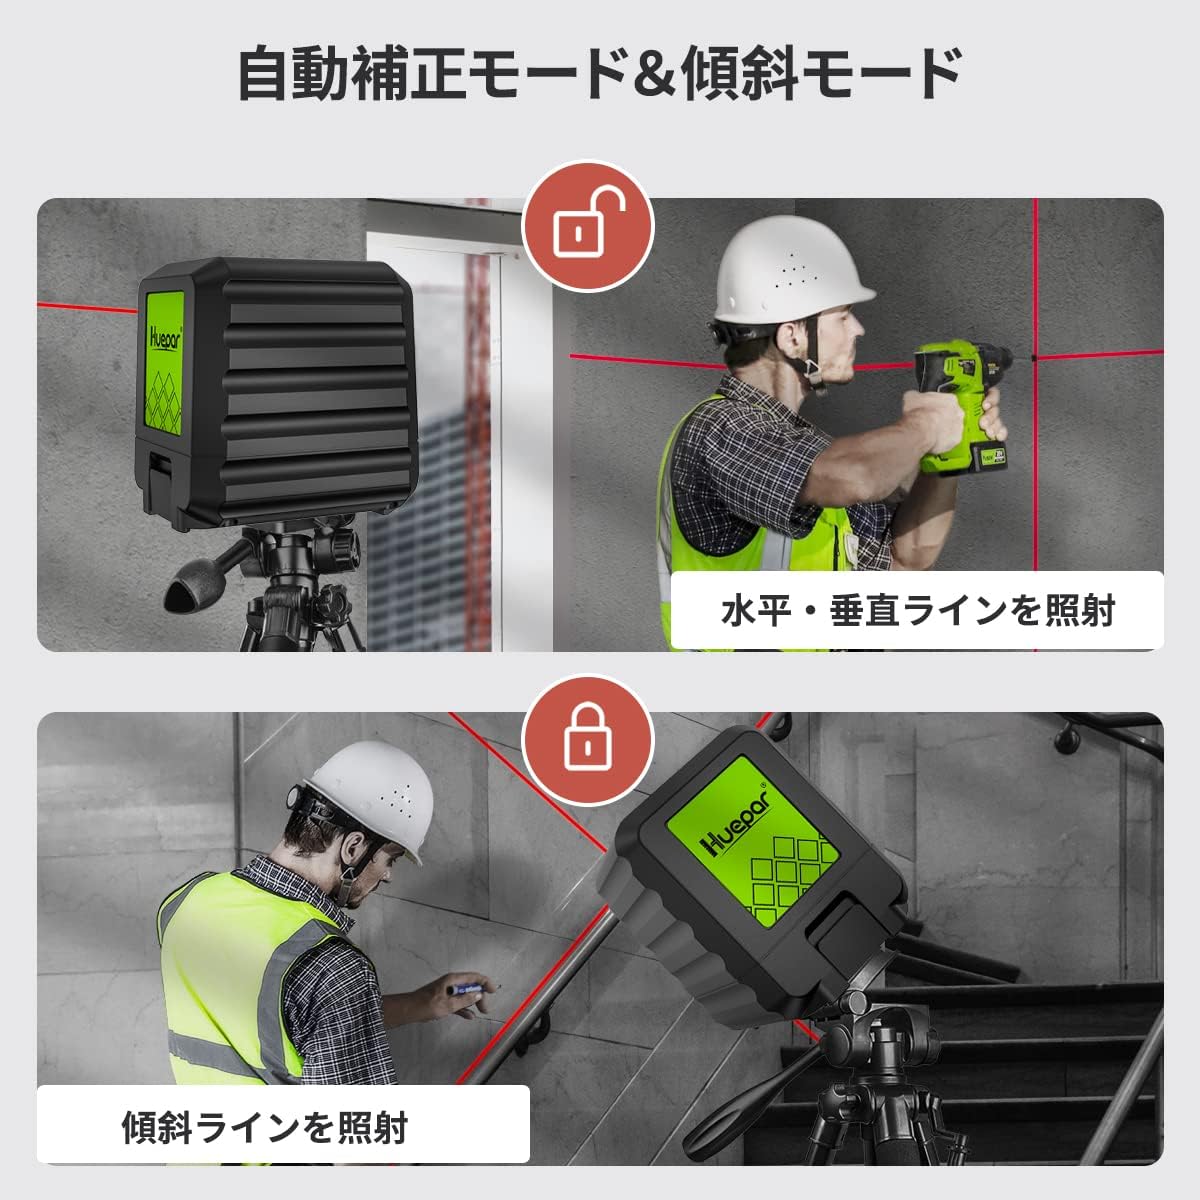
Figure 5.1: Automatic Leveling and Manual Tilt Modes.
6. Features and Applications
The Huepar B011R is designed for ease of use and durability across various tasks.
- Compact and Lightweight: At just 175g, its mini size allows for easy portability and single-handed operation.
- IP54 Protection: Dustproof and splashproof design ensures reliable performance in various working conditions.
- High Brightness Red Laser: Utilizes a German-made laser unit for stable and bright red laser lines, even in challenging environments.

Figure 6.1: Compact design for easy handling.

Figure 6.2: IP54 dust and splash protection.
6.1 Common Applications
This laser level is suitable for a wide range of professional and DIY projects:
- Furniture installation
- Tile laying
- Wall decoration
- Stair handrail installation
- Plumbing installation

Figure 6.3: Versatile applications.
7. Maintenance
- Keep the laser level clean and dry. Wipe off any dust or debris with a soft, dry cloth.
- Do not use harsh chemicals or abrasive cleaners.
- Store the device in its portable pouch in a cool, dry place when not in use.
- Remove batteries during long periods of storage to prevent leakage.
8. Troubleshooting
- Laser lines are flashing continuously in Auto-Leveling Mode: This indicates the device is tilted beyond its 4-degree self-leveling range. Adjust the device's position until the lines stabilize.
- Laser lines are flashing every 3-5 seconds: This is normal behavior for Manual Tilt Mode, indicating that the pendulum is locked and the lines are not self-leveling.
- No laser lines or dim lines: Check battery installation and ensure batteries are not depleted. Replace with fresh batteries if necessary.
9. Specifications
| Feature | Specification |
|---|---|
| Brand | Huepar |
| Model | B011R |
| Color | Red |
| Laser Type | 2-Line Cross Line Laser |
| Item Weight | 175 grams |
| Operation Modes | Manual, Automatic |
| Self-Leveling Range | ±4 degrees |
| Protection Class | IP54 (Dustproof, Splashproof) |
| Mounting Thread | 1/4-inch |
| Power Source | AA Batteries |
10. Product Videos
Watch these official videos for visual guidance on using your Huepar laser level:
Huepar 2-Line Red Laser Level BOX-1R Overview
This video provides a brief overview of the Huepar 2-Line Red Laser Level, demonstrating its features and compact design. (Note: This video is for model BOX-1R, but features are similar to B011R).
Huepar 9011 Laser Level Usage Guide
This video demonstrates battery installation, turning the device on/off, and switching between manual and self-leveling modes. (Note: This video shows a green laser version, but the operational steps are applicable to the red laser B011R).
11. Warranty and Support
Huepar products are backed by a manufacturer's warranty. For warranty details, technical support, or service inquiries, please refer to the official Huepar website or contact their customer service directly. Keep your purchase receipt as proof of purchase.
For more information, visit the official Huepar store: Huepar Store