1. Introduction
This manual provides detailed instructions for the setup, operation, and maintenance of your OOSSXX OSX-JP-NVR10 10-inch Integrated NVR Monitor. Please read this manual thoroughly before using the product to ensure proper functionality and safety.

Figure 1: OOSSXX 10-inch Integrated NVR Monitor and Remote Control
2. Product Overview
The OOSSXX OSX-JP-NVR10 is an integrated Network Video Recorder (NVR) with a 10-inch monitor, designed for wireless security camera systems. It offers high-resolution monitoring and recording capabilities for various applications.
Key Features:
- Integrated 10-inch Monitor: Provides a clear display for live viewing and playback.
- High Resolution: Default NVR resolution is 5 Megapixels (2560x1920), with five configurable resolution options.
- H.265 Compression: Utilizes H.265 real-time high compression technology, saving approximately half the HDD storage space compared to H.264 while maintaining high image quality and smoother video streaming. (Note: Hard disk drive is not included.)
- Expandable System: Supports connection of up to 10 OOSSXX IP cameras.
- Flexible Connectivity: Cameras connect wirelessly by default, with an option for wired connection to improve signal stability over long distances.
- Multiple Recording Modes: Offers Continuous Recording, Schedule Recording, and Motion Detection Recording.
- Advanced Alert System: Motion detection can trigger a buzzer, app notifications, and email alerts.
- Remote Viewing: Monitor your premises remotely via smartphone, tablet, or PC. (Requires the NVR to be connected to your home router via a LAN cable for remote access).
- Wide Viewing Angle: The IPS panel offers a 178° viewing angle for clear images from various positions.

Figure 2: IPS Panel with 178° Viewing Angle
3. Setup
3.1. Package Contents
Before starting, please verify that all items are present:
- 1 x OOSSXX 10-inch 5MP 8-channel Network Video Recorder (NVR) with integrated monitor
- 1 x HDMI Connection Cable (1 meter)
- 1 x LAN Cable (1 meter)
- 1 x USB Mouse
- 1 x NVR Power Adapter (12V2A)
- (Optional: OOSSXX IP Cameras and their respective power adapters, sold separately)
3.2. Initial Power-Up
- Connect the NVR power adapter to the NVR and plug it into a power outlet.
- The NVR monitor will power on automatically.
- Connect the USB mouse to one of the USB ports on the NVR.
3.3. Camera Pairing and Connection
OOSSXX IP cameras are designed for easy pairing with the NVR. The system supports both wireless and wired connections for cameras.
- Wireless Connection (Default):
- Power on your OOSSXX IP cameras by connecting them to their respective power adapters.
- The cameras will automatically attempt to connect wirelessly to the NVR.
- Ensure cameras are within range of the NVR for optimal signal. OOSSXX cameras feature double antennas for enhanced signal transmission.
- Wired Connection (Optional):
- If a camera is located far from the NVR or experiences weak wireless signal, a wired connection can be established.
- Connect the camera directly to the NVR using a LAN cable.
- The system will automatically detect and configure the wired camera.

Figure 3: Camera with Double Antenna for Enhanced Wireless Signal
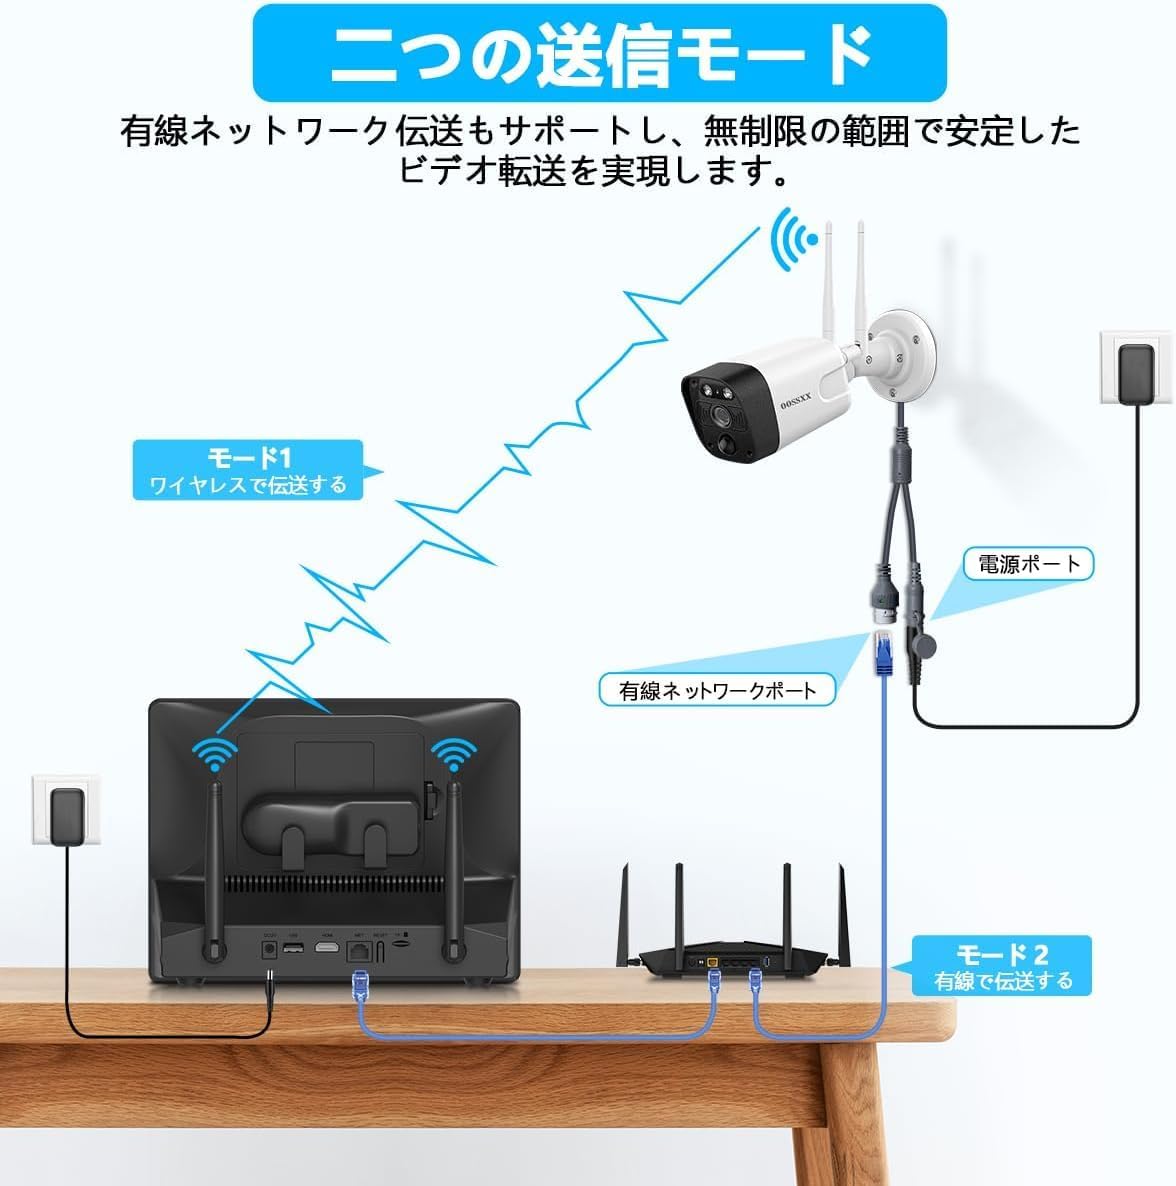
Figure 4: Wireless and Wired Connection Modes
3.4. Network Connection for Remote Viewing
To enable remote monitoring via smartphone, tablet, or PC, the NVR must be connected to your internet router.
- Connect one end of the provided LAN cable to the LAN port on the NVR.
- Connect the other end of the LAN cable to an available LAN port on your home or office router.
- Ensure your router has an active internet connection.
- Follow the instructions in Section 4.3 for setting up remote viewing via the dedicated app or PC software.
4. Operating Instructions
4.1. Recording Modes
The NVR supports three primary recording modes:
- Continuous Recording: Records continuously 24/7.
- Schedule Recording: Allows you to set specific times for recording.
- Motion Detection Recording: Records only when motion is detected, saving storage space.
You can configure these modes through the NVR's on-screen menu using the USB mouse.
4.2. Motion Detection Configuration and Alerts
Motion detection can be customized to monitor specific areas and trigger various alerts.
- Access the motion detection settings via the NVR menu.
- Define specific detection areas within the camera's view. This allows you to exclude areas where motion is irrelevant (e.g., public sidewalks).
- Configure alert actions:
- Buzzer: The NVR will emit an audible alarm.
- App Notification: Receive alerts on your smartphone or tablet via the dedicated app.
- Email Notification: Receive email alerts with snapshots of the detected motion.

Figure 5: Setting Motion Detection Areas

Figure 6: Motion Detection Recording and Alarm
4.3. Remote Monitoring
Once the NVR is connected to your router (as described in Section 3.4), you can monitor your cameras from anywhere using the OOSSXX app on your smartphone/tablet or PC software.
- Download and install the OOSSXX app from your device's app store or the PC software from the official OOSSXX website.
- Create an account and add your NVR device by scanning the QR code on the NVR or entering its device ID.
- You can now view live feeds, access recorded footage, and receive alerts remotely. Multiple users can monitor simultaneously by logging in with the same account.

Figure 7: Remote Monitoring via Smartphone and PC

Figure 8: Multi-Device Monitoring and Playback Backup
4.4. Playback and Backup
Review recorded footage directly on the NVR monitor or via the remote viewing app/software.
- Use the USB mouse to navigate the NVR menu for playback options. You can search by date, time, or event (e.g., motion detection).
- To back up footage, connect a USB flash drive to the NVR's USB port and follow the on-screen instructions to export desired recordings.
4.5. Day/Night Vision
The cameras automatically switch between day and night vision modes. Infrared LEDs provide clear images even in complete darkness.
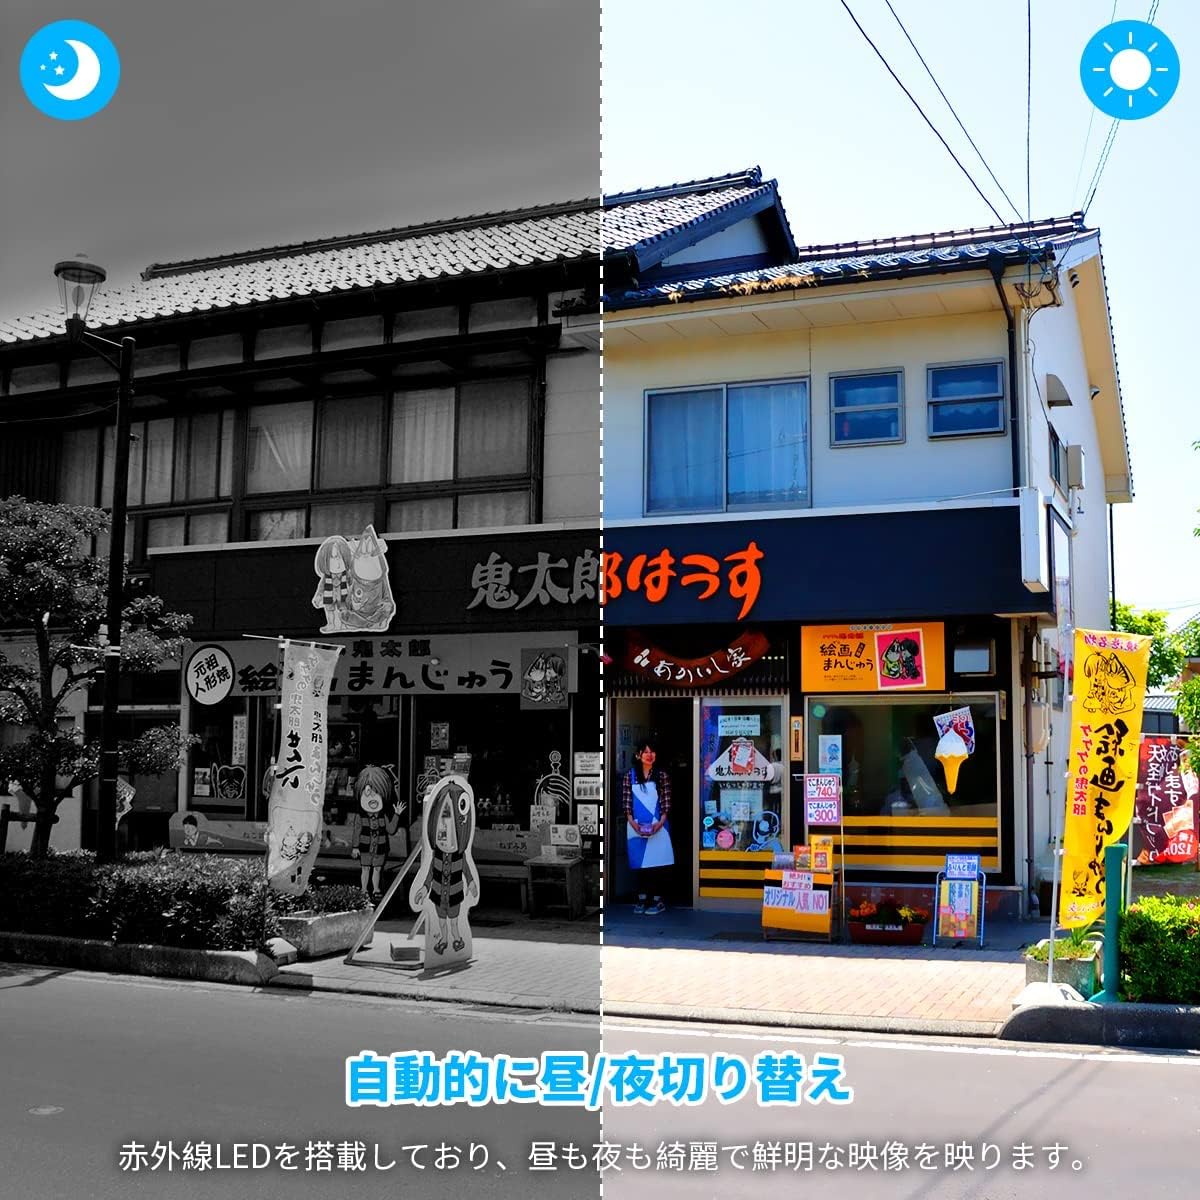
Figure 9: Automatic Day/Night Switching
5. Maintenance
5.1. General Care
- Keep the NVR and cameras clean by wiping them with a soft, dry cloth.
- Avoid using harsh chemicals or abrasive cleaners.
- Ensure the NVR is placed in a well-ventilated area to prevent overheating.
- Protect cameras from direct exposure to extreme weather conditions if they are not rated for outdoor use.
5.2. Software Updates
Periodically check the OOSSXX official website or the NVR's system settings for available firmware updates. Keeping your system updated ensures optimal performance and security.
6. Troubleshooting
If you encounter issues, refer to the following common troubleshooting steps:
- No Image on Monitor:
- Ensure the NVR is properly powered on.
- Check all cable connections, especially the power adapter.
- Camera Not Connecting:
- Ensure the camera is powered on and within range of the NVR.
- Try connecting the camera via a LAN cable to the NVR to force pairing.
- Restart both the camera and the NVR.
- No Remote Viewing:
- Verify the NVR is connected to your router via a LAN cable and the router has internet access.
- Check your smartphone/PC's internet connection.
- Ensure the OOSSXX app/software is updated to the latest version.
- Poor Image Quality:
- Clean the camera lens.
- Ensure the camera is properly focused (if adjustable).
- For wireless cameras, consider a wired connection if the signal is weak.
For further assistance, please contact OOSSXX customer support (see Section 8).
7. Specifications
| Feature | Specification |
|---|---|
| Screen Size | 10 inches (26 cm) |
| NVR Default Resolution | 5 Megapixels (2560x1920) |
| Video Compression | H.265 |
| Max Camera Support | 10 Channels |
| Connectivity | Wireless (Wi-Fi), Wired (Ethernet) |
| Compatible OS | Linux (NVR), Smartphone, Tablet, PC |
| USB Ports | 2 |
| Color | Black |
| Form Factor | Rectangular |
| Batteries Included | No |
| Material | Aluminum |
| Mounting Type | Adhesive (referring to camera mounting, not NVR) |
| Product Dimensions | 24.89 x 14.98 x 3.98 cm |
| Product Weight | 0.5 kg |
| Model Number | OSX-JP-NVR10 |
| First Available Date | 2021/10/20 |
8. Warranty and Support
OOSSXX is committed to providing high-quality products and excellent customer service.
8.1. Product Warranty
This product comes with a 12-month quality warranty from the date of purchase. This warranty covers manufacturing defects and malfunctions under normal use. Please retain your proof of purchase for warranty claims.
8.2. Customer Support
If you have any questions, concerns, or require technical assistance during installation or operation, please do not hesitate to contact our support team. We offer prompt assistance in Japanese.
- Email Support: jp-info@oossxx.com (Responses typically within 24 hours)
- Official Website: jp.oossxx.com
- LINE Service: For quick support and updates, scan the QR code below to add OOSSXX on LINE.
