Introduction
This manual provides detailed instructions for the assembly, installation, operation, and maintenance of your Vanity Art 12-inch Bathroom Vanity Base Cabinet, Model VA4012-3S. Please read all instructions carefully before beginning assembly and retain this manual for future reference.
Safety Information
WARNING: Failure to follow these safety instructions could result in injury or damage to the product.
- Always follow the assembly instructions carefully.
- Use appropriate safety gear, such as gloves and eye protection, when handling tools and components.
- Secure the cabinet to the wall using appropriate anchoring hardware (not included) to prevent tip-over hazards, especially in households with children or pets.
- Do not overload the cabinet drawers or shelves, as this may cause instability, tipping, or structural damage.
- Keep small parts and hardware out of reach of children to prevent choking hazards.
- Ensure all connections are tight before use. Periodically check and retighten fasteners as needed.
- Avoid placing hot items directly on the cabinet surface.
Package Contents
Before beginning assembly, verify that all parts are present and undamaged. If any parts are missing or damaged, do not proceed with assembly. Contact Vanity Art customer support for assistance.
- Cabinet panels (sides, back, bottom, top frame)
- 3 Drawer fronts
- Drawer box components (sides, back, bottom)
- 3 Pairs of soft-closing drawer slides
- Assembly hardware (screws, dowels, cam locks, brackets)
- Legs/Base components
- Instruction Manual
Note: Countertop and sink are sold separately and are not included with this base cabinet.
Tools Required for Assembly
- Phillips Head Screwdriver
- Hammer (for dowels)
- Drill with appropriate drill bits (optional, for pilot holes if needed)
- Level
- Measuring Tape
Assembly Instructions
Lay out all components on a clean, soft surface to prevent scratches. Follow the steps sequentially.
Step 1: Assemble the Cabinet Frame
- Attach cam locks and dowels to the side panels as indicated in the diagrams.
- Connect the bottom panel and top support rails to the side panels using the cam locks and dowels. Ensure all connections are secure.
- Slide the back panel into the grooves on the side and bottom panels. Secure with small nails or screws if provided.
- Attach the base/kick plate components to the bottom of the cabinet frame.

Image: Front view of the Vanity Art VA4012-3S cabinet frame. This shows the basic structure before drawers are installed.
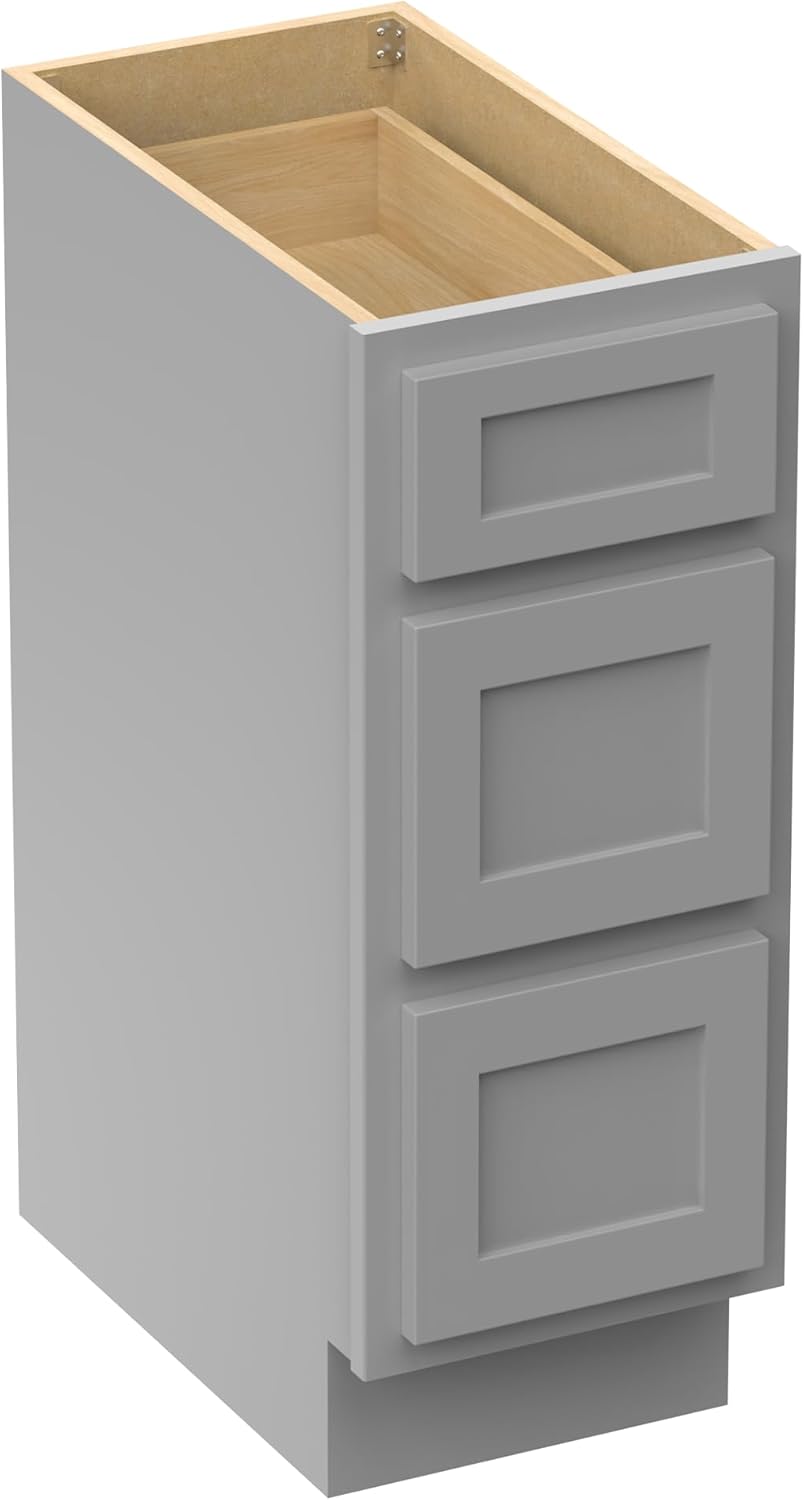
Image: Side view of the Vanity Art VA4012-3S cabinet frame, illustrating the depth and height.

Image: Back view of the Vanity Art VA4012-3S cabinet frame, showing the back panel and structural supports.
Step 2: Install Drawer Slides
- Separate the inner and outer parts of each drawer slide. The inner part attaches to the drawer box, and the outer part attaches to the cabinet frame.
- Attach the outer drawer slide rails to the inside of the cabinet side panels using the provided screws. Ensure they are level and aligned according to the pre-drilled holes or markings.
Step 3: Assemble the Drawers
- Assemble each drawer box by connecting the side, front, and back panels. Slide the drawer bottom into the grooves. Secure with screws or cam locks.
- Attach the inner drawer slide rails to the sides of each assembled drawer box.
- Attach the drawer fronts to the assembled drawer boxes. Many soft-close drawer systems have adjustable clips or screws for fine-tuning alignment.

Image: The Vanity Art VA4012-3S cabinet with its three soft-closing drawers partially extended.

Image: The Vanity Art VA4012-3S cabinet with all three drawers fully open, showcasing the storage capacity.
Step 4: Insert Drawers into Cabinet
- Carefully align the inner drawer slides with the outer cabinet slides and push the drawers into place until they click or engage.
- Test the soft-closing mechanism for each drawer. Adjust if necessary using the adjustment screws on the drawer slides or hinges.
Installation
This is a floor-mount, freestanding cabinet. While it can stand independently, securing it to a wall is highly recommended for stability and safety.
- Positioning: Place the cabinet in its desired location. Ensure the floor is level. Use shims if necessary to level the cabinet.
- Wall Anchoring (Recommended):
- Locate wall studs behind the cabinet.
- Using appropriate wall anchors and screws (not included, suitable for your wall type), secure the cabinet to the wall through the back panel or designated mounting points.
- Ensure the cabinet is flush against the wall and securely fastened to prevent tipping.
- Countertop Installation: If installing a countertop (sold separately), follow the manufacturer's instructions for proper sealing and attachment.

Image: The Vanity Art VA4012-3S cabinet shown in a bathroom environment, demonstrating its floor-mount placement.
Operating Instructions
Drawer Operation
- Opening: Gently pull the drawer handle to open.
- Closing: Push the drawer firmly until the soft-closing mechanism engages, allowing the drawer to close smoothly and quietly. Avoid slamming the drawers.
- Weight Capacity: Do not exceed the recommended weight capacity for each drawer to ensure smooth operation and prevent damage.
Maintenance and Care
- Cleaning: Wipe surfaces with a soft, damp cloth. For stubborn marks, use a mild, non-abrasive cleaner. Avoid harsh chemicals or abrasive cleaning tools that can damage the finish.
- Spills: Immediately wipe up any spills, especially water, to prevent moisture damage to the engineered wood.
- Hardware: Periodically check all screws and fasteners to ensure they are tight. Retighten as needed.
- Drawer Slides: If drawer operation becomes stiff, a small amount of silicone lubricant can be applied to the slides.
- Avoid Direct Sunlight: Prolonged exposure to direct sunlight can cause fading or discoloration of the cabinet finish.

Image: Features of the cabinet including soft-close mechanisms, waterproof properties, easy-clean surface, and engineered wood construction.
Troubleshooting
| Problem | Possible Cause | Solution |
|---|---|---|
| Drawers do not close smoothly or are stiff. | Misaligned drawer slides, loose hardware, debris in slides, overloaded drawer. | Check alignment of slides, tighten all screws, clean slides, reduce drawer contents. |
| Cabinet is wobbly or unstable. | Uneven floor, loose assembly hardware, not anchored to wall. | Ensure cabinet is on a level surface (use shims if needed), tighten all assembly screws, anchor cabinet to wall. |
| Drawer fronts are misaligned. | Improper attachment of drawer front to drawer box, adjustable clips need tuning. | Refer to drawer slide instructions for adjusting drawer fronts. Reattach if necessary. |
Specifications
| Feature | Detail |
|---|---|
| Model Number | VA4012-3S |
| Brand | Vanity Art |
| Dimensions (D x W x H) | 22"D x 12"W x 39.8"H |
| Material | Engineered Wood |
| Color | Sliver (current variant) |
| Number of Drawers | 3 |
| Drawer Type | Soft-Closing Shaker Drawers |
| Mounting Type | Floor Mount, Freestanding |
| Item Weight | 55 Pounds |
| Assembly Required | Yes |

Image: Dimensional drawing of the Vanity Art VA4012-3S cabinet, showing height, width, and depth measurements.
Warranty and Support
For warranty information or customer support regarding your Vanity Art product, please refer to the documentation included with your purchase or visit the official Vanity Art website. Contact information for customer service is typically available on the brand's website or through your retailer.
Customer Service Contact:
- Email or Phone (as per brand story FAQ)
- Visit the Vanity Art Store on Amazon