Important Safety Information
Please read this entire manual carefully before assembling or operating your Spokey Onego Hometrainer. Keep this manual for future reference.
- Consult your physician before starting any exercise program.
- Ensure all parts are securely fastened before each use.
- Place the hometrainer on a flat, stable surface.
- Keep children and pets away from the equipment during use.
- Do not exceed the maximum user weight of 100 kg.
- Stop exercising immediately if you feel faint, dizzy, or experience pain.
- Wear appropriate exercise clothing and footwear.
Setup
Carefully unpack all components and ensure all parts are present before beginning assembly. Refer to the included assembly diagram for detailed steps.
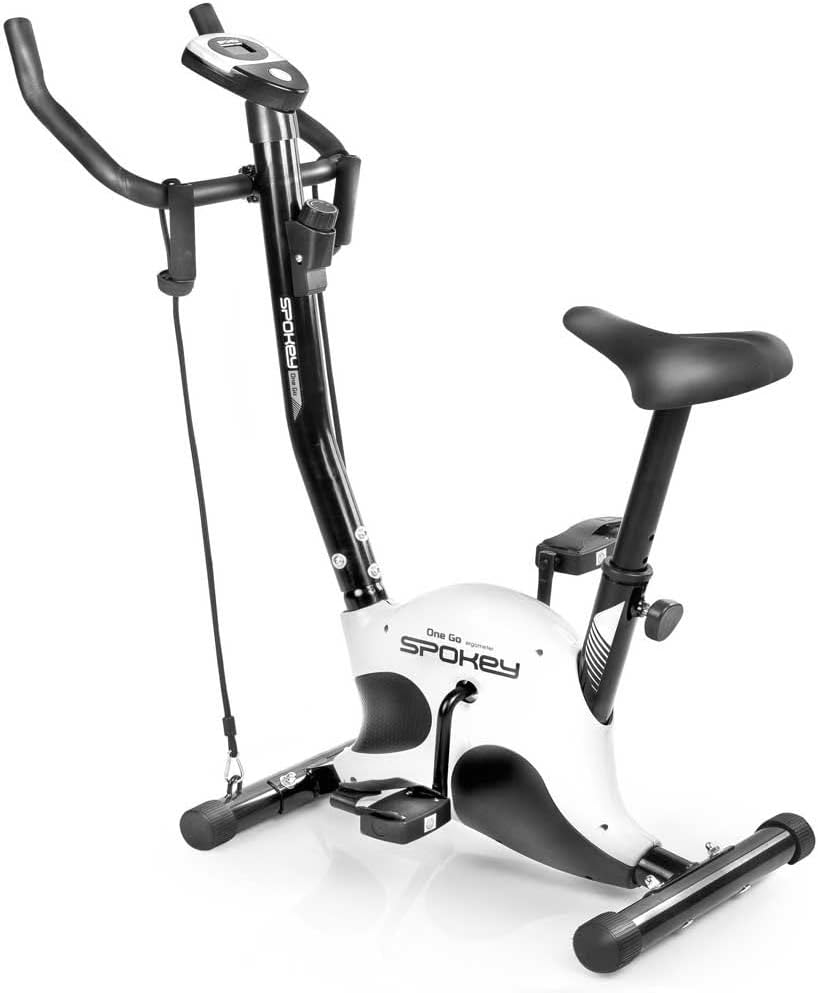
Figure 1: Fully assembled Spokey Onego Hometrainer. This image shows the complete exercise bike with its main components including the frame, handlebars, seat, pedals, and display unit.
1. Base Stabilization
Attach the front and rear stabilizer bars to the main frame using the provided bolts and washers. Ensure they are tightened securely to prevent wobbling.
2. Pedal Installation
Attach the pedals to the crank arms. Note that the left pedal (L) and right pedal (R) have different threading. Turn the left pedal counter-clockwise and the right pedal clockwise to tighten. Ensure they are firmly secured.

Figure 2: Close-up view of the hometrainer pedals. The image highlights the textured surface for grip and the adjustable straps designed to secure the user's feet during exercise.
3. Seat and Handlebar Adjustment
Insert the seat post into the frame and adjust the height to a comfortable position using the adjustment knob. The recommended maximum user height is 170 cm. The seat height can be adjusted between 55 - 75 cm. Similarly, attach the handlebars and adjust their angle if applicable, ensuring all securing bolts are tight.

Figure 3: Side view of the hometrainer, illustrating the mechanism for seat height adjustment. The knob allows users to customize the seat position for optimal comfort and exercise posture.
4. Computer and Resistance Bands
Mount the computer display unit onto the handlebar post. Connect any necessary sensor cables. Attach the resistance bands (expanders) to their designated points on the frame, ensuring they are securely fastened and ready for use.
Operating Instructions
1. Adjusting Resistance
The Spokey Onego Hometrainer features a mechanical resistance system with 8 adjustable levels. To increase or decrease the resistance, turn the resistance knob located below the handlebars. Turn clockwise to increase resistance and counter-clockwise to decrease it.

Figure 4: Close-up of the resistance adjustment knob. This knob allows users to manually select one of the 8 resistance levels, indicated by the '+' and '-' symbols for increasing and decreasing resistance.
2. Using the Computer Display
The integrated computer monitors your workout progress. It typically displays:
- Time: Duration of your workout.
- Speed: Current cycling speed.
- Distance: Total distance covered during the session.
- Calories: Estimated calories burned.
Press the mode button (usually a single button on the display) to cycle through the different metrics or to reset the values. The display is battery-powered.

Figure 5: Close-up view of the hometrainer's digital display. The screen shows numerical readouts for workout metrics, with labels for 'TOTAL' and 'CAL' visible, indicating total distance and calories burned.
3. Utilizing Resistance Bands (Expanders)
The Spokey Onego includes resistance bands for upper body workouts. While seated on the hometrainer, grasp the handles of the resistance bands and perform various arm and shoulder exercises. This helps to engage more muscle groups for a full-body workout.

Figure 6: The hometrainer with resistance bands attached to the front frame. The image shows the black elastic bands with foam handles, ready for upper body exercises during a cycling session.
Maintenance
Regular maintenance ensures the longevity and safe operation of your hometrainer.
- Cleaning: Wipe down the equipment with a damp cloth after each use to remove sweat and dust. Do not use abrasive cleaners.
- Inspection: Periodically check all bolts, nuts, and moving parts for tightness. Tighten any loose components.
- Lubrication: Moving parts may require occasional lubrication. Refer to the assembly diagram for specific points.
- Storage: Store the hometrainer in a dry, cool place away from direct sunlight and moisture.
Troubleshooting
If you encounter issues with your Spokey Onego Hometrainer, refer to the following common solutions:
| Problem | Possible Cause | Solution |
|---|---|---|
| Display not working | Dead batteries; loose sensor cable. | Replace batteries in the display unit; check and secure the sensor cable connection. |
| Unusual noise during operation | Loose bolts; parts rubbing; lack of lubrication. | Check and tighten all assembly bolts; inspect for rubbing parts and adjust; apply lubricant to moving joints if necessary. |
| Resistance not changing | Resistance cable disconnected or damaged; mechanism jammed. | Inspect the resistance cable connection to the knob and the resistance mechanism; ensure no obstructions are present. |
Specifications
- Brand: SPOKEY
- Model: Onego
- Resistance Mechanism: Mechanical (8 levels)
- Maximum User Weight: 100 kg
- Recommended Maximum User Height: 170 cm
- Seat Height Adjustment: 55 - 75 cm
- Display Functions: Time, Speed, Distance, Calories
- Power Source (Display): Battery-Powered
- Dimensions (L x W x H): 90 x 40 x 100 cm
- Special Features: Integrated Resistance Bands (Expanders)
Warranty and Support
For warranty information or technical support, please refer to the documentation provided with your purchase or contact the retailer where the product was acquired. Keep your proof of purchase for any warranty claims.
For further assistance, you may also visit the official SPOKEY website or contact their customer service department.