VTimes VT6532
VTimes VT6532 Video Baby Monitor User Manual
Model: VT6532
1. Introduction
Thank you for choosing the VTimes VT6532 Video Baby Monitor. This device is designed to provide a secure and reliable way to monitor your baby, offering peace of mind with its advanced features. This manual provides detailed instructions for setup, operation, and maintenance to ensure optimal performance and safety.
2. Important Safety Information
WARNING: STRANGULATION HAZARD
- Keep the adapter cords out of reach of children. Never place the camera or cords within 3 feet (1 meter) of the crib or playpen.
- Never use extension cords with the power adapters.
- This product is not a toy. Do not allow children to play with it.
- This product is intended for indoor use only.
- Do not place the monitor or camera near heat sources or in direct sunlight.
- Ensure proper ventilation around both units.
- Use only the provided power adapters.
3. Package Contents
Verify that all items are present in your package:
- Parent Unit (Monitor) with 3.2-inch LCD Screen
- Baby Unit (Camera)
- Power Adapter for Parent Unit
- Power Adapter for Baby Unit
- User Manual (this document)
4. Product Overview
Familiarize yourself with the components of your VTimes VT6532 Video Baby Monitor.

Image: The VTimes VT6532 Video Baby Monitor, showing the white parent unit with a 3.2-inch screen on the right and the white pan-tilt camera baby unit on the left. Both units feature the 'vtimes' logo.
4.1 Parent Unit (Monitor)
- 3.2-inch LCD Screen: Displays live video feed from the camera.
- Antenna: For wireless signal reception.
- Power/Menu Button: Turns the unit on/off and accesses the menu.
- Navigation Buttons (Up/Down/Left/Right): Used to navigate menus and control camera pan/tilt.
- OK Button: Confirms selections.
- Talk Button: Activates two-way audio communication.
- Volume Buttons: Adjusts the monitor's speaker volume.
- Zoom Button: Magnifies the video feed.
- Microphone: For two-way audio.
- Speaker: For audio output.
- Power Indicator: Shows power status.
- Battery Indicator: Displays battery level.
4.2 Baby Unit (Camera)
- Camera Lens: Captures video.
- Infrared LEDs: For night vision.
- Microphone: Picks up sounds from the baby's room.
- Speaker: For lullabies and two-way audio output.
- Temperature Sensor: Detects room temperature.
- Power Port: Connects to the power adapter.
- Pair Button: Used for pairing with the parent unit (if needed).
5. Setup
5.1 Charging the Units
- Connect the small end of the power adapter to the Parent Unit's power port.
- Plug the other end of the adapter into a power outlet. The battery indicator will show charging status.
- Repeat for the Baby Unit. The Baby Unit must remain plugged in for continuous operation.
- Charge the Parent Unit for at least 8 hours before first use to ensure optimal battery life.
5.2 Positioning the Baby Unit (Camera)
- Place the Baby Unit on a flat surface in your baby's room, such as a dresser or shelf.
- Ensure the camera is at least 3 feet (1 meter) away from the crib or playpen to prevent strangulation hazards from the power cord.
- Adjust the camera angle to get a clear view of your baby. The remote pan-tilt feature allows for fine-tuning later.
- Avoid placing the camera in direct sunlight or near heat sources.
5.3 Powering On
- Press and hold the Power/Menu button on the Parent Unit until the screen turns on.
- Ensure the Baby Unit is plugged in and powered on. The monitor should automatically connect to the camera.
- If the units do not connect, refer to the Troubleshooting section for pairing instructions.
6. Operating Instructions
6.1 General Operation
- Power On/Off: Press and hold the Power/Menu button.
- Volume Adjustment: Use the Volume buttons on the Parent Unit.
- Brightness Adjustment: Access through the menu settings.
6.2 Remote Pan-Tilt-Zoom
The Baby Unit camera can be remotely controlled from the Parent Unit to adjust its viewing angle.
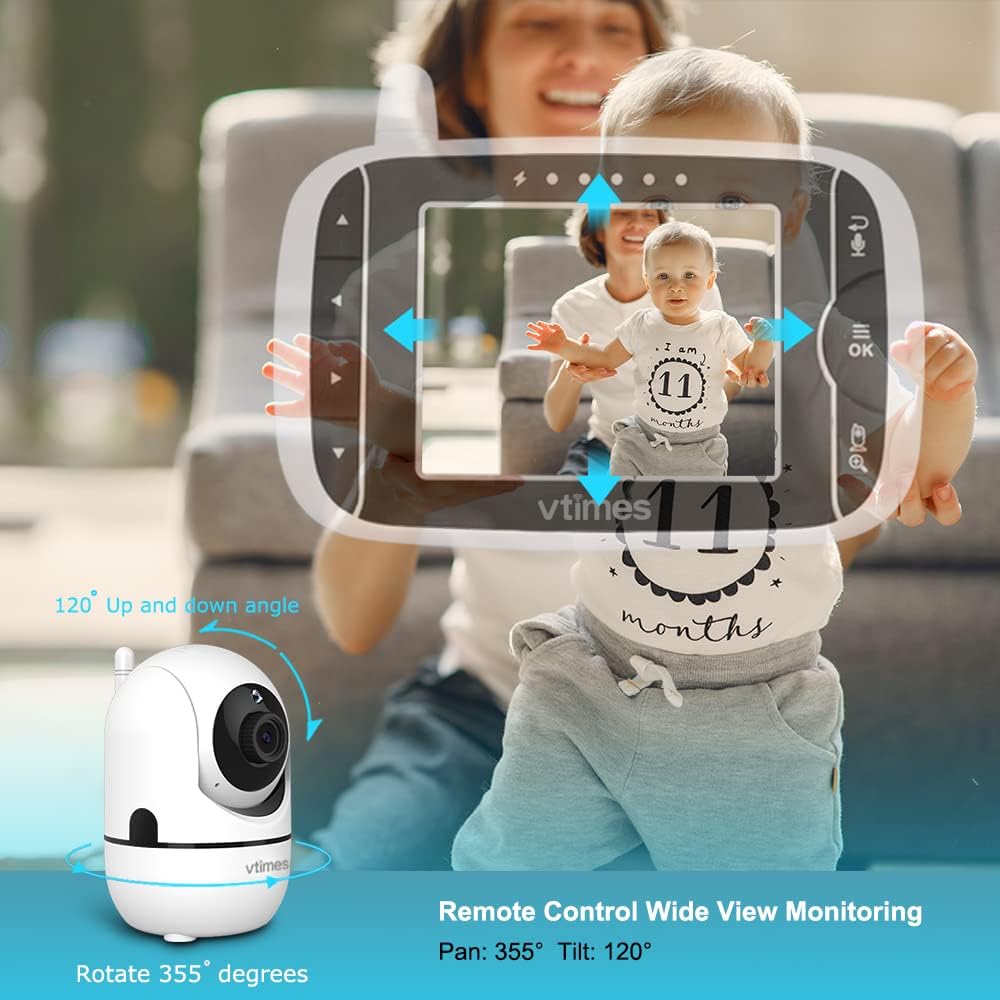
Image: A diagram illustrating the VTimes VT6532 Baby Unit's remote control capabilities, showing a 355-degree horizontal pan and 120-degree vertical tilt for comprehensive room coverage.
- Use the Navigation Buttons (Up/Down/Left/Right) on the Parent Unit to pan the camera horizontally (355°) and tilt it vertically (120°).
- Press the Zoom Button to digitally zoom in or out on the image for a closer view.
6.3 VOX Mode (Voice Operated Exchange)
VOX mode conserves battery power by turning off the screen when no sound is detected, and activating it when your baby makes a sound.

Image: A comparison showing the Parent Unit in VOX Mode (screen off) and Screen On Mode (screen activated) when a baby's crying is detected, illustrating the power-saving feature.
- Access the VOX settings through the Parent Unit's menu.
- Select the desired sound sensitivity level. A higher sensitivity will activate the screen with softer sounds.
- When VOX mode is active, the screen will automatically turn on and alert you when sounds above the set sensitivity are detected.
6.4 Lullabies
Soothe your baby to sleep with built-in lullabies.

Image: A baby sleeping peacefully with the VTimes VT6532 Baby Unit nearby, accompanied by icons representing lullabies and a temperature sensor, highlighting these features.
- Navigate to the Lullaby option in the Parent Unit's menu.
- Choose from 8 available lullabies to play through the Baby Unit's speaker.
6.5 Two-Way Audio
Communicate with your baby or partner in the baby's room.
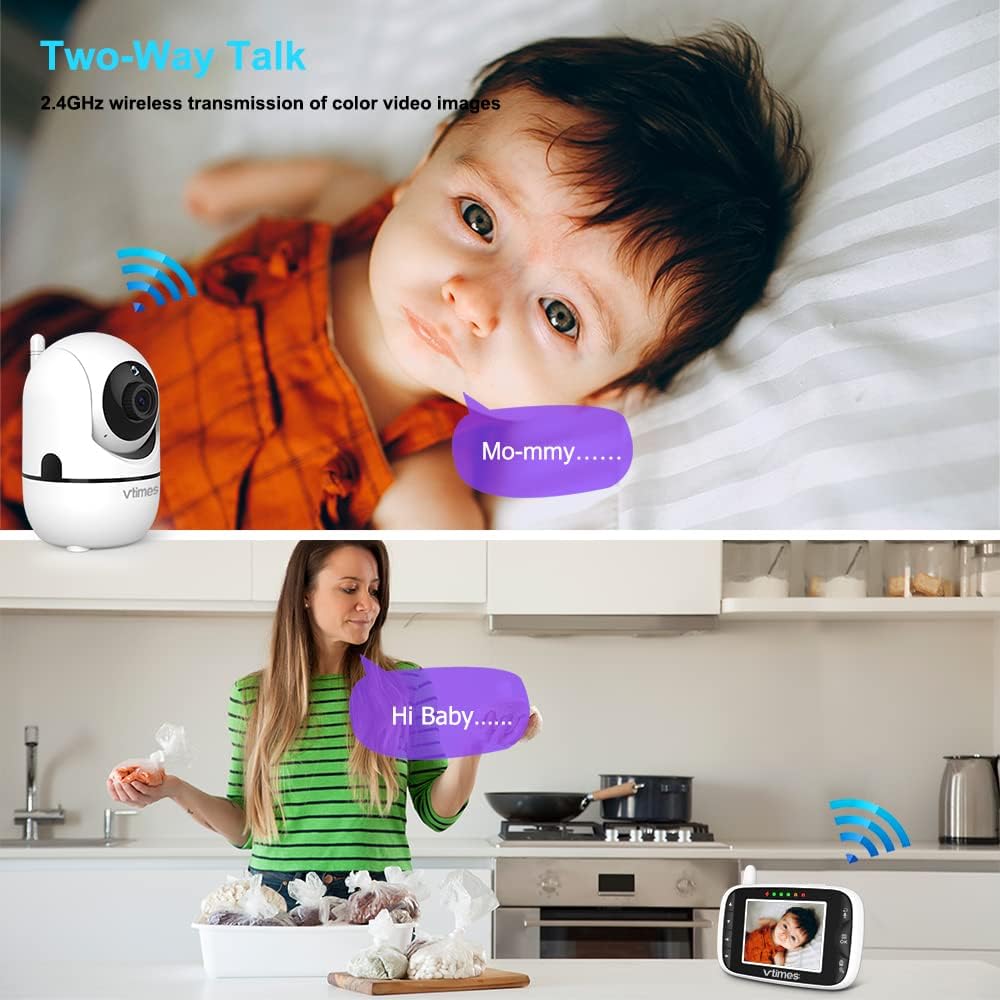
Image: A split image demonstrating the two-way talk feature. The top shows the baby unit near a baby with a speech bubble saying 'Mo-mmy...', and the bottom shows a parent with the monitor, speaking into it with a speech bubble saying 'Hi Baby....'.
- Press and hold the Talk Button on the Parent Unit to speak. Your voice will be transmitted through the Baby Unit's speaker.
- Release the button to hear your baby's response.
6.6 Temperature Monitoring
Monitor the temperature of your baby's room.
- The current room temperature is displayed on the Parent Unit's screen.
- If the temperature goes above or below the preset normal range, a red warning icon will appear on the display.
6.7 Infrared Night Vision
Automatically provides clear video in low-light conditions.

Image: A split image demonstrating the automatic infrared night vision. The left side shows a baby sleeping in a brightly lit room, and the right side shows the same baby in a dark room, rendered clearly in black and white by the night vision feature.
- The Baby Unit automatically detects dim light and activates its infrared LEDs.
- The video feed on the Parent Unit will switch to a clear black and white image, allowing you to see your baby even in complete darkness.
6.8 Feeding Reminder
Set reminders for feeding times.

Image: A parent feeding a baby, with an overlay showing the Parent Unit screen displaying feeding reminder options (0:30, 1:00, 1:30) and a clock icon, indicating the alarm setting feature.
- Access the Feeding Reminder settings in the Parent Unit's menu.
- Set reminders for various intervals (e.g., 30 minutes, 1 hour, 1 hour 30 minutes).
6.9 Multi-Camera Expandability
Monitor multiple rooms or angles with additional cameras.

Image: A diagram showing the Parent Unit connected to four separate camera units, each monitoring a different area (a dog, an elderly person, a living room, and a child playing), illustrating the multi-camera expandability feature.
- The system supports connecting up to 4 cameras to one Parent Unit.
- Additional cameras are sold separately.
- Switch between cameras or use alternate screen mode to view different feeds.
7. Maintenance
7.1 Cleaning
- Wipe the surfaces of the Parent Unit and Baby Unit with a soft, lint-free cloth.
- Do not use cleaning sprays or liquid cleaners directly on the units.
- For the camera lens, use a lens cleaning cloth to avoid scratches.
7.2 Battery Care
- To prolong battery life, avoid fully discharging the Parent Unit's battery frequently.
- If storing the unit for an extended period, charge the battery to about 50% and store in a cool, dry place.
8. Troubleshooting
| Problem | Possible Cause | Solution |
|---|---|---|
| No picture/sound on Parent Unit | Units are not powered on or connected. Out of range. | Ensure both units are powered on and plugged in. Move Parent Unit closer to Baby Unit. Re-pair units if necessary (see manual for pairing steps). |
| Poor picture quality | Interference. Low light. | Move units away from other electronic devices. Ensure Baby Unit lens is clean. Night vision activates automatically in low light. |
| VOX mode not activating | Sensitivity set too low. | Increase VOX sensitivity in the Parent Unit's menu. |
| Battery drains quickly | Frequent use. Old battery. | Reduce screen brightness. Use VOX mode. Ensure battery is fully charged. Consider battery replacement if unit is old. |
9. Specifications
| Feature | Detail |
|---|---|
| Model Number | VT6532 |
| Screen Size | 3.2 Inches |
| Wireless Technology | 2.4GHz FHSS |
| Video Capture Resolution | 720p |
| Pan Angle | 355° |
| Tilt Angle | 120° |
| Zoom Type | Digital Zoom |
| Night Vision | Infrared (Automatic) |
| Two-Way Audio | Yes |
| VOX Mode | Yes |
| Lullabies | 8 melodies |
| Temperature Display | Yes |
| Multi-Camera Support | Up to 4 cameras |
| Power Source | Corded Electric |
| Product Dimensions | 8.27 x 0.47 x 4 inches |
| Item Weight | 1.23 pounds |
| UPC | 190282011341 |
10. Warranty and Support
VTimes is committed to providing high-quality products. For any questions, technical support, or warranty inquiries, please contact VTimes customer service. While specific warranty details are not provided in this manual, VTimes aims to ensure customer satisfaction and product reliability.
Please refer to the product packaging or the official VTimes website for the most current warranty information and contact details.
Related Documents - VT6532
 |
ZP-2406 Intelligent Taillight User Manual & Setup Guide Comprehensive user manual for the ZP-2406 intelligent taillight, covering installation, setup, features, app connectivity, and specifications for enhanced cycling safety. |
 |
Vtimes RCVT070 Digital Wireless Backup Camera System User Manual Comprehensive user manual for the Vtimes RCVT070 Digital Wireless Backup Camera System, covering installation, operation, troubleshooting, and technical specifications for enhanced vehicle safety. |
Ask a question about this manual
Ask about setup, troubleshooting, compatibility, parts, safety, or missing instructions. Manuals+ will review the question and use this page’s manual context to help answer it.