1. Important Safety Instructions
Please read all instructions carefully before using this treadmill. Keep this manual for future reference.
- Always consult with a physician before starting any exercise program.
- Place the treadmill on a flat, stable surface with adequate clearance around it (at least 2 meters behind and 0.6 meters on each side).
- Keep children and pets away from the treadmill during operation.
- Do not operate the treadmill if it has a damaged cord or plug, or if it is not working properly.
- Wear appropriate athletic footwear and clothing.
- Use the safety key clip at all times. In case of emergency, the safety key will stop the treadmill.
- Do not step on or off the treadmill while the belt is moving.
- Unplug the treadmill from the power outlet when not in use, before cleaning, and before performing any maintenance.
2. Product Overview
The Shua Commercial Electric Treadmill T5517s(T16) is designed for robust fitness training, featuring a powerful AC motor and a wide range of speed and incline options. Its durable construction ensures a smooth and effective workout experience.
Key Features:
- LED Display Screen
- AC Motor with 4.5 HP Peak Power
- Speed Range: 1.5 to 18 km/h
- Incline Range: 0 to 15%
- 9 Pre-set Programs
- Spacious Walking Area: 145 x 52 cm
- Robust Construction with Solid Metal Alloy Frame
- Maximum User Weight: 145 kg

Image 2.1: Side view of the Shua Commercial Electric Treadmill T5517s(T16).
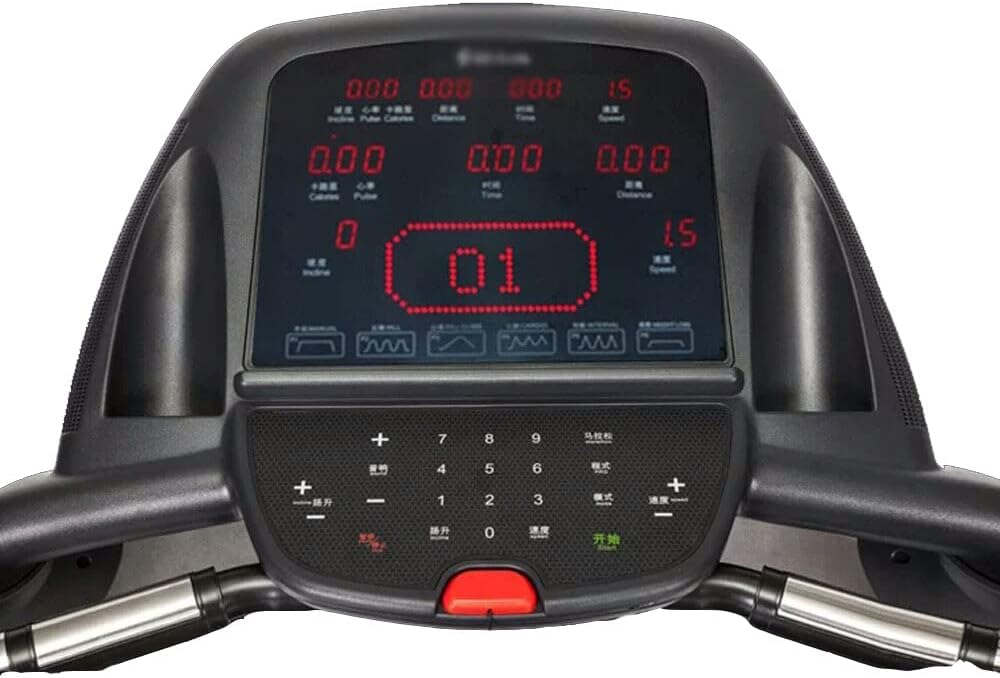
Image 2.2: Close-up view of the treadmill's control console with LED display.
3. Setup Instructions
Follow these general steps for assembling your treadmill. Refer to the detailed assembly diagram included in the packaging for specific part identification.
- Unpacking: Carefully remove all components from the packaging. Place them on a clear, flat surface.
- Base Assembly: Attach the uprights to the main base frame using the provided bolts and tools. Ensure all connections are secure.
- Console Attachment: Mount the console assembly onto the top of the uprights. Connect any necessary cables from the console to the main frame.
- Handlebar Installation: Secure the handlebars to the uprights or console frame as per the diagram.
- Final Checks: Double-check all bolts and nuts to ensure they are tightened. Plug the power cord into a grounded outlet.
4. Operating Instructions
Familiarize yourself with the control panel before beginning your workout.
4.1 Control Panel Functions:
- LED Display: Shows time, speed, distance, calories, incline, and pulse.
- Start/Stop Button: Initiates and halts the treadmill belt.
- Speed +/- Buttons: Adjust the belt speed.
- Incline +/- Buttons: Adjust the incline level of the running deck.
- Program Buttons: Select from 9 pre-set workout programs.
- Safety Key Slot: Insert the safety key to enable operation. Remove to stop the treadmill immediately.
4.2 Starting a Workout:
- Ensure the treadmill is plugged in and the safety key is inserted. Clip the safety key to your clothing.
- Stand on the side rails of the treadmill.
- Press the 'Start' button. The belt will begin moving at a low speed.
- Carefully step onto the moving belt.
- Adjust speed and incline using the corresponding buttons to your desired level.
- To use a pre-set program, select the desired program before pressing 'Start' or during the workout if the treadmill supports on-the-fly program changes.
4.3 Ending a Workout:
- Press the 'Stop' button. The belt will gradually slow down and stop.
- Alternatively, pull the safety key to immediately stop the treadmill.
- Once the belt has completely stopped, step off the treadmill.
5. Maintenance
Regular maintenance ensures the longevity and optimal performance of your treadmill.
5.1 Cleaning:
- Always unplug the treadmill before cleaning.
- Wipe down the console and other surfaces with a damp cloth. Avoid harsh chemicals.
- Vacuum under the treadmill regularly to prevent dust buildup.
5.2 Belt Lubrication:
- The running belt requires periodic lubrication to reduce friction. Consult your treadmill's specific lubrication schedule (typically every 3-6 months depending on usage).
- Use only silicone-based treadmill lubricant.
- Lift the edge of the running belt and apply a thin line of lubricant to the center of the deck.
- Run the treadmill at a low speed for a few minutes to distribute the lubricant.
5.3 Belt Adjustment:
- If the running belt is off-center, use the adjustment bolts at the rear of the treadmill to center it. Turn the bolt on the side the belt is drifting towards clockwise, and the opposite bolt counter-clockwise, in small increments.
- If the belt is slipping, it may need tensioning. Tighten both rear adjustment bolts equally, in small increments, until the slipping stops.
6. Troubleshooting
This section addresses common issues you might encounter with your treadmill.
| Problem | Possible Cause | Solution |
|---|---|---|
| Treadmill does not start | Power cord unplugged, safety key not inserted, circuit breaker tripped. | Check power connection, ensure safety key is fully inserted, reset circuit breaker. |
| Running belt slips | Belt too loose, belt needs lubrication. | Adjust belt tension (see Section 5.3), lubricate belt (see Section 5.2). |
| Unusual noise from motor area | Loose components, motor issue. | Check for loose bolts. If noise persists, contact customer support. |
| Incline not working | Incline motor issue, cable disconnected. | Check cable connections. If issue persists, contact customer support. |
7. Specifications
Detailed technical specifications for the Shua Commercial Electric Treadmill T5517s(T16).
- Model Name: T5517s (T16)
- Brand: Shua
- Color: Black
- Motor: AC Motor, 2.5 HP Continuous, 4.5 HP Peak Power
- Speed Range: 1.5 - 18 km/h
- Incline Range: 0 - 15%
- Programs: 9
- Walking Area (L x W): 145 x 52 cm
- Running Deck Thickness: 30 mm
- Belt Thickness: 2.5 mm
- Product Dimensions (L x W x H): 196 x 83 x 138 cm
- Item Weight: 145 kg
- Maximum User Weight: 145 kg
- Display Size: 5 inch LED
- Frame Material: Stainless Steel Alloy
- Material Type: Solid Metal Alloy
- Power Source: Corded Electric
- Included Components: Electric Treadmill
- Batteries Included: No
- Department: Unisex
8. Warranty and Support
For warranty information and customer support, please refer to the warranty card included with your product or visit the official Shua website. Keep your purchase receipt as proof of purchase for any warranty claims.
If you encounter any issues not covered in this manual, please contact Shua customer service for assistance.


