1. Introduction
This manual provides essential information for the proper use, setup, operation, and maintenance of the HFBTE KS100 Small Hole Sensor. This sensor is designed for integration with the KR220 Surface Roughness Tester to accurately measure surface roughness on various materials and geometries.
The KS100 sensor is specifically engineered to measure flat surfaces and shafts. For inner hole surface measurements, the hole diameter must be greater than 5 mm, and the measurement depth must exceed 22 mm.
2. Product Overview
The HFBTE KS100 is a versatile sensor capable of measuring a wide range of surface types. Its design allows for hand-held operation, making it suitable for various applications.
2.1 Key Features
- Designed for measuring flat surfaces and shafts.
- Capable of measuring inner hole surfaces with a diameter greater than 5 mm and a depth exceeding 22 mm.
- Versatile for measuring planes, inclined planes, cone surfaces, inner holes, and grooves.
- Supports hand-held measurement for flexibility.
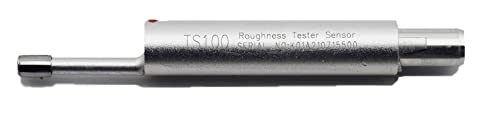
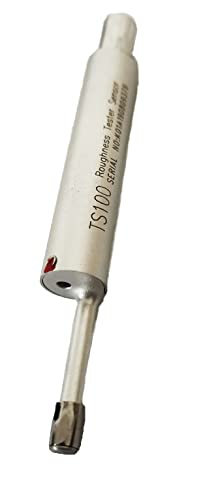
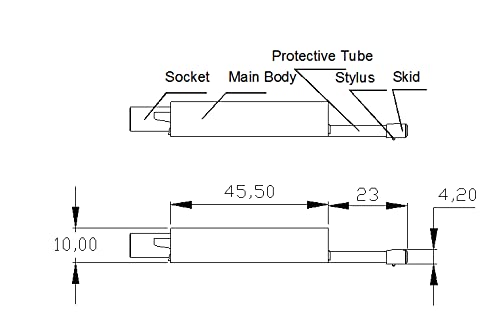
2.2 Sensor Components
The KS100 sensor consists of several key parts:
- Socket: Connection point to the main roughness tester unit.
- Main Body: The primary housing of the sensor.
- Protective Tube: Shields the delicate stylus mechanism.
- Stylus: The component that makes contact with the surface to be measured.
- Skid: Provides a reference plane for the stylus movement.
3. Setup
Before operating the KS100 sensor, ensure it is correctly attached to a compatible surface roughness tester, such as the KR220 model.
- Inspect the Sensor: Carefully remove the KS100 sensor from its protective case. Inspect the stylus and skid for any visible damage or debris.
- Connect to Tester: Align the sensor's socket with the corresponding port on your KR220 Surface Roughness Tester. Gently push and secure the sensor into place. Ensure a firm connection to prevent measurement inaccuracies.
- Power On Tester: Turn on the KR220 Surface Roughness Tester according to its specific instructions.
- Calibration (if required): Refer to your KR220 Surface Roughness Tester manual for specific calibration procedures. Proper calibration is crucial for accurate measurements.

4. Operating Instructions
The KS100 sensor is designed for precise surface roughness measurements. Follow these guidelines for optimal performance.
Video: This video demonstrates the HFBTE KS100 Small Hole Sensor, showing its physical characteristics and how its probe extends and retracts, suitable for various surface roughness measurements.
4.1 General Measurement Procedure
- Prepare the Surface: Ensure the surface to be measured is clean and free from oil, dust, or other contaminants that could affect accuracy.
- Position the Sensor: Gently place the sensor on the surface, ensuring the skid is stable and the stylus is positioned correctly for the measurement path.
- Initiate Measurement: Follow the instructions of your KR220 Surface Roughness Tester to start the measurement cycle. The sensor's stylus will traverse the surface.
- Read Results: Once the measurement is complete, read the roughness parameters displayed on the KR220 tester.
4.2 Specific Measurement Applications
- Flat Surfaces and Shafts: Position the sensor directly on the surface or shaft, ensuring the stylus path is perpendicular to the axis of the shaft if measuring along its length.
- Inner Hole Surfaces: For inner holes, ensure the hole diameter is greater than 5 mm and the depth is greater than 22 mm. Carefully insert the sensor into the hole until the stylus can make proper contact with the inner wall.
- Inclined Planes, Cone Surfaces, Grooves: The sensor's design allows for measurement on these geometries. Ensure stable contact of the skid and proper alignment of the stylus with the surface contour.
5. Maintenance
Regular maintenance ensures the longevity and accuracy of your KS100 Small Hole Sensor.
- Cleaning: After each use, gently clean the stylus and skid with a soft, lint-free cloth. If necessary, use a small amount of isopropyl alcohol. Avoid harsh chemicals or abrasive materials.
- Storage: Always store the sensor in its protective case when not in use to prevent damage from dust, impacts, or environmental factors.
- Inspection: Periodically inspect the stylus for wear or damage. A worn stylus can lead to inaccurate measurements. If damage is observed, contact customer support for replacement options.
- Environmental Conditions: Operate and store the sensor within recommended temperature and humidity ranges to prevent material degradation.
6. Troubleshooting
If you encounter issues with your KS100 sensor, consider the following common problems and solutions:
| Problem | Possible Cause | Solution |
|---|---|---|
| Inaccurate Readings | Dirty stylus/skid, worn stylus, improper calibration, unstable measurement setup. | Clean stylus/skid. Check stylus for wear. Recalibrate the tester. Ensure stable sensor placement. |
| Sensor Not Detected by Tester | Loose connection, damaged sensor cable/socket. | Ensure the sensor is firmly connected to the tester. Inspect the connection points for damage. |
| Stylus Not Moving Freely | Debris obstructing movement, bent stylus. | Carefully clean the stylus area. If the stylus is bent, contact customer support for replacement. |
If the problem persists after attempting these solutions, please contact HFBTE customer support.
7. Specifications
| Feature | Detail |
|---|---|
| Model | KS100 |
| Compatibility | KR220 Surface Roughness Tester (and compatible models) |
| Measurement Surfaces | Flat surfaces, shafts, inclined planes, cone surfaces, inner holes, grooves. |
| Inner Hole Diameter Requirement | > 5 mm |
| Inner Hole Depth Requirement | > 22 mm |
| Product Dimensions | 5.55 x 2.17 x 1.57 inches |
| Product Weight | 2.2 Pounds |
| Manufacturer | HFBTE |
8. Support
For any questions, technical assistance, or warranty inquiries regarding your HFBTE KS100 Small Hole Sensor, please contact HFBTE customer support. We are committed to providing comprehensive support to ensure your satisfaction.
You can often find contact information on the official HFBTE website or through your purchase documentation.