1. Introduction
The Orium Quaelis 14 11325 CO2 Meter is designed to provide continuous monitoring of indoor air quality. This device accurately measures carbon dioxide (CO2) levels, temperature, and humidity, offering real-time data for a healthier environment. Its user-friendly interface, featuring color codes and educational smileys, simplifies the interpretation of air quality data.
This manual provides essential information for the proper setup, operation, and maintenance of your Quaelis 14 11325 CO2 Meter. Please read it thoroughly before using the device to ensure optimal performance and safety.
2. Safety Information
- Do not expose the device to extreme temperatures, direct sunlight, or high humidity.
- Avoid dropping or subjecting the device to strong impacts.
- Do not attempt to open or repair the device yourself. Refer to qualified personnel for service.
- Use only the provided USB cable for charging.
- Keep the device away from water and other liquids.
3. Product Features
The Orium Quaelis 14 11325 CO2 Meter includes the following key features:
- Continuous monitoring of CO2, temperature, and humidity.
- Educational color codes and smileys for easy air quality interpretation.
- Suitable for private homes, professional environments, and public establishments.
- Integrated clock and customizable alarm function.
- Practical autonomy with low battery indicator and included USB cable.
- MIN/MAX value display for all measured parameters.
- Adjustable backlit LCD screen for excellent readability.
- NDIR (Non-Dispersive Infrared) sensor for accurate CO2 measurement.
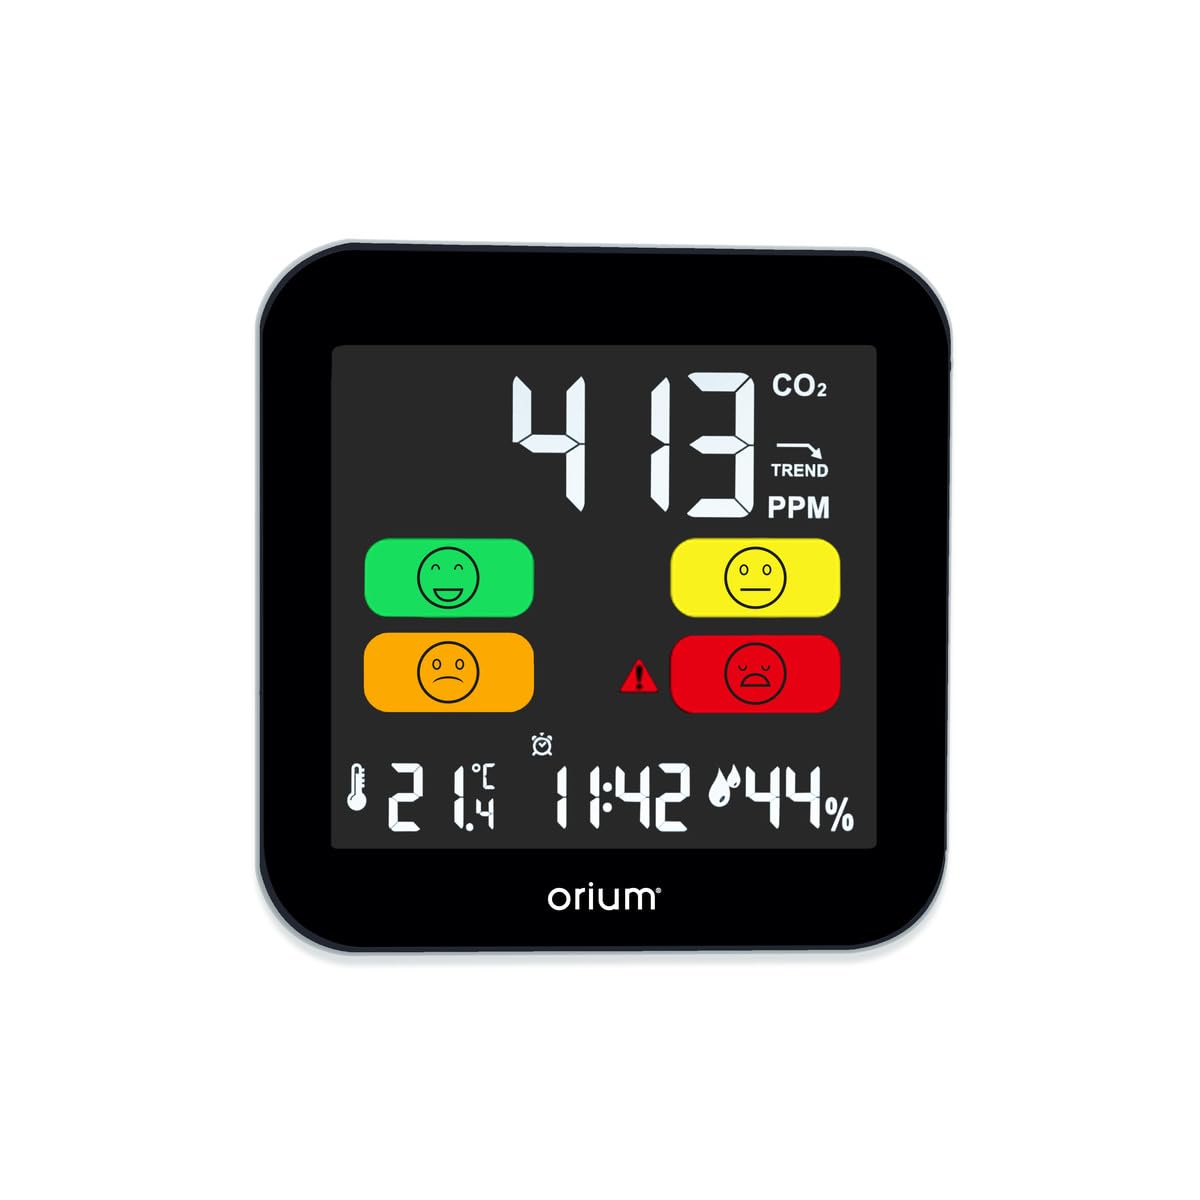
Figure 1: Front view of the Orium Quaelis 14 11325 CO2 Meter, showing the display with CO2 levels, temperature, humidity, and time, along with air quality indicators.
4. Package Contents
Verify that all items are present in the package:
- Orium Quaelis 14 11325 CO2 Meter
- USB Charging Cable
- User Manual (this document)
5. Setup
5.1 Initial Charging
- Connect the provided USB cable to the charging port on the device.
- Plug the other end of the USB cable into a compatible USB power adapter (not included) or a computer USB port.
- Allow the device to charge fully before first use. The battery indicator on the display will show charging status.
5.2 Placement
For accurate readings, place the CO2 meter in a location that:
- Is away from direct airflow (e.g., windows, air conditioning vents).
- Is not exposed to direct sunlight or heat sources.
- Is at a typical breathing height (e.g., on a desk or shelf).
- Is not obstructed by other objects.

Figure 2: Example placement of the CO2 meter on a shelf in a room.
6. Operating Instructions
6.1 Powering On/Off
- To power on: Press and hold the power button (refer to device diagram for button location) for a few seconds until the display illuminates.
- To power off: Press and hold the power button again until the display turns off.
6.2 Display Overview
The LCD screen displays the following information:
- CO2 Concentration: Shown in Parts Per Million (PPM).
- Temperature: Displayed in degrees Celsius (°C).
- Humidity: Displayed as a percentage (%).
- Time: Current time.
- Battery Indicator: Shows remaining battery life.
- Air Quality Indicator: Color-coded smileys or segments indicating CO2 levels (e.g., Green for good, Yellow for moderate, Red for poor).

Figure 3: Close-up of the device display, highlighting various readings.
6.3 Understanding Air Quality Indicators
| CO2 Level (PPM) | Indicator | Meaning | Action |
|---|---|---|---|
| 0 - 800 | Good (Green Smiley) | Excellent air quality. | No action required. |
| 801 - 1200 | Moderate (Yellow Smiley) | Acceptable air quality, but ventilation may be beneficial. | Consider increasing ventilation. |
| 1201+ | Poor (Red Smiley/Alarm) | Poor air quality, potential for discomfort or health effects. | Immediately ventilate the area. |
6.4 Setting Alarm Thresholds
The device allows you to set a custom CO2 alarm threshold. When the CO2 level exceeds this threshold, an audible alarm will sound, and the display indicator will change.
- Press the "SET" button (refer to device diagram for button location).
- Use the "UP" and "DOWN" buttons to navigate to the alarm setting option.
- Press "SET" again to enter the alarm value adjustment mode.
- Use "UP" and "DOWN" to adjust the desired CO2 alarm threshold (e.g., 1000 PPM).
- Press "SET" to confirm and exit.
6.5 Viewing MIN/MAX Values
To view the minimum and maximum recorded values for CO2, temperature, and humidity:
- Press the "MIN/MAX" button (refer to device diagram).
- Each press will cycle through MIN CO2, MAX CO2, MIN Temp, MAX Temp, MIN Humidity, MAX Humidity.
- The values will reset automatically after a certain period or can be manually reset (refer to device specific instructions if available).
7. Maintenance
7.1 Cleaning
- Wipe the device with a soft, dry cloth.
- Do not use abrasive cleaners, solvents, or harsh chemicals.
- Ensure no liquid enters the device openings.
7.2 Calibration
The NDIR CO2 sensor is generally self-calibrating. However, if you suspect inaccurate readings, a manual calibration might be possible. Refer to the device's specific menu options for calibration procedures. Typically, this involves placing the device in a well-ventilated outdoor area for a period to allow it to read ambient CO2 levels (around 400-450 PPM).
7.3 Battery Care
- Recharge the battery when the low battery indicator appears.
- Avoid completely draining the battery frequently to prolong its lifespan.
- If storing the device for an extended period, charge it to about 50% and recharge every few months.
8. Troubleshooting
| Problem | Possible Cause | Solution |
|---|---|---|
| Device does not turn on. | Low or depleted battery. | Connect the device to a power source using the USB cable and charge it. |
| Inaccurate CO2 readings. | Poor ventilation, sensor obstruction, or need for calibration. | Move the device to a well-ventilated area. Ensure sensor vents are clear. Perform a manual calibration if necessary. |
| Alarm sounds frequently. | High CO2 levels in the environment or alarm threshold set too low. | Increase ventilation in the area. Adjust the alarm threshold to a higher value if appropriate for your environment. |
| Display is dim or unreadable. | Low battery or backlight setting. | Charge the device. Check the device settings for backlight brightness adjustment. |
9. Specifications
| Parameter | Value |
|---|---|
| Model Number | 11325 |
| Brand | Orium |
| Dimensions (L x W x H) | 14.9 x 14.6 x 14 cm |
| Weight | 170 grams |
| Color | Black |
| Power Source | Battery Powered (Rechargeable via USB) |
| Sensor Type | Non-Dispersive Infrared (NDIR) |
| Alarm Type | Audible |
| Material | PVC/Steel |
| Upper Rated Temperature | 50 Degrees Celsius |
10. Warranty and Support
For warranty information and technical support, please refer to the documentation provided with your purchase or contact Orium customer service. Keep your proof of purchase for warranty claims.
Contact information for Orium can typically be found on their official website or on the product packaging.