1. Product Overview
This manual provides detailed instructions for the installation, operation, and maintenance of your AS Headlight Assembly. This product is designed as a direct OEM fitment replacement, ensuring compatibility and ease of installation for specified Dodge Ram models. The assembly features a weather-sealed design for durability and is DOT/SAE certified for safety compliance.

Image 1.1: A pair of AS Headlight Assemblies, showcasing their chrome housing and clear lenses. These units are designed for direct replacement in compatible vehicles.

Image 1.2: The AS Headlight Assembly installed on a Dodge Ram truck, illustrating the brighter and wider light output. This image emphasizes the enhanced visibility provided by the headlights.
2. Compatibility and Fitment
This headlight assembly is compatible with the following vehicle models:
- 2009-2018 Dodge Ram 1500 with Quad style Halogen headlights
- 2010-2018 Dodge Ram 2500/3500 with Quad style Halogen headlights
- 2019-2022 Ram 1500 Classic with Quad style Halogen headlights
Important Note: This product is not compatible with 2010-UP RAM models that have factory projector LED style headlights. Please ensure your vehicle has Quad style Halogen headlights for proper fitment.

Image 2.1: A visual guide demonstrating the first step in checking vehicle compatibility. This involves locating the 'Make sure this fits' option on an online product page.
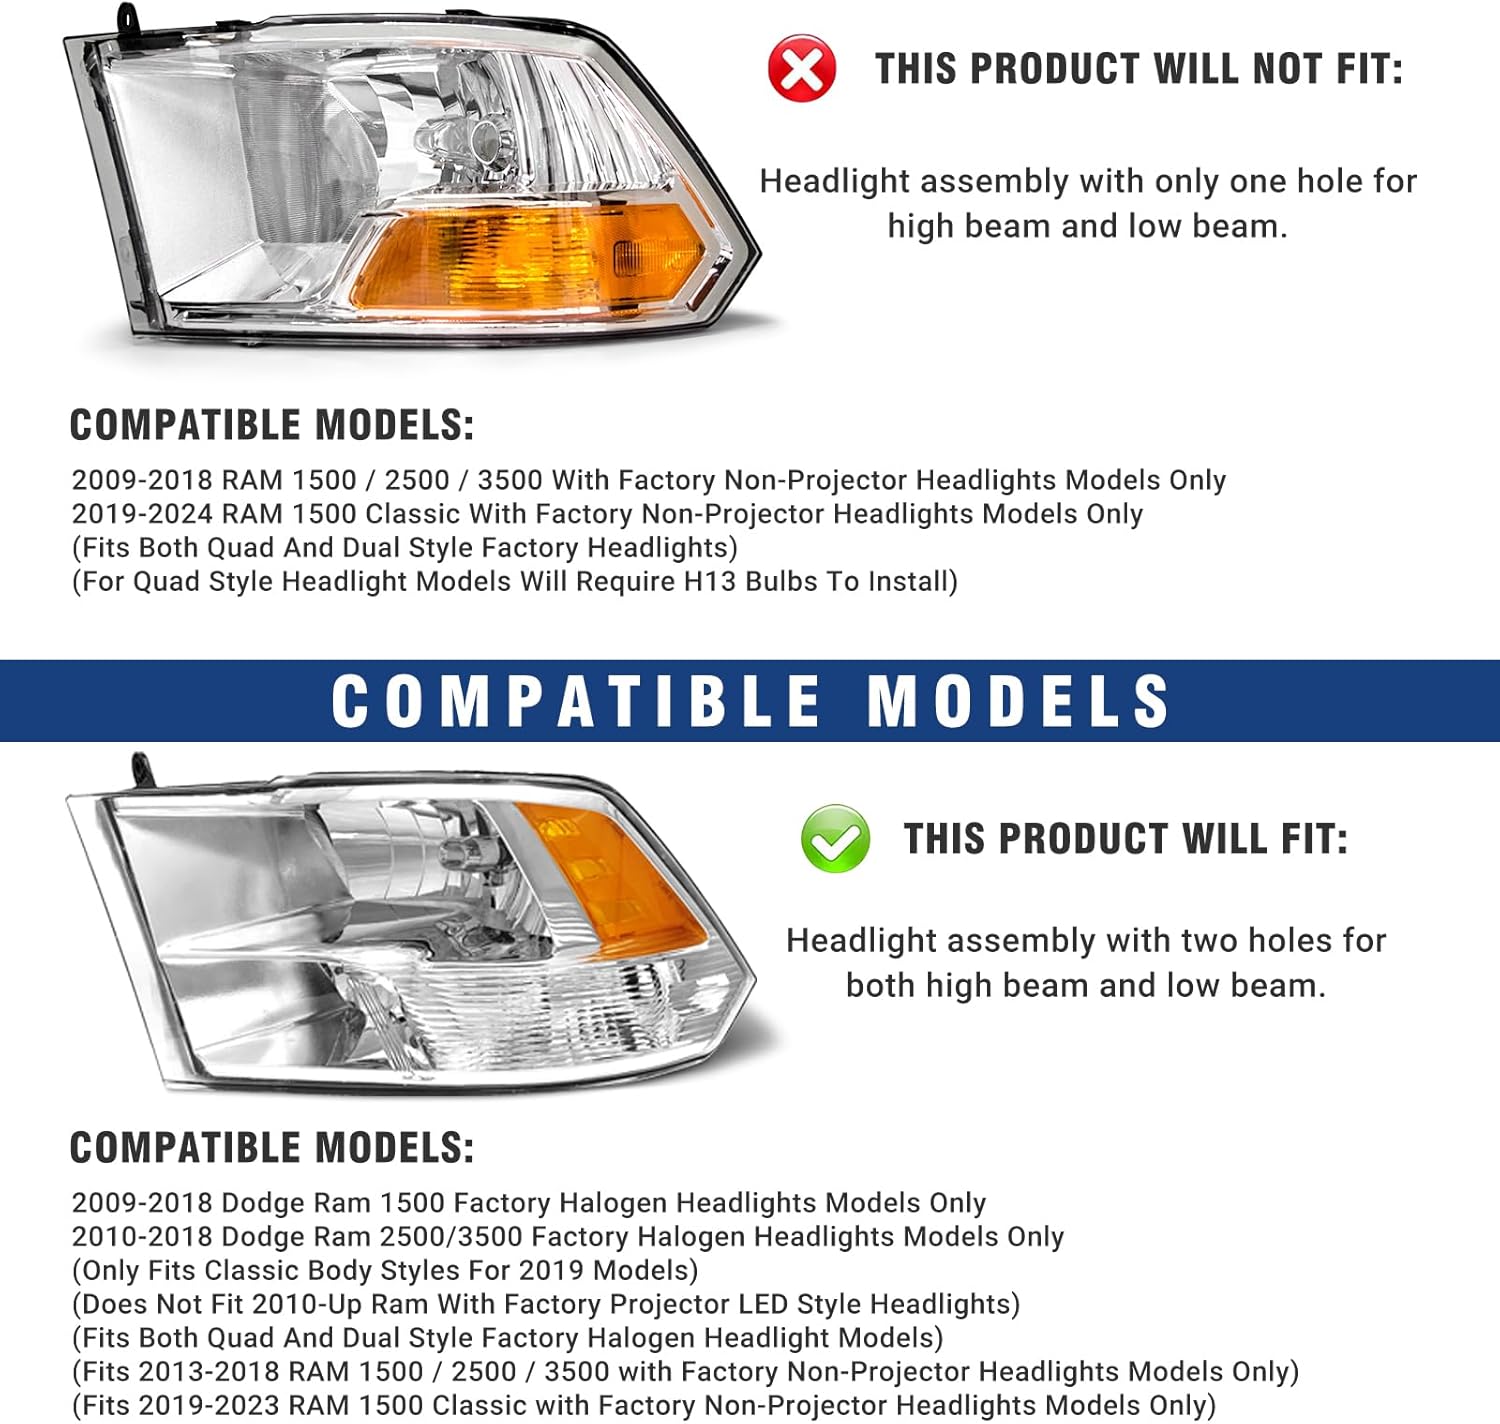
Image 2.2: This image illustrates the difference between incompatible (one hole for high/low beam) and compatible (two holes for high/low beam) headlight assemblies, along with a list of compatible models.

Image 2.3: A visual comparison showing that the product fits 2009 and above models (new body style) and does not fit 2006-2009 models (old body style) of Dodge Ram trucks.
3. Product Components
The AS Headlight Assembly is designed with key components for optimal performance and safety:
- High Beam: Utilizes 9005 bulbs (not included).
- Low Beam: Utilizes H11 bulbs (not included).
- Turn Signal Beam: Utilizes 3157A bulbs (not included).
- Safety Reflector: Integrated for enhanced visibility.
- High/Low Beam Adjuster: Allows for precise beam alignment.
- One-way Vent: Helps regulate internal pressure and moisture.

Image 3.1: A detailed diagram of the AS Headlight Assembly, labeling the Safety Reflector, Low Beam, Turn Signal Beam, and High Beam areas, along with the required bulb types (HB3 for High Beam, H11 for Low Beam, 3157A for Turn Signal Beam).

Image 3.2: The rear view of the headlight assembly, highlighting the High/Low Beam Adjuster and the One-way Vent, crucial for installation and maintenance.

Image 3.3: Close-up images detailing the High Beam, Low Beam, Turn Signal Light, and Amber Reflector components of the headlight assembly.
4. Installation Guide
The AS Headlight Assembly features a bolt-on, plug-n-play design for straightforward installation, typically taking 15 minutes or less. No vehicle modification is required.
Installation Steps:
- Preparation: Ensure the vehicle is turned off and the battery is disconnected for safety.
- Access: Depending on your vehicle model, you may need to remove the grille or other front-end components to access the existing headlight assembly. Consult your vehicle's service manual for specific removal procedures.
- Remove Old Assembly: Unbolt the existing headlight assembly and carefully disconnect the electrical connectors.
- Install New Assembly: Connect the electrical wiring from your vehicle to the new AS Headlight Assembly. Ensure all connections are secure.
- Secure Assembly: Position the new headlight assembly into place and secure it with the appropriate bolts.
- Reassemble: Reinstall any removed grille or front-end components.
- Reconnect Battery: Reconnect the vehicle's battery.
- Test and Adjust: Turn on the headlights and verify proper function of high beams, low beams, and turn signals. Adjust the beam aim as necessary using the integrated adjusters (refer to Section 5).

Image 4.1: A person's hands carefully positioning a headlight assembly into the vehicle's front fender, demonstrating the ease of installation.
5. Operation and Adjustment
Once installed, the AS Headlight Assembly operates in conjunction with your vehicle's existing electrical system. The primary operational aspects involve the high beam, low beam, and turn signal functions.
Beam Adjustment:
Proper headlight aim is crucial for safe driving and to avoid blinding oncoming traffic. The AS Headlight Assembly includes integrated adjusters for both high and low beams. To adjust:
- Park your vehicle on a level surface approximately 25 feet from a wall or garage door.
- Measure the height from the ground to the center of your headlight's low beam bulb. Mark this height on the wall.
- Turn on your low beams. The top edge of the low beam cut-off should be at or slightly below the marked line on the wall.
- Use a Phillips head screwdriver to turn the adjustment screws located on the back of the headlight assembly (refer to Image 3.2). Turn clockwise to raise the beam and counter-clockwise to lower it.
- Repeat for the other headlight. Ensure both headlights are aimed correctly.

Image 5.1: A visual comparison demonstrating the superior focused beam and clear cut-off line of the AS Headlight Assembly, ensuring better driving vision without affecting other drivers.

Image 5.2: This image contrasts the precise beam pattern of AS headlights ('Ours') with a clear horizontal cutoff, against other headlights ('Others') that exhibit a more scattered and less controlled light distribution.
6. Care and Maintenance
To ensure the longevity and optimal performance of your AS Headlight Assembly, follow these care and maintenance guidelines:
- Cleaning: Regularly clean the outer lens with a soft cloth and mild automotive soap to remove dirt, dust, and road grime. Avoid abrasive cleaners or harsh chemicals that can damage the polycarbonate lens or UV coating.
- Inspection: Periodically inspect the headlight assembly for any signs of damage, cracks, or moisture intrusion. The I65-certified fully sealed structure is designed to prevent moisture, but regular checks are recommended.
- Bulb Replacement: If a bulb burns out, replace it promptly with the correct type (High beam: 9005; Low beam: H11; Turn signal: 3157A). Ensure the vehicle is off and cool before handling bulbs.
- UV Protection: The lens features a UV coating to prevent yellowing and hazing over time. Avoid prolonged exposure to direct sunlight when possible, or consider using a UV protectant spray designed for automotive plastics.

Image 6.1: This image highlights key features of the AS Headlight Assembly, including its IP65 waterproof and dustproof rating, ease of installation, safety compliance, sturdy and durable construction, and superior lighting performance.

Image 6.2: This image depicts vehicles operating in diverse weather conditions, including rain, dusty desert, and snow, illustrating the headlight's ability to perform reliably in challenging environments.
7. Troubleshooting
If you encounter issues with your AS Headlight Assembly, consider the following troubleshooting steps:
| Problem | Possible Cause | Solution |
|---|---|---|
| Headlight not working | Blown bulb, loose electrical connection, blown fuse, faulty wiring. | Check and replace bulb. Ensure all electrical connectors are secure. Inspect vehicle's fuse box and replace any blown fuses. Consult a professional for wiring issues. |
| Dim or flickering light | Aging bulb, poor electrical connection, insufficient power supply. | Replace bulb. Check and clean electrical contacts. Verify vehicle's charging system is functioning correctly. |
| Moisture inside lens | Condensation (normal in some conditions), seal compromise. | Small amounts of condensation usually dissipate. If excessive or persistent, inspect the housing for cracks or seal damage. Ensure the one-way vent is clear. |
| Improper beam aim | Incorrect adjustment after installation. | Refer to Section 5 for detailed beam adjustment instructions. |
If the problem persists after attempting these solutions, please contact customer support for further assistance.
8. Technical Specifications
- Brand: AS
- Model Number: AS-DPU20009885
- Color: Chrome Housing, Crystal Clear Lens
- Specific Uses For Product: Head Lights
- Wattage: 55 watts
- Auto Part Position: Front
- Lens Material: Polycarbonate
- Special Feature: Including Passenger And Driver Side
- UPC: 784529184914
- Assembly Required: No
- Item Weight: 13.12 pounds (Pair)
- Package Dimensions: 23 x 19 x 12.2 inches
- Exterior Finish: UV COATING
- OEM Part Number: 68001484AG, 68001485AG
- ABPA Partslink Number: CH2518135, CH2519135
9. Warranty and Support
AS provides a one-year warranty for this headlight assembly. This warranty covers manufacturing defects and ensures the product functions as intended under normal use.
For any issues, questions, or assistance with proper operation, please contact AS customer support. We are committed to providing a responsive solution and offer lifetime service for each purchase.
Contact Support: Please refer to the 'Ask a question' button on the product's purchase page or visit the official AS store for contact information.