Instruction Manual: Replacement Optical Pickup for AIWA NSX-500 CD Player
\nBrand: Boer Hermes | Model Compatibility: AIWA NSX-500
\n1. Introduction
\nThis manual provides essential information for the installation and care of your new replacement optical pickup unit, designed specifically for the AIWA NSX-500 CD Player. This component is crucial for the proper reading of CDs and DVDs, ensuring optimal audio and video playback performance.
\nThe optical pickup, also known as a laser lens or laser unit (Lasereinheit, Bloc Optique), is a precision component responsible for reading data from optical discs. Proper handling and installation are vital for its functionality and longevity.
\n \n
\n Figure 1: Front view of the replacement optical pickup unit.
\n2. Setup and Installation
\nInstalling an optical pickup requires careful attention to detail and basic technical proficiency. It is recommended that installation be performed by a qualified technician if you are not familiar with electronic component replacement.
\n2.1 Safety Precautions
\n- \n
- Always disconnect the CD player from the power source before beginning any installation. \n
- Wear an anti-static wrist strap to prevent electrostatic discharge (ESD), which can damage sensitive electronic components. \n
- Handle the optical pickup by its edges; avoid touching the laser lens or internal components. \n
2.2 Installation Steps
\n- \n
- Disassembly: Carefully open the AIWA NSX-500 CD player casing according to its service manual (not provided here). Locate the existing optical pickup unit. \n
- Disconnect Old Unit: Gently disconnect all ribbon cables and power connectors attached to the old optical pickup. Note their orientation for reassembly. \n
- Remove Old Unit: Unscrew or unclip the old optical pickup from its mounting rails or chassis. \n
- Prepare New Unit: Before installing the new optical pickup, it is crucial to remove the protective solder point. This solder bridge is applied by the manufacturer to protect the laser diode from static electricity during shipping and handling. Failure to remove this solder point will prevent the unit from functioning. \n
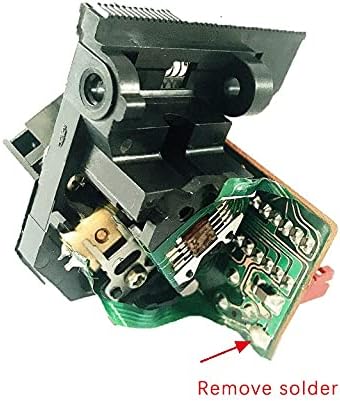 \n
\n Figure 2: Location of the protective solder point to be removed. Use a fine-tipped soldering iron to carefully desolder and remove this bridge.
\n- \n
- Install New Unit: Mount the new optical pickup into the CD player's chassis, ensuring it slides smoothly on its rails. Secure it with screws or clips. \n
- Connect Cables: Reconnect all ribbon cables and power connectors to the new unit, ensuring they are seated correctly and in the proper orientation. \n
- Reassembly: Carefully reassemble the CD player's casing. \n
- Testing: Connect the CD player to power and insert a known good CD to test functionality. \n
3. Operating Principles
\nOnce correctly installed, the optical pickup operates automatically as an integral part of the AIWA NSX-500 CD player's disc reading mechanism. It emits a laser beam that reflects off the disc's surface, and a photodetector within the unit reads the reflected light patterns to interpret the digital data stored on the CD or DVD.
\nThere are no direct user controls for the optical pickup itself. Its operation is entirely managed by the CD player's internal electronics and firmware.
\n4. Maintenance
\nThe optical pickup unit is a sealed, precision component and generally requires no internal maintenance. However, proper care of the CD player can extend the life of the optical pickup:
\n- \n
- Keep Clean: Ensure the CD player's disc tray and internal areas are free from dust and debris. Dust accumulation on the laser lens can impair reading performance. \n
- Avoid Touching Lens: Never touch the laser lens with bare fingers or abrasive materials. If cleaning is necessary, use a specialized CD/DVD lens cleaning disc or a soft, lint-free cloth with a small amount of isopropyl alcohol, applied very gently. \n
- Environmental Conditions: Operate the CD player in a clean, dry environment, away from extreme temperatures and humidity. \n
5. Troubleshooting
\nIf you experience issues after installing the new optical pickup, consider the following troubleshooting steps:
\n- \n
- No Disc Detected / Disc Reading Errors:\n
- \n
- Check Solder Point: Reconfirm that the protective solder point (refer to Section 2.2, Figure 2) has been completely removed. This is the most common cause of non-functionality. \n
- Cable Connections: Verify that all ribbon cables and power connectors are securely and correctly attached to the optical pickup and the main board. \n
- Lens Cleanliness: Ensure the laser lens is clean and free from dust or smudges. \n
- Disc Condition: Test with multiple, known good, clean CDs/DVDs. \n
\n - Skipping or Intermittent Playback:\n
- \n
- Lens Cleanliness: Clean the laser lens as described in the Maintenance section. \n
- Disc Condition: Ensure discs are clean and free from scratches. \n
- Mounting: Verify the optical pickup is securely mounted and moves freely on its rails. \n
\n - No Power to Unit:\n
- \n
- Power Connections: Double-check all power supply connections to the optical pickup and the CD player's main board. \n
- CD Player Power: Ensure the CD player itself is receiving power and functioning otherwise. \n
\n
If issues persist after performing these checks, professional diagnosis and repair may be required.
\n6. Specifications
\n| Feature | \nDetail | \n
|---|---|
| Product Type | \nReplacement Optical Pickup Unit (Laser Lens / Lasereinheit) | \n
| Compatibility | \nAIWA NSX-500 CD Player | \n
| Brand | \nBoer Hermes | \n
| Item Weight | \nApproximately 200 g | \n
| ASIN | \nB09J1DNRRH | \n
| Date First Available | \n8 October 2021 | \n
7. Warranty and Support
\nSpecific warranty terms for this replacement part are typically provided by the seller at the time of purchase. Please refer to your purchase documentation or contact the seller directly for details regarding warranty coverage and support services.
\nFor technical support related to the AIWA NSX-500 CD player itself, please consult the original manufacturer's documentation or their official support channels.
\n


