1. Product Overview
This Owigift Washer Tub Bearing and Seal Kit is designed as an aftermarket replacement for various Kenmore and LG front load washing machine models. It provides the necessary components to repair a noisy or leaking washer tub, restoring its proper function.
1.1 Kit Contents
- 1x Washing Tub Seal
- 1x Tub Seal Gasket
- 1x Large Bearing
- 1x Small Bearing
Note: The exact appearance of components may vary slightly from images.
1.2 Compatibility
This kit is compatible with a range of Kenmore and LG front load washer models. To confirm compatibility, please cross-reference your washer's model number with the list below. You can typically find your model number on a label inside the washer door, on the back, or on the control panel.
Compatible Models include:
- 796.40518900
- 796.41022900
- 796.41028900
- 796.41029900
- 796.42192900
- 796.42198900
- 796.42199900
- 796.40272800
- 796.40272900
- 796.40311900
- 796.40318900
- 796.40441900
- 796.40448900
- 796.40512900
2. Safety Information
Before beginning any repair work on your washing machine, it is crucial to observe the following safety precautions:
- Disconnect Power: Always unplug the washing machine from the electrical outlet before starting any disassembly or repair.
- Turn Off Water Supply: Close the hot and cold water supply valves to the washer.
- Wear Protective Gear: Use work gloves to protect your hands from sharp edges and safety glasses to protect your eyes.
- Professional Assistance: If you are unsure about any step or uncomfortable performing the repair, consult a qualified appliance technician.
- Heavy Components: Washing machine tubs and other components can be heavy. Exercise caution and seek assistance if needed to prevent injury.
3. Installation Instructions
Replacing the tub bearings and seals in a front load washer is a complex procedure that requires significant disassembly of the appliance. The following steps provide a general guide. Specific disassembly steps may vary by washer model. It is highly recommended to consult your specific washer's service manual or a reputable online repair guide for detailed, model-specific instructions.
3.1 Required Tools (Not Included)
- Screwdrivers (Phillips and Flathead)
- Socket Wrench Set
- Pliers
- Bearing Puller / Press Tool (essential for bearing removal/installation)
- Rubber Mallet
- Grease (waterproof, for seals and bearings)
- Sealant (optional, for tub halves)
3.2 Disassembly Steps (General Guide)
- Prepare the Washer: Disconnect power and water supply. Drain any residual water.
- Remove Top Panel: Unscrew and remove the top panel of the washer.
- Remove Control Panel: Carefully detach the control panel, disconnecting any wiring harnesses.
- Remove Front Panel/Door: Disconnect the door boot clamp, then remove the front panel and door assembly.
- Remove Components from Tub: Disconnect the dispenser hose, pressure switch hose, heating element wires, and any other components attached to the outer tub.
- Remove Counterweights: Unbolt and remove the concrete counterweights, usually located on the top and front of the outer tub.
- Remove Shock Absorbers/Springs: Detach the tub from the shock absorbers and suspension springs.
- Remove Outer Tub: Carefully lift and remove the entire outer tub assembly from the washer frame.
- Separate Tub Halves: Place the outer tub on a stable surface. Remove the bolts or clamps holding the front and rear halves of the outer tub together. Carefully separate the halves.
- Remove Inner Drum: Lift the inner drum out of the rear outer tub half.
3.3 Bearing and Seal Replacement
- Remove Old Seal: Carefully pry out the old tub seal from the rear outer tub half. Clean the seal area thoroughly.
- Remove Old Bearings: Using a bearing puller or a suitable punch and hammer, carefully tap out the old bearings from the rear outer tub half. Note the orientation of each bearing. Clean the bearing bores.
- Install New Bearings: Apply a thin layer of waterproof grease to the new bearings. Using a bearing press tool or a block of wood and a rubber mallet, gently tap the new bearings into their respective bores. Ensure they are seated squarely and fully.
- Install New Seal: Apply a thin layer of waterproof grease to the new tub seal. Press the new seal into place, ensuring it is fully seated and facing the correct direction (lip facing the inner tub).
- Install New Gasket: If your tub uses a gasket between the two halves, place the new tub seal gasket onto one of the tub halves.

Image: Small bearing, typically installed first. This component allows the inner tub to rotate smoothly.
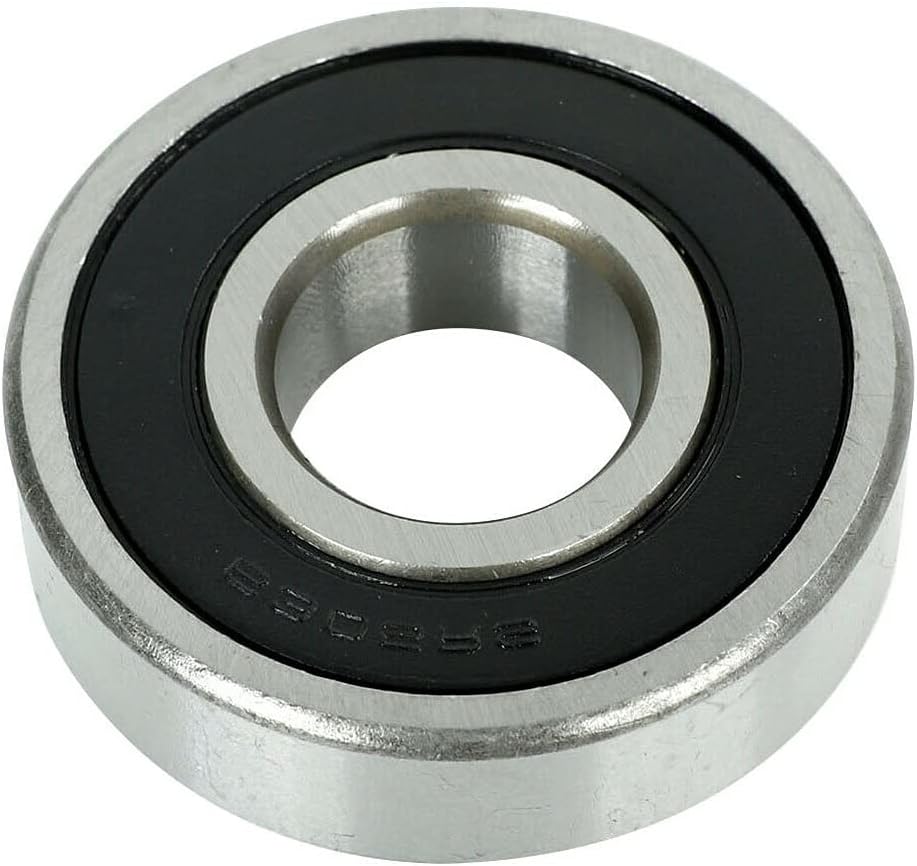
Image: Large bearing, often installed after the smaller bearing. Both bearings are crucial for tub rotation.
3.4 Reassembly Steps (General Guide)
- Reassemble Tub Halves: Place the inner drum back into the rear outer tub half. Carefully align and join the front and rear outer tub halves, securing them with bolts or clamps. Ensure the gasket is properly seated.
- Reinstall Outer Tub: Carefully place the outer tub assembly back into the washer frame. Reattach the shock absorbers and suspension springs.
- Reinstall Counterweights: Bolt the counterweights back onto the tub.
- Reconnect Components: Reconnect all hoses and wiring harnesses to the outer tub.
- Reinstall Front Panel/Door: Reattach the front panel and door assembly, securing the door boot clamp.
- Reinstall Control Panel: Reconnect wiring and reattach the control panel.
- Reinstall Top Panel: Secure the top panel.
- Final Checks: Double-check all connections, bolts, and clamps to ensure everything is secure.
- Test Washer: Reconnect water supply and power. Run a short test cycle (e.g., rinse and spin) to check for leaks and proper operation. Listen for any unusual noises.
4. Maintenance
Proper maintenance of your washing machine can help extend the life of its components, including the tub bearings and seals.
- Avoid Overloading: Do not overload the washer. Excessive weight puts undue stress on the tub bearings.
- Balance Loads: Ensure laundry loads are balanced to prevent the inner tub from spinning unevenly, which can accelerate bearing wear.
- Regular Cleaning: Periodically clean the washer tub and dispenser to prevent buildup that could affect performance.
- Check for Leaks: Address any leaks promptly to prevent water from reaching and damaging the bearings.
5. Troubleshooting
If you encounter issues after installing the bearing and seal kit, consider the following:
- Still Noisy:
- Incorrect Bearing Installation: Ensure bearings are fully seated and not damaged during installation.
- Other Components: Noise might be coming from other parts, such as the motor, pump, or suspension components.
- Leaking Water:
- Seal Not Seated: Verify the tub seal is correctly installed and not pinched or damaged.
- Tub Gasket Issue: Ensure the tub gasket between the tub halves is properly aligned and sealed.
- Hose Connections: Check all hose connections for tightness.
- Washer Not Spinning:
- Obstruction: Check for any tools or debris left inside the tub.
- Wiring: Ensure all electrical connections disconnected during repair are reconnected securely.
If troubleshooting steps do not resolve the issue, it is recommended to contact a professional appliance technician.
6. Specifications
| Brand | Owigift |
| Material | Alloy Steel, Bronze |
| Bearing Type | Ball Bearing |
| Compatible Lubricant | Grease |
| UPC | 718997268241 |
7. Warranty and Support
As an aftermarket replacement part, this Owigift Washer Tub Bearing and Seal Kit is designed to meet or exceed the performance of original equipment manufacturer (OEM) parts. For specific warranty information, please refer to the product listing or contact the seller directly.
If you have questions regarding compatibility, installation, or require assistance with the product, please contact Owigift customer support through the platform where the purchase was made. Provide your order details and model number for prompt assistance.