Comm Gear Supply Clarus FX2
Silynx Clarus FX2 Tactical In-Ear Communications System
User Manual
Model: Clarus FX2 | Brand: Comm Gear Supply
1. Introduction
The Silynx Clarus FX2 is a compact, rugged, and reliable tactical in-ear communication system designed for professional use. It integrates receiving, transmitting, hearing protection, and hearing enhancement capabilities into a single unit. This system is engineered to provide clear communications while maintaining situational awareness and protecting hearing in noisy environments.
Key features include an in-ear microphone to eliminate external boom mics, proprietary hear-thru technology for ambient sound awareness, and an internal noise gate for hearing protection. The system is powered by a single AAA battery, offering extended operational time.
2. Safety Information
Please read and understand all safety instructions before operating the Silynx Clarus FX2 system. Failure to follow these instructions may result in injury or damage to the device.
- Hearing Protection: This device provides hearing protection. Ensure ear tips are properly seated to achieve the stated Noise Reduction Rating (NRR).
- Battery Safety: Use only specified AAA batteries. Do not mix old and new batteries, or different types of batteries. Dispose of batteries according to local regulations.
- Water Resistance: The system is IP68 rated for dust and water resistance. While waterproof, avoid prolonged submersion beyond specified limits (20m for 30min for control box, 1m for 30min for headset). Ensure all connections are secure before exposure to water.
- Cleaning: Disconnect from power and radio before cleaning. Use a soft, damp cloth. Do not use harsh chemicals or abrasive cleaners.
- Temperature: Operate and store the device within the specified temperature ranges to prevent damage. Operating: -40°C to +72°C; Storage: -40°C to +72°C.
- Modifications: Do not attempt to modify or disassemble the unit. Unauthorized modifications will void the warranty and may cause damage or injury.
3. Package Contents
Verify that all items are present in your Silynx Clarus FX2 package:
- Silynx Clarus FX2 Control Unit with integrated cable
- In-Ear Headset (Left and Right Earpieces)
- Comply Foam Ear Tips (various sizes)
- User Manual (this document)

Figure 3.1: Main components of the Silynx Clarus FX2 system, including the control unit and in-ear headset.
4. Setup
4.1 Battery Installation
- Locate the battery compartment on the Silynx Clarus FX2 control unit.
- Open the compartment cover.
- Insert one (1) AAA battery, ensuring correct polarity (+/-) as indicated inside the compartment.
- Securely close the battery compartment cover.
Note: The system can function for hearing protection/enhancement even without a radio connected, powered by the AAA battery.
4.2 Connecting to Radio
- Identify the fixed radio lead extending from the Clarus FX2 control unit.
- Connect this lead to the compatible 2-pin radio port (e.g., Motorola, HYT, Tekk, BearCom, Blackbox). Ensure a firm connection.
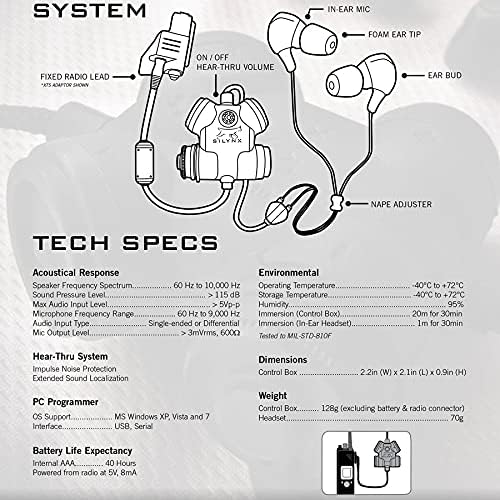
Figure 4.1: Diagram illustrating the system components and connections, including the fixed radio lead.
4.3 Ear Tip Selection and Insertion
- Select the appropriate size of Comply Foam Ear Tips for a comfortable and secure fit. A proper seal is crucial for optimal hearing protection and audio quality.
- Compress the foam ear tip by rolling it between your fingers.
- Gently insert the earbud into your ear canal. Hold it in place for a few seconds while the foam expands to create a seal.
- Adjust the nape adjuster for a secure fit around the back of your neck.

Figure 4.2: Proper placement of the Silynx Clarus FX2 headset for secure fit and optimal performance.
5. Operating Instructions
5.1 Powering On/Off and Hear-Thru Volume
The Clarus FX2 features a single button for power and hear-thru volume control.
- Power On: Press and hold the power/volume button until you hear an audible confirmation.
- Adjust Hear-Thru Volume: Short presses of the power/volume button will cycle through volume levels for the hear-thru function.
- Power Off: Press and hold the power/volume button until you hear an audible confirmation of power down.
The hear-thru system allows you to maintain situational awareness by listening to ambient sounds. When external noise reaches unsafe levels, the internal noise gate automatically activates, providing hearing protection.
5.2 Push-To-Talk (PTT) Function
The Clarus FX2 Push To Talk (PTT) system incorporates dual, ambidextrous PTT buttons. Both or either button will activate the microphone for transmission.
- Transmit: Press and hold either PTT button to transmit your voice through the connected radio.
- Release: Release the PTT button to stop transmitting and return to receive mode.
The strategic placement of the PTT buttons helps prevent accidental activations. The in-ear microphone ensures clear transmissions by minimizing external noise.
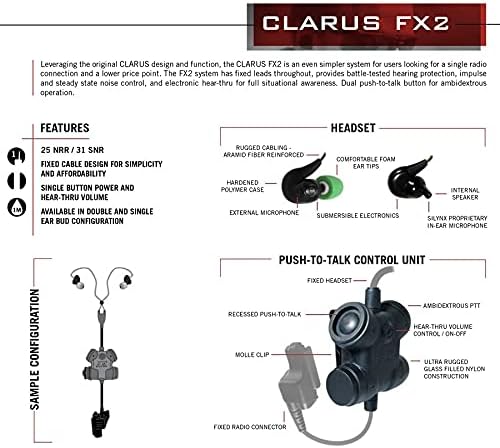
Figure 5.1: Detailed diagram of the Clarus FX2 headset and Push-To-Talk control unit, highlighting key features and controls.

Figure 5.2: Example of holding the Clarus FX2 PTT unit for operation.
6. Maintenance
6.1 Cleaning
- Before cleaning, ensure the system is powered off and disconnected from any radio.
- Wipe the control unit and cables with a soft, damp cloth.
- For ear tips, remove them from the earbuds and clean separately. Replace foam ear tips regularly for hygiene and optimal performance.
- Do not use harsh chemicals, solvents, or abrasive cleaners, as these can damage the materials.
6.2 Storage
- Store the Clarus FX2 system in a cool, dry place away from direct sunlight and extreme temperatures.
- If storing for an extended period, remove the AAA battery to prevent leakage.
- Avoid kinking or sharply bending the cables to prevent internal damage.
7. Troubleshooting
| Problem | Possible Cause | Solution |
|---|---|---|
| No power/No sound from headset | Dead or incorrectly installed battery. | Check battery polarity. Replace AAA battery. |
| Poor audio quality / Static | Loose radio connection; Damaged cable; Radio issue. | Ensure radio connector is fully seated. Inspect cable for damage. Test with another radio if possible. |
| Hear-thru not working or too quiet/loud | Hear-thru volume setting; System not powered on. | Adjust hear-thru volume using the power/volume button. Ensure system is powered on. |
| Microphone not transmitting | PTT button not pressed; Radio not in transmit mode; In-ear mic obstruction. | Ensure PTT button is fully depressed. Check radio settings. Ensure earbud is properly seated and mic port is clear. |
| Poor hearing protection | Improper ear tip seal; Incorrect ear tip size. | Re-insert ear tips to ensure a tight seal. Try different sized Comply Foam Ear Tips. |
If the problem persists after attempting these solutions, please contact Comm Gear Supply customer support.
8. Specifications
| Feature | Detail |
|---|---|
| Model | Clarus FX2 |
| Connectivity Technology | Wired |
| Compatible Devices | Motorola 2 Pin Radios, HYT, Tekk, BearCom, Blackbox & more |
| Hearing Protection Rating | 25 NRR / 31 SNR |
| Water Resistance Level | IP68 (Dust Sealed & Waterproof, Tested to MIL-STD-810F) |
| Battery Type | 1x AAA battery (required) |
| Battery Life | Up to 40 Hours (active hearing protection/enhancement) |
| Control Type | Volume Control, Push-To-Talk (PTT) |
| Microphone Type | In-ear microphone |
| Material | Plastic, Rubber |
| Operating Temperature | -40°C to +72°C |
| Storage Temperature | -40°C to +72°C |
| Humidity | 95% |
| Control Box Dimensions | 2.2in (W) x 2.1in (L) x 0.9in (H) |
| UPC | 761596460585 |
| ASIN | B09HSQFBR2 |
9. Warranty and Support
9.1 Warranty Information
Comm Gear Supply, an American-owned and operated company, stands behind its products and offers a warranty for the Silynx Clarus FX2 system. The product is guaranteed to fit and function as described. A money-back guarantee is also provided.
For specific warranty terms and conditions, please refer to the purchase documentation or contact Comm Gear Supply directly.
9.2 Customer Support
For technical assistance, troubleshooting beyond this manual, or warranty claims, please contact Comm Gear Supply customer support:
- Website: www.commgearsupply.com (Please note: This is a placeholder URL based on the company name. Verify the actual support URL.)
- Refer to your purchase receipt or packaging for additional contact information.
Ask a question about this manual
Ask about setup, troubleshooting, compatibility, parts, safety, or missing instructions. Manuals+ will review the question and use this page’s manual context to help answer it.