1. Introduction
This manual provides essential information for the proper installation, operation, and maintenance of your Onkyo C-A7 CD Player Laser Lens Optical Pick-up Block. Please read this manual thoroughly before use to ensure optimal performance and longevity of the product. This optical pick-up block is a replacement component designed for specific CD player models.
2. Safety Information
- Laser Radiation: This product contains a laser diode. Do not stare directly into the laser beam. Improper use may result in hazardous radiation exposure.
- Professional Installation: Installation of this component should only be performed by qualified technicians. Incorrect installation can damage the unit or the CD player.
- Static Electricity: Handle the optical pick-up block with care, as it is sensitive to static electricity. Use anti-static precautions (e.g., anti-static wrist strap) during installation.
- Power Disconnection: Always disconnect the CD player from the main power supply before attempting any installation or maintenance.
- Keep Dry: Avoid exposing the unit to moisture or liquids.
3. Package Contents
Verify that all items are present in the package:
- 1 x Onkyo C-A7 CD Player Laser Lens Optical Pick-up Block
- This Instruction Manual
4. Setup and Installation
This section outlines the general steps for installing the optical pick-up block. Due to the delicate nature of this component and the specific requirements of various CD player models, professional installation is highly recommended.
- Prepare the CD Player: Disconnect the CD player from all power sources and external connections. Open the CD player casing carefully, following the manufacturer's service manual for your specific CD player model.
- Locate the Old Pick-up: Identify the existing optical pick-up block within the CD mechanism. Note its connections and mounting points.
- Remove the Old Pick-up: Carefully disconnect any ribbon cables or wires attached to the old pick-up. Unscrew or unclip the old pick-up from its mounting.
- Install the New Pick-up: Position the new Onkyo C-A7 optical pick-up block in the same location as the old one. Secure it using the original screws or clips.
- Connect Cables: Reconnect all ribbon cables and wires to the new pick-up block, ensuring correct orientation and secure connections. Refer to the CD player's service manual for wiring diagrams if necessary.
- Remove Anti-static Solder Point (if present): Some new optical pick-up blocks have an anti-static solder point (a small solder bridge) that needs to be desoldered before operation. This protects the laser diode during shipping. Consult a qualified technician if you are unsure about this step. Failure to remove it will prevent the unit from functioning.
- Reassemble and Test: Carefully reassemble the CD player casing. Connect the CD player to power and test its functionality with a known good CD.
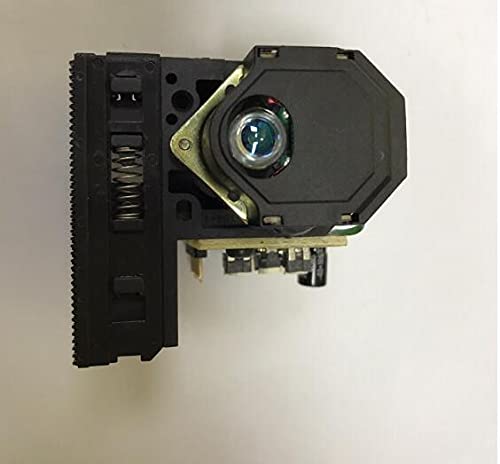
Image 1: The Onkyo C-A7 CD Player Laser Lens Optical Pick-up Block. This image shows the compact electronic component with its circuit board and laser assembly, ready for installation into a compatible CD player.
5. Operating Instructions
Once the optical pick-up block is correctly installed, its operation is integrated into the CD player's normal functions. There are no separate operating controls for the pick-up block itself.
- CD Playback: Insert a CD into the player. The optical pick-up block will automatically read the disc and initiate playback according to the CD player's controls.
- Track Navigation: Use the CD player's controls to skip tracks, fast forward, rewind, and pause playback.
- Disc Recognition: Ensure CDs are clean and free from scratches to allow the pick-up block to read them correctly.
6. Maintenance
The optical pick-up block itself requires minimal maintenance. The primary focus should be on maintaining the cleanliness of the CD player environment and the discs.
- Disc Care: Always handle CDs by their edges. Store them in their cases to prevent dust and scratches. Clean discs with a soft, lint-free cloth, wiping from the center outwards.
- Environment: Keep the CD player in a clean, dust-free environment. Excessive dust can accumulate on the laser lens, affecting performance.
- Lens Cleaning (Advanced): If playback issues persist and are suspected to be due to a dirty lens, a specialized CD lens cleaning disc can be used. For manual cleaning, only a qualified technician should attempt to clean the laser lens directly using a specialized lens cleaning solution and swab. Improper cleaning can cause permanent damage.
7. Troubleshooting
If you experience issues after installing the new optical pick-up block, refer to the following troubleshooting guide:
| Problem | Possible Cause | Solution |
|---|---|---|
| CD player does not recognize discs or shows "NO DISC" | Anti-static solder point not removed. | Have a qualified technician remove the anti-static solder point. |
| Disc skips or playback is intermittent | Dirty or scratched CD. | Clean the CD or try a different disc. |
| Disc skips or playback is intermittent | Laser lens is dirty. | Use a CD lens cleaning disc or consult a technician for manual cleaning. |
| No sound during playback | Audio connections are loose or incorrect. | Check all audio cables connected to the CD player and amplifier. |
| Unit not powering on | Power cable not connected or faulty. | Ensure power cable is securely connected and check power outlet. |
8. Specifications
- Model: Onkyo C-A7 (Optical Pick-up Block)
- Brand: Boer Hermes
- ASIN: B09HQB57DR
- Item Weight: 200 grams
- First Available Date: October 4, 2021
- Compatibility: Designed for specific Onkyo CD player models (verify compatibility with your specific player before purchase).
9. Warranty and Support
For warranty information and technical support, please refer to the documentation provided with your original CD player or contact the retailer where this replacement part was purchased. Due to the nature of this component, warranty terms may vary. Professional installation is often a prerequisite for warranty claims on replacement parts.
For further assistance, please visit the Boer Hermes brand page or contact their customer service.