
1. Introduction
This manual provides essential instructions for the safe and efficient operation, setup, and maintenance of your Konsew JACK A2 Industrial Sewing Machine. The JACK A2 is a high-performance industrial lockstitch sewing machine equipped with an automatic thread trimmer, designed for versatility across various fabric types, from light to heavy materials. It features an integrated Eco-Servo motor and a user-friendly control panel for enhanced productivity.
2. Safety Instructions
- Always disconnect the machine from the power supply before cleaning, servicing, or when not in use.
- Keep fingers and hands away from the needle, presser foot, and other moving parts during operation.
- Ensure proper lighting in your work area to prevent eye strain.
- Do not operate the machine with damaged parts or if it is not functioning correctly.
- Use only genuine Konsew replacement parts and accessories.
- Keep the work area clean and free of clutter.
3. Setup and Assembly
The Konsew JACK A2 machine is supplied with a table and stand that require assembly. Follow the instructions provided with the table and stand components for proper setup.
3.1 Machine Head Installation
Carefully place the machine head onto the assembled table. Ensure it is securely seated and aligned with the table cut-out.

Image: The Konsew JACK A2 industrial sewing machine fully assembled on its dedicated table and stand, ready for operation.
3.2 Power Connection
Connect the machine's power cord to a suitable electrical outlet. The integrated Eco-Servo motor ensures efficient power usage.
3.3 Oil Pan Setup
The machine features a detached oil pan. Ensure the oil pan is correctly positioned and filled with the recommended sewing machine oil before first use. Refer to the oil level indicator for proper filling.
3.4 Threading the Machine
Follow these steps to thread the machine:
- Place the thread spool on the spool pin.
- Guide the thread through the thread guides as indicated by the machine's markings.
- Pass the thread through the tension discs.
- Thread the take-up lever.
- Guide the thread through the needle bar thread guide.
- Finally, thread the needle from front to back.

Image: A detailed view of the upper threading path, showing the thread guides and tension assembly.
3.5 Bobbin Winding and Insertion
Wind the bobbin according to the machine's instructions, typically using the integrated bobbin winder. Insert the wound bobbin into the bobbin case and then into the shuttle hook assembly beneath the needle plate.
4. Operating Instructions
The JACK A2 is designed for ease of use and high efficiency.

Image: Front view of the Konsew JACK A2 machine head, highlighting the needle area and presser foot.
4.1 Control Panel Overview
The machine features an elegant and easy-to-use control panel for adjusting various settings.

Image: A close-up of the digital control panel, showing speed adjustment buttons and other function controls.
4.2 Starting and Stopping Sewing
Press the foot pedal to start sewing. The machine will begin stitching. Release the foot pedal to stop. The automatic thread trimmer will activate at the end of a seam if programmed.
4.3 Speed Adjustment
Use the speed control buttons on the control panel to adjust the sewing speed. The machine offers precise speed regulation for various sewing tasks.
4.4 Automatic Thread Trimmer
The automatic thread trimmer significantly increases efficiency by cutting the threads at the end of a seam. This feature can be activated or deactivated via the control panel.
4.5 Stitch Length Adjustment
Adjust the stitch length using the dial located on the machine head. Rotate the dial to select the desired stitch length for your fabric and project requirements.
4.6 Fabric Handling
The JACK A2 is suitable for a wide range of fabrics, from light to heavy materials, with a maximum thickness capacity of 10mm.

Image: An illustration demonstrating the machine's capability to sew through materials up to 10mm thick.
4.7 LED Lighting
The machine is equipped with omnidirectional LED lighting with three intensity levels, reducing eye strain and improving visibility of the sewing area. The light can be controlled via a switch on the machine head.

Image: A close-up view of the switch for controlling the integrated LED lighting.
5. Maintenance
Regular maintenance ensures the longevity and optimal performance of your JACK A2 machine.
5.1 Cleaning
Regularly clean lint and dust from the bobbin area, feed dogs, and tension discs using a soft brush or compressed air. Ensure the machine is unplugged before cleaning.
5.2 Lubrication
Check the oil level in the detached oil pan regularly. Refill with appropriate sewing machine oil as needed. Refer to the machine's specific lubrication points and schedule in the detailed service manual.
5.3 Needle Replacement
Replace the needle frequently, especially when sewing different fabric types or if the needle shows signs of wear or bending. Use the correct needle type and size for your fabric.
5.4 Cooling System
The machine incorporates a cooling system to maintain optimal operating temperature. Ensure the vents are clear of obstructions to allow proper airflow.
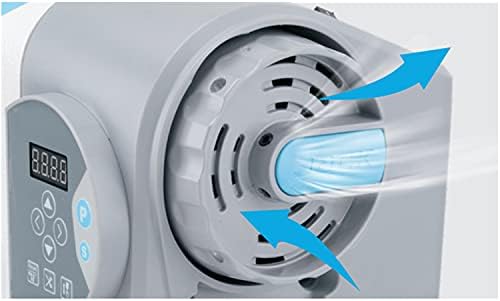
Image: A diagram showing the internal airflow for the cooling system, ensuring efficient heat dissipation.
6. Troubleshooting
| Problem | Possible Cause | Solution |
|---|---|---|
| Thread breakage | Incorrect threading, wrong needle size, worn needle, improper tension. | Re-thread the machine, replace needle, adjust tension. |
| Skipped stitches | Bent or dull needle, incorrect needle insertion, wrong needle type for fabric. | Replace needle, ensure needle is fully inserted and oriented correctly. |
| Machine not starting | Power cord not connected, safety switch engaged, motor issue. | Check power connection, disengage safety switch, consult service professional. |
| Uneven stitches | Incorrect tension, worn feed dogs, inconsistent fabric feeding. | Adjust thread tension, clean feed dogs, ensure smooth fabric guidance. |
7. Specifications
- Brand: Konsew
- Model: A2
- Color: White, Gold, Blue
- Material: Metal
- Product Dimensions (L x W x H): 100 x 40.01 x 100 cm
- Item Weight: 35 Kilograms
- Power Source: Electric motor
- Electric: Yes
- UPC: 630606393864
- ASIN: B09HJ6WBP8
8. Warranty and Support
Spare parts availability for this product is guaranteed for 1 year. For technical support, service, or warranty claims, please contact your Konsew dealer or authorized service center. Keep your purchase receipt as proof of purchase.