1. Introduction
Thank you for purchasing the VILINICE BL89 Native 1080P Projector. This manual provides essential information for the safe and efficient operation of your projector. Please read it thoroughly before use and retain it for future reference.
The VILINICE BL89 projector delivers a native 1920x1080P resolution, 9000 Lux brightness, and an 8000:1 contrast ratio, designed for a high-quality viewing experience. It features a long-lasting LED lamp and versatile connectivity options.

Image: The VILINICE BL89 Native 1080P Projector set up for a home theater experience, including a 100-inch screen.
2. Safety Information
To ensure safe operation and prolong the life of your projector, please observe the following precautions:
- Do not block the ventilation openings. Ensure adequate airflow around the projector to prevent overheating.
- Do not look directly into the projector lens when the lamp is on. The bright light can cause eye damage.
- Keep the projector away from water or any liquids. Do not operate in damp environments.
- Place the projector on a stable, level surface to prevent it from falling.
- Use only the power adapter supplied with the projector.
- Unplug the projector during lightning storms or when unused for extended periods.
- Do not attempt to repair the projector yourself. Refer all servicing to qualified personnel.
- This projector is less harmful to children's eyesight than television due to diffuse reflection imaging, but direct viewing of the lens should still be avoided.
3. Package Contents
Please check that all items are present upon unpacking:
- VILINICE BL89 Projector
- Power Cable
- Remote Control
- HDMI Cable
- AV Cable
- User Manual
- 100-inch Projector Screen
4. Product Overview
Familiarize yourself with the various parts and connections of your VILINICE BL89 projector.
Front View

Image: Front view of the VILINICE BL89 projector, highlighting the projection lens.
Rear and Side Views (Ports and Controls)

Image: Rear and side view of the VILINICE BL89 projector, illustrating the power input, HDMI ports, USB ports, VGA port, AV port, and control panel.
- Lens: Projects the image onto the screen.
- Focus Ring: Adjusts image clarity.
- Keystone Correction: Corrects trapezoidal image distortion.
- Control Panel: Power, menu, source, navigation buttons.
- HDMI Ports (x2): Connect to HDMI-enabled devices (laptops, TV sticks, game consoles).
- USB Ports (x2): Connect USB drives for media playback.
- VGA Port: Connect to computers with VGA output.
- AV Port: Connect to older devices using an AV cable.
- Audio Out (AUX): Connect external speakers or headphones.
- Power Input: Connect the power cable.
5. Setup
5.1 Projector Placement
Choose a suitable location for your projector. The optimal projection distance ranges from 1.2 meters (approximately 5 feet) to 5 meters (approximately 30 feet), yielding screen sizes from 44 inches to 300 inches. For the included 100-inch screen, position the projector at an appropriate distance to fill the screen.

Image: A family enjoying a movie projected onto a 100-inch screen, demonstrating typical projector placement.
5.2 Power Connection
- Connect the power cable to the projector's power input port.
- Plug the other end of the power cable into a power outlet.
- Press the power button on the projector or remote control to turn it on.
5.3 Connecting Input Devices
The VILINICE BL89 projector supports various input sources:
- HDMI: Connect TV sticks (e.g., Amazon Fire Stick, Roku), laptops, game consoles (Playstation, Xbox), or Blu-ray players using an HDMI cable.
- USB: Insert a USB flash drive into a USB port for direct media playback.
- VGA: Connect older computers or laptops using a VGA cable.
- AV: Connect legacy devices like DVD players using the provided AV cable.
- Smartphones/Tablets: Connect via HDMI adapter (not included) or screen mirroring devices (e.g., Chromecast).
Image: Visual representation of compatible devices and their connection types for the VILINICE BL89 projector.
6. Operating Instructions
6.1 Power On/Off
Press the power button on the projector or the remote control to turn the unit on or off.
6.2 Adjusting Image Focus and Keystone
After powering on, adjust the image for clarity and correct shape:
- Focus: Rotate the focus ring near the lens until the image appears sharp and clear.
- Keystone Correction: If the image appears trapezoidal (wider at the top or bottom), use the manual keystone correction dial (±15°) to adjust the image to a rectangular shape.
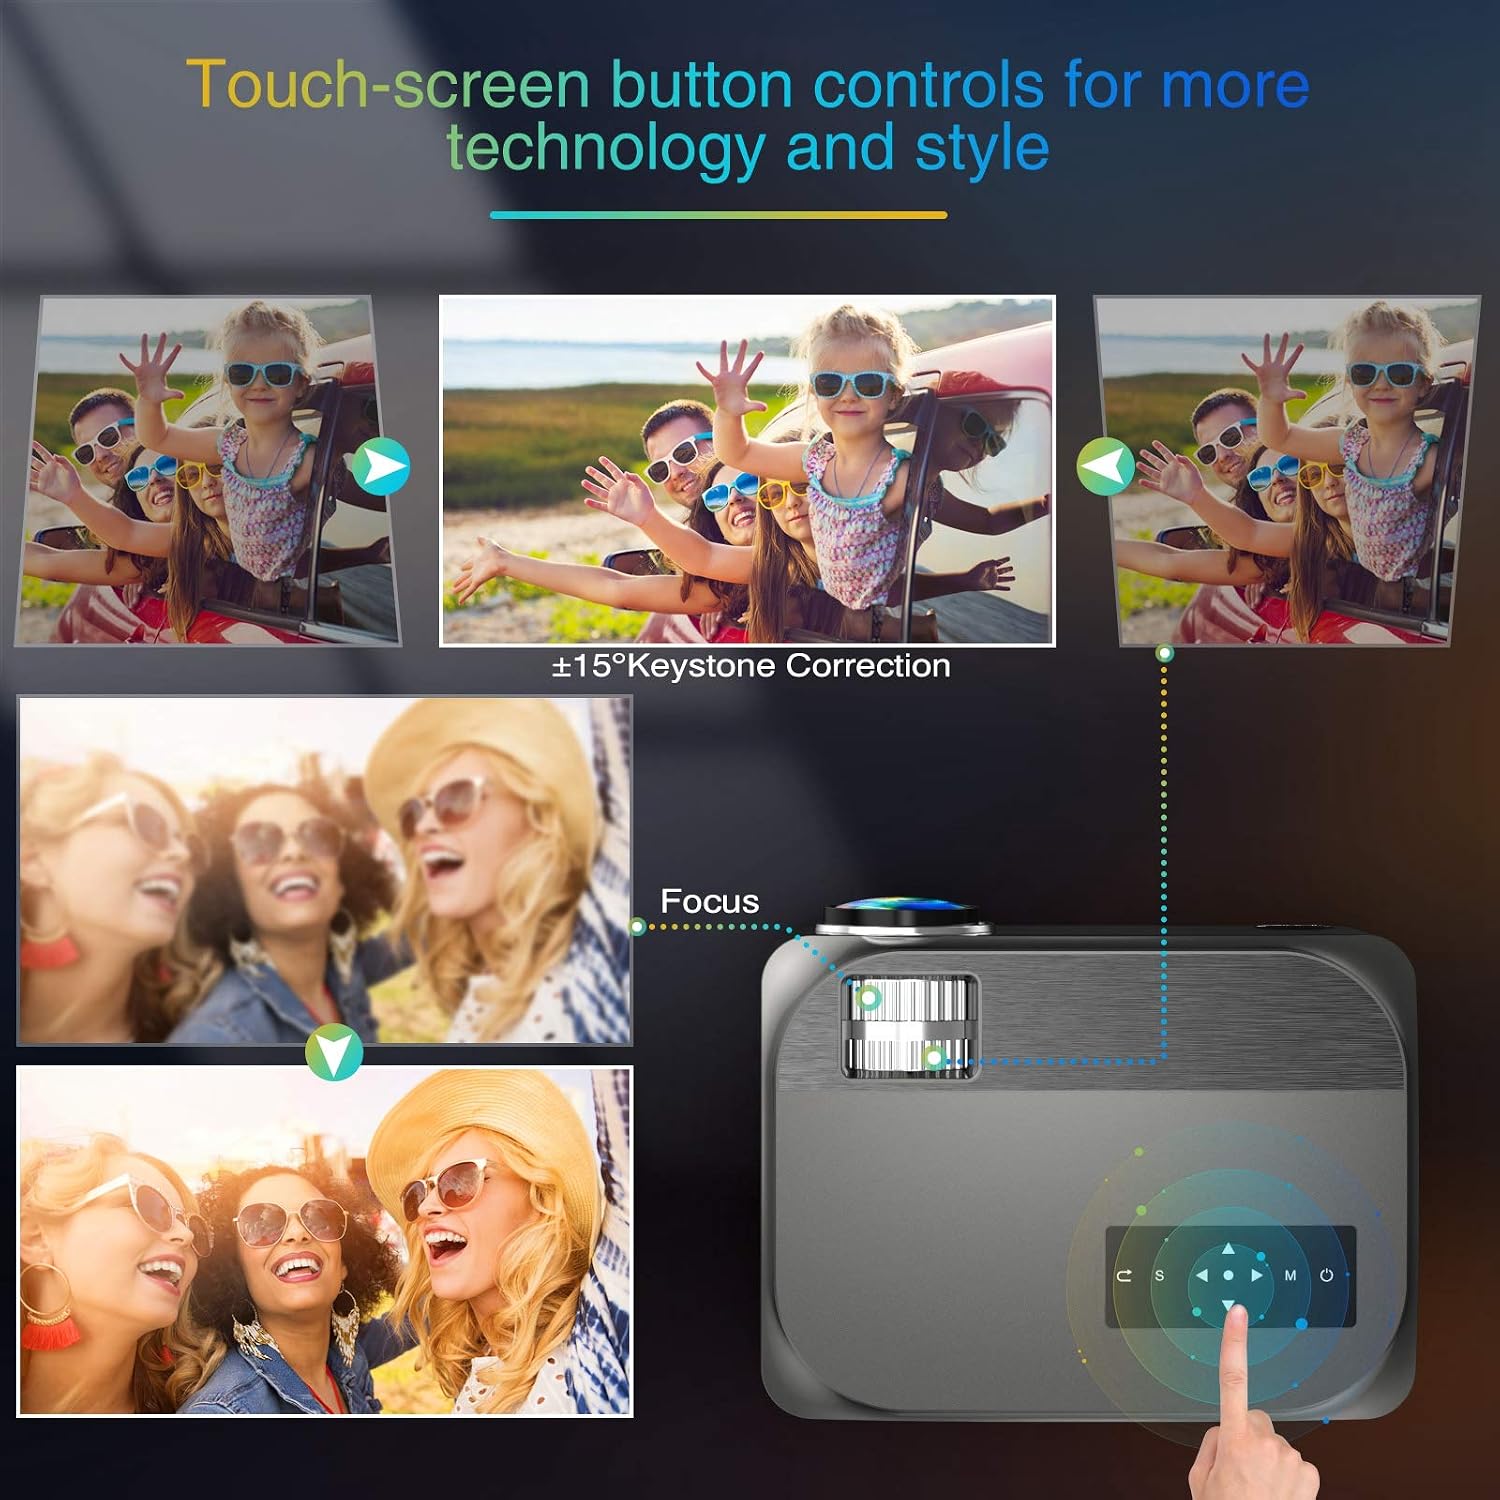
Image: Visual guide for adjusting keystone correction and focus on the VILINICE BL89 projector.
6.3 Zoom Function
The projector features a -25% zoom function, allowing you to reduce the image size without moving the projector. This is particularly useful for ceiling-mounted installations. Use the remote control to access and adjust the zoom setting.

Image: Illustration of the projector's zoom function, showing how the image size can be reduced from 100% to 75%.
6.4 Selecting Input Source
Press the 'Source' button on the projector or remote control to cycle through available input sources (HDMI1, HDMI2, USB1, USB2, VGA, AV). Select the input corresponding to your connected device.
6.5 Audio Output
The projector has built-in 10W HiFi stereo speakers. For an enhanced audio experience, you can connect external speakers or headphones to the 3.5mm audio out (AUX) port.

Image: An overhead view showing the VILINICE BL89 projector in use, emphasizing its integrated Hi-Fi stereo sound system.
6.6 Streaming Services
Due to app copyright restrictions, direct streaming of services like Netflix, Prime Video, or Hulu is not supported via the projector's internal system. To watch content from these platforms, connect an external device such as a laptop, Amazon Fire TV Stick, Roku, or Chromecast via an HDMI port.
7. Maintenance
7.1 Cleaning the Lens
Use a soft, lint-free cloth specifically designed for optical lenses to gently wipe the projector lens. Avoid using abrasive cleaners or excessive force, which can scratch the lens.
7.2 Cleaning the Projector Body
Wipe the exterior of the projector with a soft, dry cloth. Do not use liquid or aerosol cleaners.
7.3 Ventilation
Regularly check that the ventilation openings are clear of dust and debris to ensure proper airflow and prevent overheating. The projector's ECO-mode helps extend the lamp life.
7.4 Lamp Life
The LED lamp in your VILINICE BL89 projector has an estimated operating life of up to 100,000 hours, significantly reducing the need for lamp replacement.
8. Troubleshooting
If you encounter issues with your projector, refer to the following common problems and solutions:
| Problem | Possible Cause | Solution |
|---|---|---|
| No image or blurry image | Focus not adjusted; Keystone not adjusted; Lens cap on; Incorrect input source. | Adjust the focus ring; Adjust keystone correction; Remove lens cap; Select correct input source. |
| No sound | Volume too low; Mute enabled; External audio device not connected or configured correctly; Source device volume low. | Increase projector volume; Disable mute; Check external audio connections; Increase volume on source device. |
| Remote control not working | Batteries dead or incorrectly inserted; Obstruction between remote and projector; Remote out of range. | Replace batteries; Remove obstructions; Ensure remote is within range and pointed at the IR receiver. |
| Projector overheats and shuts down | Ventilation blocked; Operating in high ambient temperature. | Ensure ventilation openings are clear; Operate in a well-ventilated area. |
| Image is distorted or discolored | Faulty cable connection; Source device issue; Projector settings. | Check and re-secure all cable connections; Test with a different source device; Reset projector display settings. |
9. Specifications
| Feature | Detail |
|---|---|
| Brand | VILINICE |
| Model Number | BL89 |
| Native Resolution | 1920 x 1080P Full HD |
| Brightness | 9000 Lux |
| Contrast Ratio | 8000:1 |
| Display Type | LCD |
| Light Source Operating Life | 100,000 Hours |
| Keystone Correction | Manual ±15° |
| Zoom Function | -25% |
| Projection Size | 44" - 300" |
| Throw Distance | 1.2 - 5 Meters (5 - 30 ft) |
| Built-in Speakers | 10W HiFi Stereo Sound |
| Connectivity Technology | HDMI, USB, VGA, AV, AUX |
| Compatible Devices | TV Box, Amazon Fire Stick TV, Chromecast, Laptop, Speakers, Playstation, Xbox, DVD player, Card reader, USB stick, Media players, iPad, iPhone, Android smartphone |
| Control Method | Remote Control, App (if applicable) |
| Color | Grey |
| Wattage | 130 Watt-hours |
10. Warranty & Support
10.1 Warranty Information
The VILINICE BL89 Projector comes with a 2-year warranty. Additionally, upon product registration, you may receive an extended 3-month return period and a 24-month promise.
10.2 Technical Support
VILINICE offers lifetime technical support for this product. If you have any questions, require assistance, or encounter issues not covered in this manual, please contact VILINICE customer service. Refer to the product packaging or the official VILINICE website for contact details (e.g., email address or support portal).