1. Product Overview
The RODOT Universal Ceiling Fan Remote Control Kit is designed to convert your existing ceiling fan into a remote-controlled unit, providing convenient control over fan speed, light, and timing functions. This 3-in-1 kit includes a remote transmitter and a receiver, offering enhanced comfort and accessibility for your home, office, hotel, or restaurant.
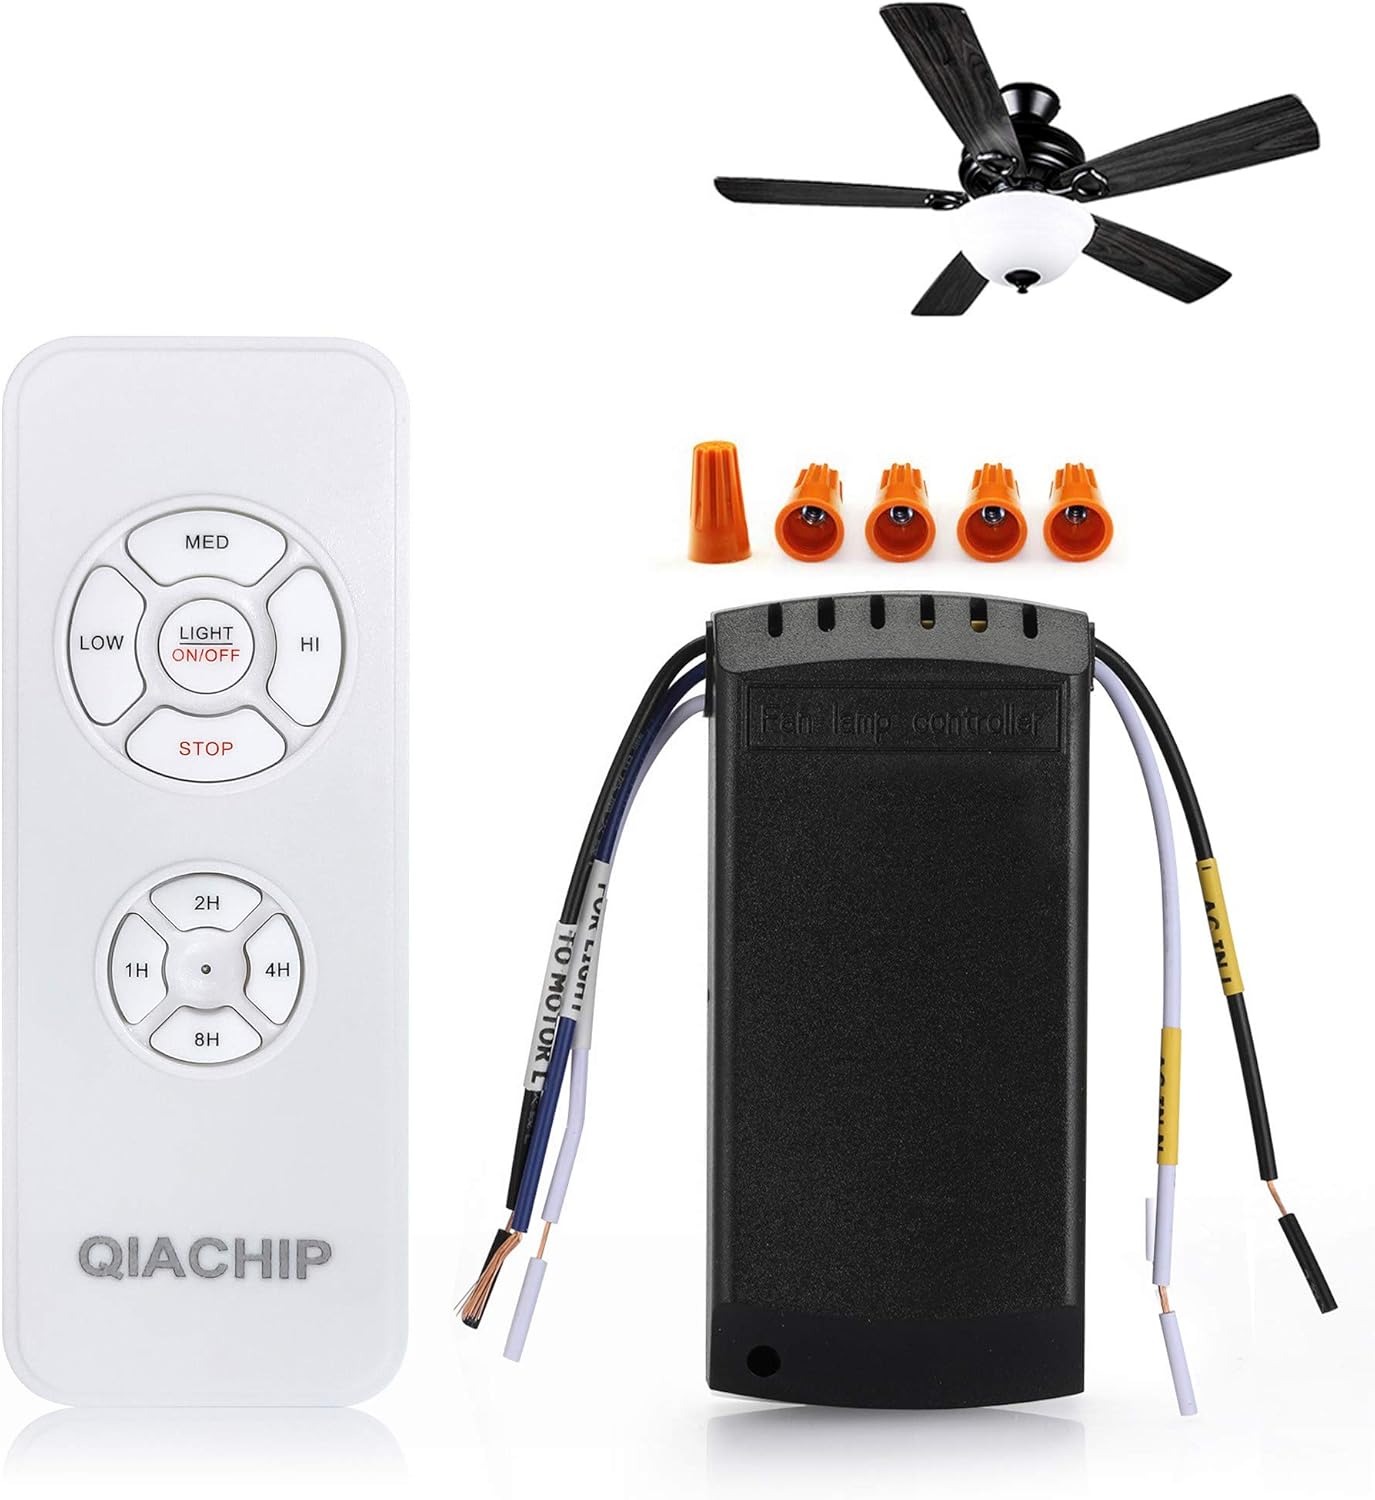
Figure 1: Components of the RODOT Universal Ceiling Fan Remote Control Kit.
2. Safety Information
- Always disconnect power at the circuit breaker before installing or servicing the receiver.
- Ensure all wiring connections are secure and comply with local electrical codes.
- Do not use this product with solid-state speed controls.
- Verify that the ceiling fan canopy can accommodate the receiver's dimensions (4.56 x 2.13 x 1.1 inches) before purchase and installation.
- If you are unsure about electrical wiring, consult a qualified electrician.
3. Package Contents
- 1 x Remote Control Transmitter
- 1 x Receiver Unit
- Wire Nuts (for installation)
- Remote Control Stand
Note: Batteries (AAA) for the remote control are not included and must be purchased separately.
4. Installation Guide
For detailed wiring instructions, please refer to the official Instructions for Use (IFU) PDF document provided by the manufacturer. A general overview of the installation process is provided below.
4.1 Pre-Installation Check
- Before starting, ensure the power to the ceiling fan is turned off at the circuit breaker.
- Measure the available space within your ceiling fan canopy to confirm the receiver (4.56 x 2.13 x 1.1 inches) will fit.
4.2 Wiring Diagram

Figure 2: Basic wiring connections for the receiver unit. Wire colors may vary in older fans.
4.3 Installation Steps
- Disconnect power to the fan at the main circuit breaker.
- Remove the existing canopy or cover to access the fan's wiring.
- Connect the receiver unit according to the wiring diagram (Figure 2). Ensure all connections are secure using the provided wire nuts.
- Carefully tuck the receiver into the fan canopy, ensuring it does not interfere with the fan's operation or wiring.
- Reattach the canopy or cover.
- Restore power at the circuit breaker.

Figure 3: Visual guide for receiver installation within the fan canopy.
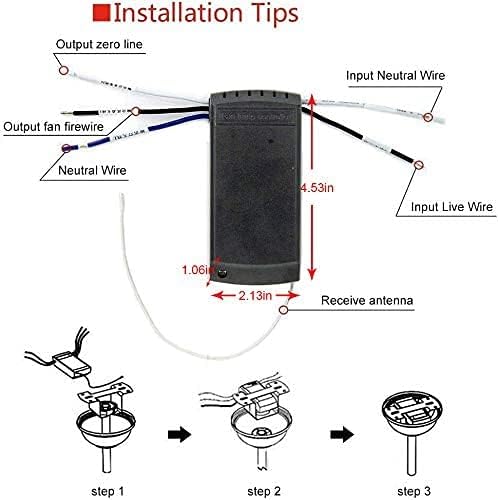
Figure 4: Receiver dimensions and wiring labels for installation planning.
4.4 Pairing the Remote Control
After installation, the remote control needs to be paired with the receiver.
- Within 15 seconds after the receiver has been connected with power, press and hold the 'Light' and 'HI' buttons together on the remote control.
- The LED indicator on the remote control will flash simultaneously until you hear 3 beep sounds from the receiver.
- The pairing process is complete.
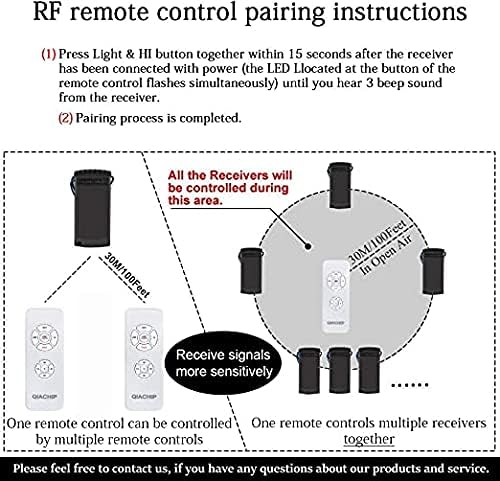
Figure 5: RF remote control pairing instructions.
4.5 Unpairing the Remote Control
To unpair a remote control from the receiver:
- Within 5 seconds of power-on, press and hold the 'STOP' and '2H' buttons together on the remote until you hear a long beep. The pairing is released.
5. Operating Instructions
The handheld remote control allows for convenient operation of your ceiling fan and light.
5.1 Remote Control Functions
- LIGHT ON/OFF: Controls the ceiling fan light, turning it on or off.
- LOW/MED/HI: Adjusts the fan speed to Low, Medium, or High.
- STOP: Turns off the fan.
- 1H/2H/4H/8H: Activates the timing-off function, setting the fan to power off automatically after 1, 2, 4, or 8 hours.

Figure 6: Enjoying the convenience of the timing-off function from bed.
5.2 Tutorial Video
Watch this official tutorial video for a visual demonstration of the remote control kit's use and functions:
Video: Tutorial on the use of the fan light remote control kit by RODOT DIY. This video demonstrates the functionality and operation of the remote control kit.
6. Maintenance
- Clean the remote control and receiver with a soft, dry cloth. Do not use abrasive cleaners or solvents.
- Replace remote control batteries when the indicator light dims or the remote's range decreases.
- Ensure the receiver is kept dry and free from dust.
7. Troubleshooting
7.1 Remote Not Responding
- Check if the batteries in the remote control are correctly inserted and not depleted. Replace if necessary.
- Ensure the receiver is receiving power.
- Re-pair the remote control with the receiver (refer to Section 4.4).
7.2 Fan or Light Not Working
- Verify all wiring connections are secure and correct.
- Check the circuit breaker to ensure power is supplied to the fan.
- Ensure the fan's pull chain (if any) is set to the 'High' speed and the light pull chain is set to 'On'.
7.3 Interference Issues
- The remote operates on a 433mHz frequency. While designed for stable signal, ensure there are no other devices operating on similar frequencies nearby that could cause interference.
8. Specifications
| Feature | Detail |
|---|---|
| Product Dimensions | 5.2 x 1.97 x 0.7 inches |
| Item Weight | 6.7 ounces |
| Receiver Dimensions | 4.56 x 2.13 x 1.1 inches |
| Brand | RODOT |
| Model Number | RF 1 SET |
| Special Feature | Universal, Handheld Remote Control, Separate Buttons for Fan and Light, Timing Off Function, Control Stand, Stable Signal Frequency |
| Max Number of Supported Devices | 1 |
| Compatible Devices | Fan |

Figure 7: Dimensions of the remote control and receiver.
9. Warranty and Support
RODOT offers a 12-month warranty for hardware-related issues with this product. For any inquiries or technical assistance, please contact RODOT customer support. Refer to your purchase documentation for specific contact details.
You can also find additional information and a downloadable PDF version of the instructions here: Instructions for Use (PDF)