1. Introduction
The RODOT Universal WiFi Ceiling Fan Light Remote Control Kit is designed to upgrade your traditional ceiling fan and light into a smart, controllable device. This kit allows for convenient control via a handheld remote, a mobile application, and voice commands through smart home assistants like Amazon Alexa and Google Home.
It is compatible with most three-speed motor ceiling fans and lights, offering enhanced functionality including fan speed control, light on/off, and timing features.

Image: Overview of the RODOT Universal WiFi Ceiling Fan Light Remote Control Kit, showing the remote, receiver, and a smartphone displaying the control app, alongside a ceiling fan.
2. Package Contents
- 1 x Remote Control Transmitter
- 1 x Receiver Unit
- Wire Nuts (for installation)
- Instruction Manual

Image: Detailed dimensions of the remote control (1.96 x 5.15 x 0.78 inches) and the receiver unit (2.12 x 4.56 x 1.1 inches).
3. Specifications
| Feature | Detail |
|---|---|
| Model Number | RODOT Alpha |
| Receiver Dimensions | 4.56 x 2.13 x 1.1 inches |
| Item Weight | 7.8 ounces |
| Remote Frequency | 433mHz |
| Operating Frequency | 50-60Hz |
| Fan Speeds | 3 Levels (1/2/3) |
| Timing Settings | 1H/2H/4H/8H |
| Remote Battery | 2 x AAA batteries (not included) |
| Connectivity | Wi-Fi (2.4Ghz only), RF |
| Voice Control Compatibility | Amazon Alexa, Google Assistant, IFTTT |
| App Support | Smart Life App (iOS & Android) |
4. Safety Information
- Always turn off power at the circuit breaker before installation or maintenance.
- Ensure all wiring connections are secure and properly insulated.
- Do not exceed the maximum electrical ratings of the device.
- Consult a qualified electrician if you are unsure about any part of the installation process.
- Keep the remote control and receiver away from water and excessive heat.
5. Installation
This kit is designed to replace the traditional driver of your non-smart LED ceiling fan. The receiver unit must be installed within the canopy of the ceiling fan.
5.1 Wiring Diagram

Image: Wiring diagram showing connections from main power to the receiver (White: AC Neutral Line, Black: AC Live Line) and from the receiver to the fan (Black: Live Line to FAN, Blue: Live Line to LIGHT).
5.2 Step-by-Step Installation
- Disconnect Power: Before starting, ensure the power to the ceiling fan is turned off at the main circuit breaker.
- Access Wiring: Remove the canopy cover of your ceiling fan to expose the wiring.
- Connect Receiver: Follow the wiring diagram carefully. Connect the receiver's wires to the corresponding fan and power supply wires using the provided wire nuts. Ensure secure connections.
- Position Receiver: Carefully tuck the receiver unit into the fan canopy. Ensure it fits without pinching wires.
- Secure Canopy: Reattach the canopy cover to the ceiling fan.
- Restore Power: Turn the power back on at the circuit breaker.
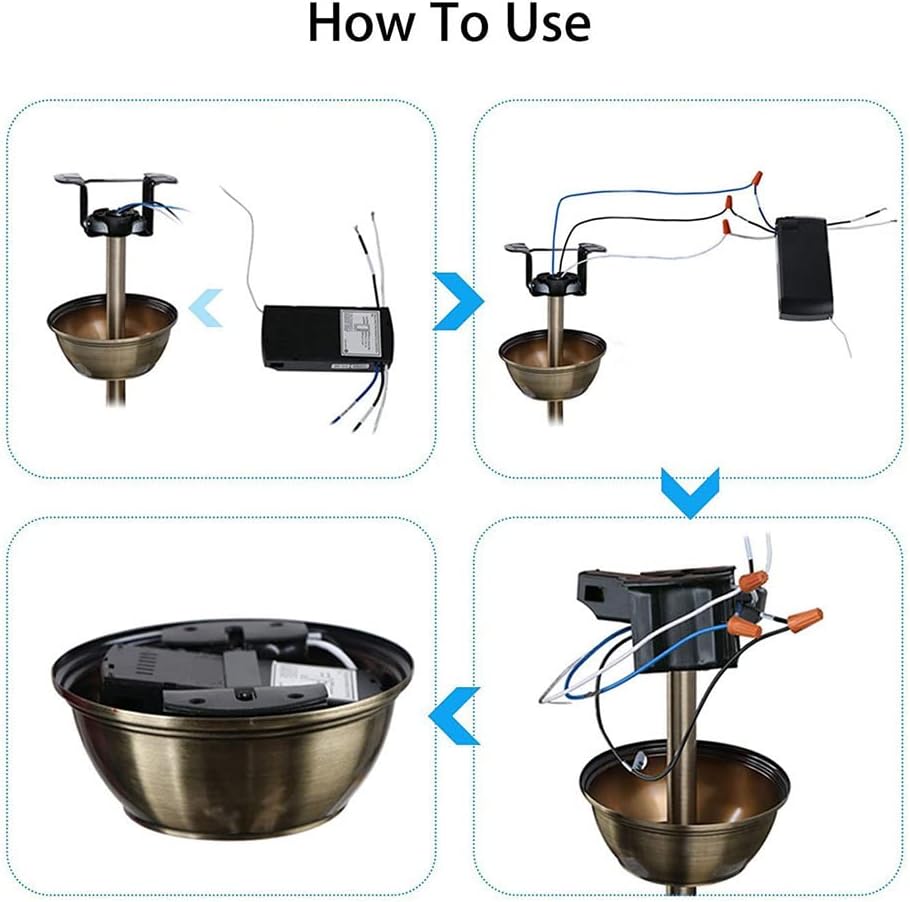
Image: Visual guide illustrating the installation process: 1) Opening the fan canopy, 2) Connecting the receiver, 3) Placing the receiver inside, and 4) Closing the canopy.
Video: A tutorial demonstrating the physical installation and basic use of the fan light remote control kit, including wiring and initial testing.
6. Setup and Pairing
6.1 Remote Control Pairing
- Ensure the receiver is powered on.
- Within 5 seconds of power-on, press and hold the 'LIGHT' + 'HI' buttons on the remote control until you hear a beep. This indicates successful pairing.
6.2 Smart Life App Setup
- Download App: Download and open the 'Smart Life' mobile application from your device's app store.
- Register/Login: Register a new account or log in to an existing one.
- Add Device: Tap 'Add Device' or the '+' icon in the app. Select 'Fan' or 'Ceiling Fan Light' from the electrical category.
- Connect to 2.4GHz Wi-Fi: Ensure your mobile phone is connected to a 2.4GHz Wi-Fi network. The device does not support 5GHz or 5.8GHz networks. Enter your Wi-Fi network name and password in the app.
- Reset Device for Pairing: Turn on the power to the fan light receiver. After 10 seconds, press and hold the 'LIGHT' and 'HI' buttons on the remote control simultaneously until you hear 3 LONG 'BE-EP' sounds from the receiver. If you hear 3 SHORT 'BEEP' sounds, release and press again until you hear the long beeps.
- Confirm Indicator Blinking: In the app, confirm that the indicator on the receiver is blinking rapidly.
- Start Connection: Tap 'Next' in the app to begin the connection process. The app will scan for and add the device.
- Device Added: Once successfully added, you can rename the device in the app.

Image: Smart Life App interface showing initial steps for adding a device, including Wi-Fi settings and device selection.

Image: Smart Life App interface for entering 2.4GHz Wi-Fi network name and password, with a note about 5GHz incompatibility.

Image: Smart Life App interface showing the device reset prompt, device adding progress, and successful device addition.
Video: A detailed demonstration of setting up the WiFi Fan Light Remote Control Kit with the Smart Life App, including Wi-Fi connection and device pairing.
7. Operating Instructions
7.1 Handheld Remote Control

Image: Diagram of the remote control with labels for Fan Speed (LOW, MED, HI), Light On/Off, Fan Off (STOP), and Timing Off (1H, 2H, 4H, 8H).
- Light On/Off: Press the 'LIGHT ON/OFF' button to toggle the light.
- Fan Speed: Use 'LOW', 'MED', 'HI' buttons to adjust fan speed.
- Fan Off: Press 'STOP' to turn off the fan.
- Timing Off: Select 1H, 2H, 4H, or 8H to set a timer for the fan to turn off automatically.
7.2 Smart Life App Control
Once the device is added to the Smart Life App, you can control it from your smartphone.
- Light Control: Tap the light icon to turn the light on or off.
- Fan Speed Control: Adjust the slider or select predefined levels (e.g., Level 1, 2, 3) to change fan speed.
- Timing/Scheduling: Use the app's scheduling features to set specific times for the fan or light to turn on/off, or to activate the countdown timer.
- Mute Function: The 'Smart Life' APP can be used to implement the mute function for the device.
7.3 Voice Control (Alexa/Google Home)
After linking your Smart Life account with Amazon Alexa or Google Home, you can use voice commands.
- Enable Skill: In the Alexa or Google Home app, search for and enable the 'Smart Life' skill.
- Link Account: Link your Smart Life account using your credentials.
- Discover Devices: Discover new devices in the smart home app.
- Common Commands:
- "Alexa, turn on the bedroom light."
- "Hey Google, turn off the fan."
- "Alexa, set the fan speed to medium."
8. Troubleshooting
- Remote not responding: Check battery in remote. Ensure receiver is powered. Re-pair the remote control (see Section 6.1).
- Wi-Fi connection issues: Ensure your Wi-Fi network is 2.4GHz. Check Wi-Fi signal strength near the receiver. Re-attempt app pairing process.
- Voice control not working: Verify Smart Life skill is enabled and linked in Alexa/Google Home app. Ensure device name is easily recognizable. Check internet connection.
- Fan/Light not working after installation: Double-check all wiring connections according to the diagram. Ensure power is restored at the circuit breaker.
- Receiver size: Note that the receiver size is 4.56 x 2.13 x 1.1 inches. Ensure your fan canopy has sufficient space.
9. Maintenance
The RODOT Ceiling Fan Light Remote Control Kit requires minimal maintenance.
- Periodically check the remote control batteries and replace them when needed.
- Keep the remote control clean and free from dust.
- Ensure the receiver unit remains dry and free from moisture.
10. Warranty and Support
RODOT offers a 12-month warranty for hardware-related issues. For any problems encountered during product use, please contact customer support. Support is available 24/7 via email.
For further assistance, please visit the RODOT Store on Amazon.