1. Important Safety Instructions
Please read all instructions carefully before using your new induction cooktop. Retain this manual for future reference.
General Safety
- Electrical Safety: Ensure the cooktop is connected to a properly grounded 220-240V, 50/60Hz power supply with a dedicated 50A circuit breaker. Installation must be performed by a qualified electrician in accordance with local electrical codes.
- Heat Warning: The cooktop surface will be hot during and after use. Avoid touching hot surfaces. Use pot holders or oven mitts.
- Child Safety Lock: Utilize the child lock function to prevent unintended activation by children.
- Overheating Protection: The cooktop is equipped with an overheating protection system that will automatically shut off if excessive temperatures are detected.
- Proper Cookware: Only use induction-compatible cookware (magnetic base). Non-compatible cookware will not heat.
- Ventilation: Ensure adequate ventilation around the cooktop during installation and operation.
- Liquid Spills: In case of liquid spills on the control panel, wipe immediately to prevent unintended operation or damage.
2. Product Overview
The singlehomie 36 Inch Induction Cooktop IXFD905 offers efficient and precise cooking with its advanced features and sleek design.
Key Features:
- Flexible BBQ Function: Two independent sensors can combine to form one large cooking zone for larger pots or grilling.
- Powerful Cooking Zones: Five cooking zones with a total power of 9000W. Includes a center cross burner (3000W) and flexible double burners (up to 2800W/2000W).
- Easy Digital Sensor Touch Control: Intuitive touch controls for each cooking zone with 9 power levels and a 99-minute timer.
- Easy to Clean: Smooth glass surface allows for simple wiping after use.
- Multiple Protection Features: Includes overheating protection, auto shut-off, and child lock for enhanced safety.
Control Panel Introduction
Familiarize yourself with the cooktop's touch controls for optimal use.
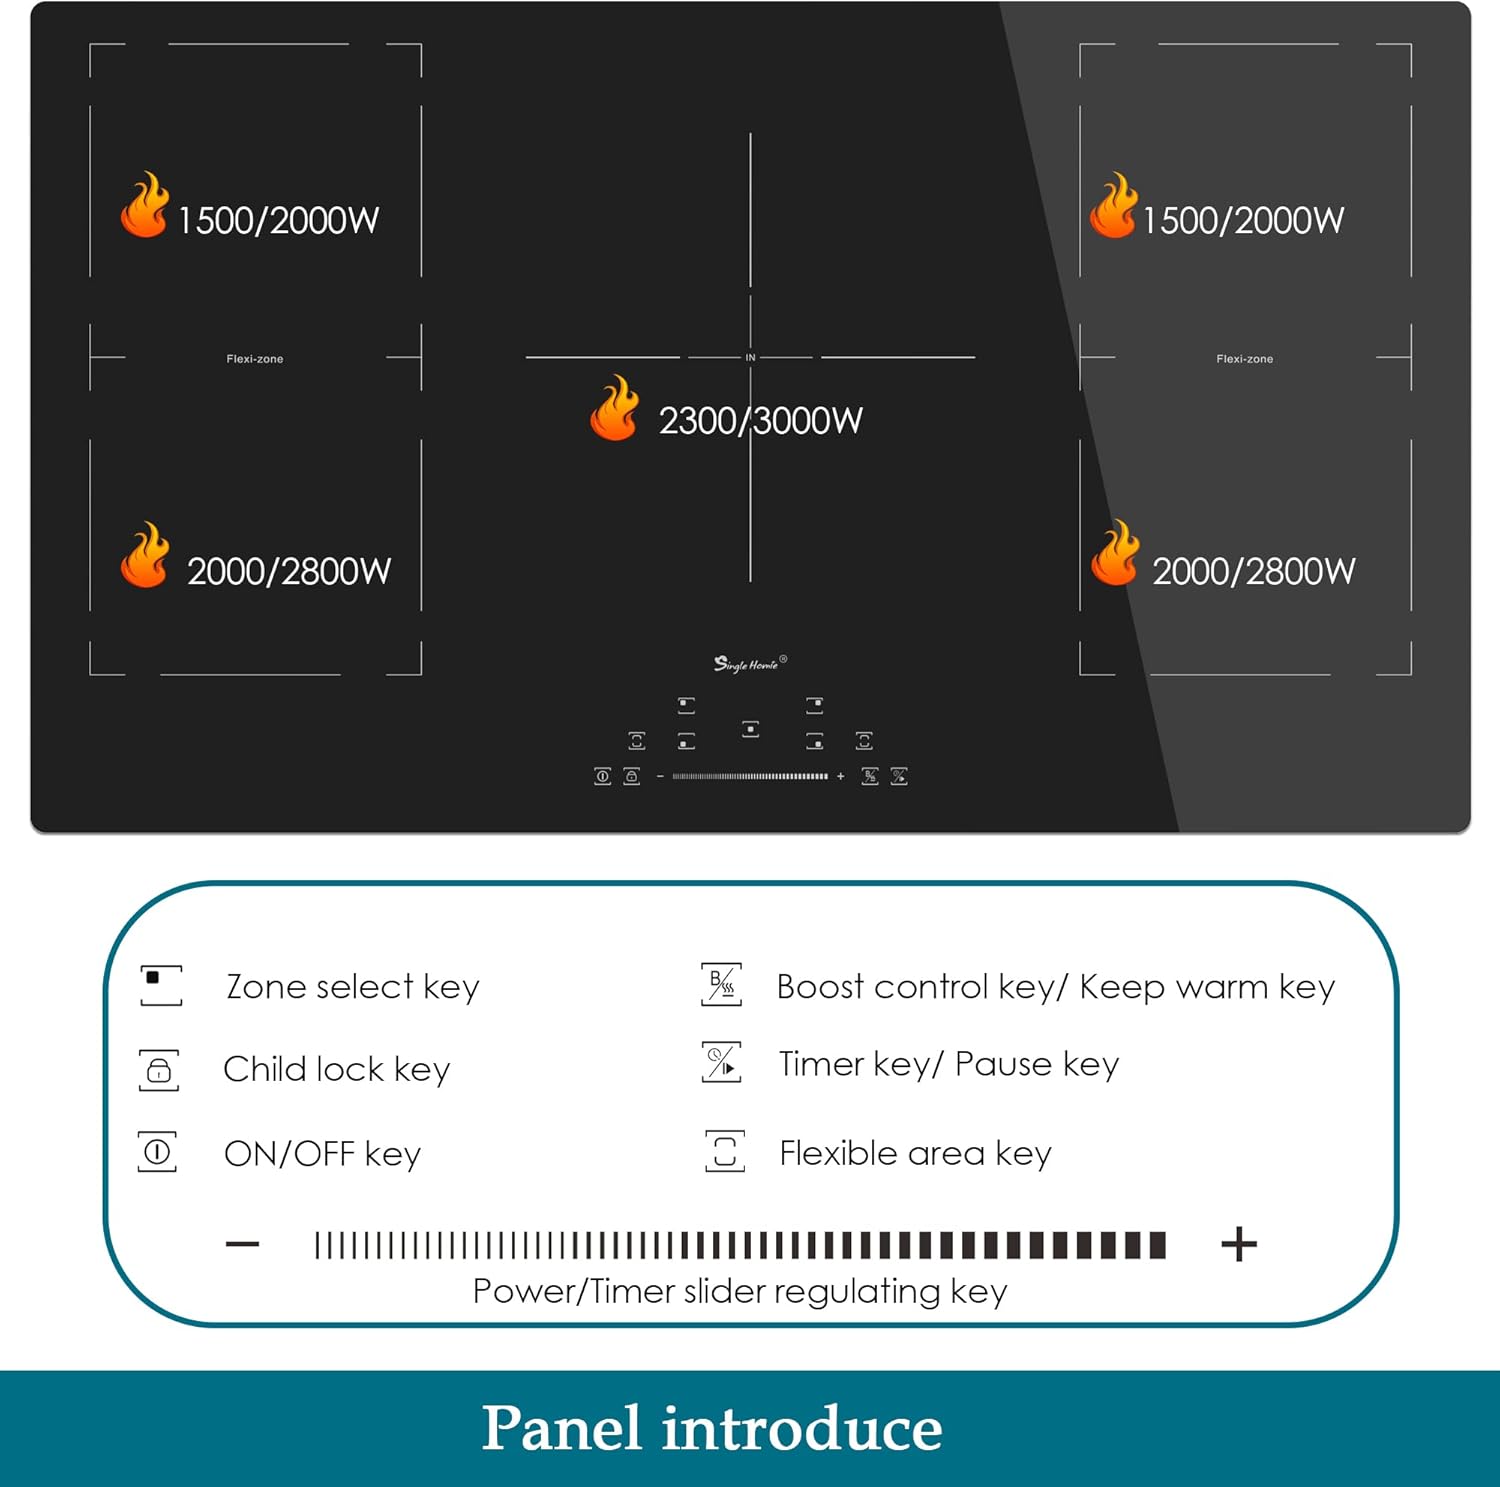
Image: Overview of the singlehomie induction cooktop control panel, showing buttons for zone select, child lock, ON/OFF, Boost/Keep Warm, Timer/Pause, Flexible Area, and Power/Timer slider.
3. Installation
Proper installation is crucial for the safe and efficient operation of your cooktop. It is recommended that installation be performed by a qualified professional.
3.1 Unpacking
Carefully open the packaging and remove the cooktop and all accessories. Inspect for any damage. Keep packaging materials until installation is complete.
Video: Unboxing of a 36-inch induction cooktop, showing the careful removal of the appliance from its packaging and the protective film.
3.2 Required Installation Space and Cutout Dimensions
Ensure your countertop has the correct dimensions for a flush fit. The cooktop dimensions are 35.43" x 20.47" x 2.2". The recommended cutout size is 34.44" x 19.48".

Image: Diagram illustrating the overall product dimensions (35.43"D x 20.47"W x 2.2"H) and the required cutout size for installation (34.44" x 19.48").
Video: Installation guide for a similar 36-inch induction cooktop (TECASA brand), demonstrating the cutout process and mounting.
3.3 Electrical Connection
WARNING: Disconnect the appliance from the mains electricity supply before carrying out any work or maintenance on it.
The cooktop requires a 208-240 VAC, 50 Hz/60 Hz power supply. Use 4 AWG wire gauge and a 50 A fuse protection. Connect the L1 (Black) and L2 (Red) wires to the corresponding terminals, and the Green wire to the ground bar.
Video: Electrical connection steps for a similar 36-inch induction cooktop (TECASA brand), showing wiring to a junction box.
4. Operating Instructions
This section details how to use your singlehomie induction cooktop.
4.1 Turning On/Off and Selecting Heating Levels
- Place induction-compatible cookware centrally on the desired heating zone.
- Press the ON/OFF key for the specific cooking zone.
- Use the '+' or '-' buttons, or slide your finger along the power/timer slider, to select the desired heating level (1-9).
Video: Demonstration of turning on a similar induction cooktop (ThermoMate brand), selecting a cooking zone, and adjusting the power level to boil water.
4.2 Boost Function
The Boost function provides maximum power to a selected zone for rapid heating. Activate it by pressing the 'Boost control key' (B) for the desired zone. This function is ideal for boiling water quickly.

Image: A singlehomie induction cooktop showing a pot and a grill pan, highlighting the 9 power settings and Boost function for varied cooking needs.
4.3 Flexible Zones
The cooktop features flexible zones that can be combined to create a larger cooking area. This is useful for oversized cookware like grill pans or griddles.

Image: Diagram illustrating the flexible hob feature of the singlehomie induction cooktop, allowing two zones to combine into one large cooking area for items like a grill pan with steak.
4.4 Timer Function
Each cooking zone has an independent timer, adjustable up to 99 minutes. Press the 'Timer key' to set the desired cooking duration. The zone will automatically switch off once the timer expires.
Video: Overview of a similar electric cooktop (OmniEase brand) highlighting features like 9-level precise control, smart touch slider, and 99-minute timer.
4.5 Child Safety Lock
To activate the child lock, press the 'Child lock key'. This will disable the control panel, preventing accidental changes to settings or activation of cooking zones. Press again to unlock.
Video: Overview of a similar electric cooktop (OmniEase brand) demonstrating the child lock function for safety.
4.6 Compatible Cookware
Induction cooktops require cookware with a magnetic base. Test your cookware by placing a magnet on the bottom; if it sticks, it's compatible.

Image: Visual guide to induction-compatible cookware (Iron pot, Stainless steel pot, Composite bottom pot, Enameled iron) and non-compatible types (Glass pot, Aluminum pot, Copper pot, Ceramic cookware).
5. Maintenance and Cleaning
Regular cleaning and maintenance will ensure the longevity and optimal performance of your cooktop.
5.1 Cleaning the Cooktop Surface
- Always ensure the cooktop is cool to the touch and the residual heat indicator is off before cleaning.
- Wipe the glass surface with a soft cloth and mild detergent. Avoid abrasive cleaners, scouring pads, or harsh chemicals.
- For stubborn stains, use a ceramic cooktop cleaner and a non-abrasive pad.
- Wipe up spills immediately, especially sugary liquids, to prevent them from hardening and damaging the surface.
Video: Overview of a similar electric cooktop (OmniEase brand) demonstrating the easy-to-clean sleek crystal glass surface.
6. Troubleshooting
If you encounter issues with your cooktop, refer to the following common problems and solutions before contacting customer service.
| Problem | Possible Cause | Solution |
|---|---|---|
| Cooktop does not turn on. | No power supply; Child lock activated. | Check circuit breaker; Deactivate child lock. |
| Heating zone not heating. | Non-compatible cookware; Cookware not centered. | Use induction-compatible cookware; Center cookware on zone. |
| Display shows 'E' or error code. | Internal fault; Overheating. | Turn off and restart; Allow cooktop to cool down. If error persists, contact support. |
| Controls unresponsive after liquid spill. | Liquid on control panel. | Wipe the control panel thoroughly with a dry cloth. |
7. Specifications
| Feature | Detail |
|---|---|
| Brand | singlehomie |
| Model Info | IXFD905 |
| Item Weight | 33 pounds |
| Product Dimensions | 35.43 x 20.47 x 2.2 inches |
| Installation Type | Built-In |
| Special Features | Auto Safety Switch Off, Child Lock, Pot detector, Residual Heat Indicator, Timer |
| Burner Type | Induction |
| Heating Elements | 5 |
| Color | Black |
| Voltage | 240 Volts |
| Wattage | 9000 watts |
| Fuel Type | Electric |
| Material Type | Glass |
| Heater Surface Material | Glass Ceramic |
8. Warranty and Support
singlehomie is committed to providing quality products. If your product has manufacturing defects, it may be eligible for replacement or a full refund. Please contact customer support for assistance.
Customer support typically responds within 24 hours to address any questions or concerns.