1. Introduction
The Inrico TM-9 is an advanced 4G LTE PoC (Push-to-Talk over Cellular) mobile radio designed for reliable communication. It features an Android operating system, a touch screen, and various connectivity options, making it suitable for a wide range of professional and amateur applications.

Figure 1: Inrico TM-9 Mobile Radio with Palm Microphone
Key Features:
- Zello Network Radio over 4G, 3G, WiFi, GPS, SOS capabilities.
- Crystal Clear Voice with a runway-shaped speaker for balanced audio.
- 4-inch OLED Touch Screen for easy information reading and navigation.
- RSM (Remote Speaker Microphone) Interface compatible with Motorola Solutions' accessories.
- DB25 Port design for external connectivity, supporting external cameras and speakers.
- Android 7.0 operating system.
- Works on 12V and 24V power systems.
- High-sensitive antenna for reliable signal reception.

Figure 2: Overview of TM-9 features including 4G LTE, Android 7.0, GPS, Bluetooth, WiFi, and dual SIM card support.
2. Package Contents
Verify that all items listed below are included in your package:
- 1 x Inrico TM-9 Mobile Radio
- 1 x Palm Microphone
- 1 x Mounting Bracket
- 1 x Power Cable
- 1 x GPS Antenna
- 1 x 2G/3G/4G LTE Cellular Antenna
- 1 x User Manual (this document)
- Bluetooth, GPS, NFC, Camera (integrated components)

Figure 3: Standard accessories included with the TM-9 mobile radio.
3. Setup
3.1 Component Identification
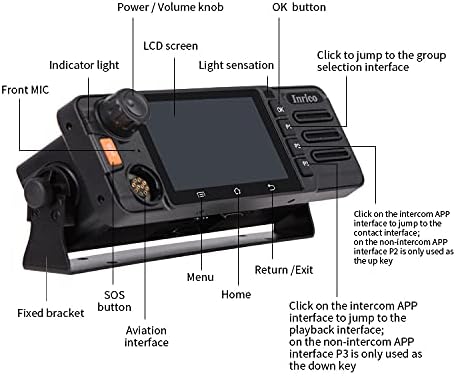
Figure 4: Front Panel Overview
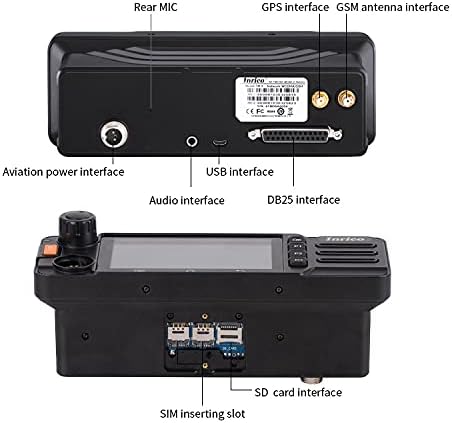
Figure 5: Rear Panel Overview
3.2 Antenna Installation
Connect the provided GPS antenna and 2G/3G/4G LTE Cellular antenna to their respective ports on the rear of the radio. Ensure connections are secure but do not overtighten.
3.3 Power Connection
Connect the power cable to the Aviation power interface on the rear of the unit. The TM-9 supports both 12V and 24V power systems. Ensure the power source matches the radio's requirements.
3.4 Palm Microphone Connection
Connect the palm microphone to the Aviation interface on the front left side of the radio. This interface is designed for secure and reliable connection of the microphone.

Figure 6: Connecting the Palm Microphone
3.5 SIM Card and SD Card Installation
Locate the SIM inserting slots and SD card interface on the bottom of the unit (refer to Figure 5). Insert your 4G LTE SIM cards and an optional SD card for additional storage as needed. Ensure proper orientation for SIM cards.
3.6 External Device Connection (Optional)
The DB25 port on the rear of the radio allows for connection of external accessories such as an external camera or speaker. Refer to the accessory's manual for specific connection instructions.

Figure 7: DB25 Port for External Devices
4. Operating Instructions
4.1 Power On/Off and Volume Control
To power on the device, rotate the Power/Volume knob (refer to Figure 4) clockwise until the screen illuminates. To power off, rotate counter-clockwise until the device shuts down. Adjust volume by rotating the same knob.
4.2 Touch Screen Navigation
The 4-inch OLED touch screen allows for intuitive navigation through the Android interface. Tap icons to open applications, swipe to navigate menus, and use the on-screen navigation buttons (Home, Return/Exit, Menu) as needed.
4.3 Push-to-Talk (PTT) Communication
The Inrico TM-9 supports Zello and other PoC applications for group and private communication. To transmit, press and hold the PTT button on the palm microphone. Speak clearly into the microphone. Release the PTT button to listen for replies. The screen will indicate when you are transmitting or receiving voice.
Video 1: Demonstration of the Inrico TM-9 PoC radio, showcasing its features and operation, including voice transmission and reception.
4.4 SOS Emergency Function
Press the dedicated SOS button (refer to Figure 4) to activate the emergency call function. This will typically send an alert to pre-configured contacts or dispatch centers, depending on your network and application settings.
4.5 Noise Reduction
The TM-9 features advanced noise reduction technology to ensure clear audio transmission and reception, even in noisy environments. This enhances communication clarity for all users.
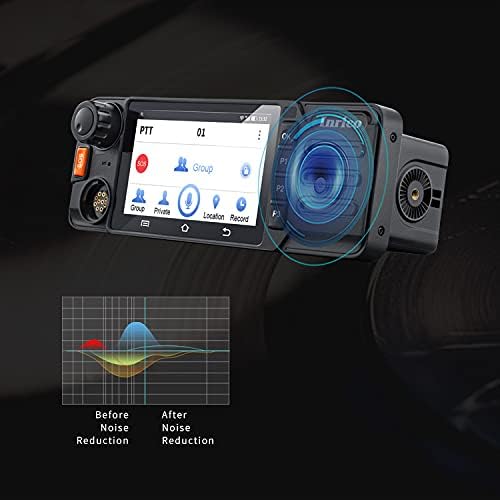
Figure 8: Noise Reduction Capability
5. Maintenance
To ensure the longevity and optimal performance of your Inrico TM-9 mobile radio, follow these maintenance guidelines:
- Keep the device clean by wiping it with a soft, dry cloth. Avoid abrasive cleaners or solvents.
- Ensure all ports and connectors are free from dust and debris.
- Do not expose the device to extreme temperatures, direct sunlight for prolonged periods, or excessive moisture. While water resistant, it is not fully waterproof.
- Regularly check antenna connections for tightness.
- Perform software updates as recommended by the manufacturer to ensure optimal performance and security.
6. Troubleshooting
If you encounter issues with your Inrico TM-9, refer to the following common troubleshooting steps:
| Problem | Possible Cause | Solution |
|---|---|---|
| Device does not power on. | No power, loose power cable, faulty power source. | Check power cable connection. Ensure power source (12V/24V) is active and correct. |
| No network connection. | No SIM card, incorrect SIM card installation, out of network coverage, faulty antenna. | Ensure SIM card is correctly inserted and active. Move to an area with better network coverage. Check cellular antenna connection. |
| Cannot transmit or receive voice. | Palm microphone not connected, PTT application not running, network issue. | Verify palm microphone is securely connected. Ensure the PTT application (e.g., Zello) is open and logged in. Check network connection. |
| Touch screen unresponsive. | Software glitch, screen damage. | Restart the device. If the problem persists, contact customer support. |
7. Specifications
| Feature | Detail |
|---|---|
| Model Number | TM 9 |
| Operating System | Android 7.0 |
| Screen | 4-inch OLED Touch Screen |
| Network Support | GSM, 3G, 4G/LTE, WiFi |
| Power Input | 12V / 24V |
| Speaker | Bass Stereo Speaker |
| Interfaces | Aviation Interface (for mic), DB25 Port, USB Interface, Audio Interface, GPS Interface, GSM Antenna Interface, SIM Inserting Slots, SD Card Interface |
| Special Features | SOS Emergency Call, GPS, Bluetooth, NFC, Camera (optional external) |
| Item Weight | 1.1 pounds (approx. 0.5 kg) |
| Product Dimensions | 7.09 x 3.94 x 3.54 inches |
| Water Resistance Level | Water Resistant |
| Manufacturer | G GENEINNO |
| Country of Origin | China |
8. Warranty and Support
For warranty information and technical support, please contact G GENEINNO directly through their official channels or the retailer from whom you purchased the product. Keep your purchase receipt as proof of purchase for warranty claims.
For additional resources and product updates, visit the official G GENEINNO store: G GENEINNO Amazon Store


