1. Important Safety Information
Read all instructions before using this appliance to reduce the risk of fire, electric shock, or injury. Keep this manual for future reference.
- Ensure the appliance is properly grounded.
- Do not operate with a damaged power cord or plug.
- Keep ventilation openings clear of obstruction.
- Do not use mechanical devices or other means to accelerate the defrosting process.
- Do not damage the refrigerant circuit.
- Do not store explosive substances such as aerosol cans with a flammable propellant in this appliance.
- This appliance is not intended for use by persons (including children) with reduced physical, sensory or mental capabilities, or lack of experience and knowledge, unless they have been given supervision or instruction concerning use of the appliance by a person responsible for their safety.
2. Product Overview
The Velieta 24-inch Dual Zone Wine and Beverage Refrigerator is designed to store both wine and various beverages at their optimal temperatures. It features two independent cooling zones, a powerful compressor, and an advanced fan system for stable and consistent cooling.

Image: The refrigerator's interior, illustrating the distinct beverage zone (left) and wine zone (right) with their respective temperature displays and blue LED lighting.

Image: A diagram illustrating the dual temperature zones: the left zone for beverages (35-50°F / 118 Cans) and the right zone for wine (41-64°F / 29 Bottles).
3. Setup and Installation
3.1 Unpacking
- Remove all packaging materials, including the foam base and adhesive tape.
- Inspect the appliance for any damage. Report any damage to the retailer immediately.
- Clean the interior and exterior of the appliance with a soft cloth and mild detergent before use.
3.2 Placement
This refrigerator can be installed as a built-in unit under a counter or as a freestanding appliance.
- Freestanding Installation: Allow at least 2 inches (5 cm) of space at the back and sides for proper air circulation.
- Built-in Installation: Ensure adequate ventilation around the unit. The front ventilation design allows for under-counter installation. Refer to the dimensions diagram for precise cutout requirements.
- Place the appliance on a flat, solid surface strong enough to support it when fully loaded.
- Avoid direct sunlight or heat sources.

Image: Illustration of the refrigerator's versatility, demonstrating both built-in under-counter and freestanding placement options.
3.3 Leveling
Adjust the leveling legs at the bottom of the appliance to ensure it is stable and level. This is crucial for proper door sealing and efficient operation.
3.4 Electrical Connection
- Connect the appliance to a dedicated, grounded 115V AC, 60Hz electrical outlet.
- Do not use extension cords or ungrounded adapters.
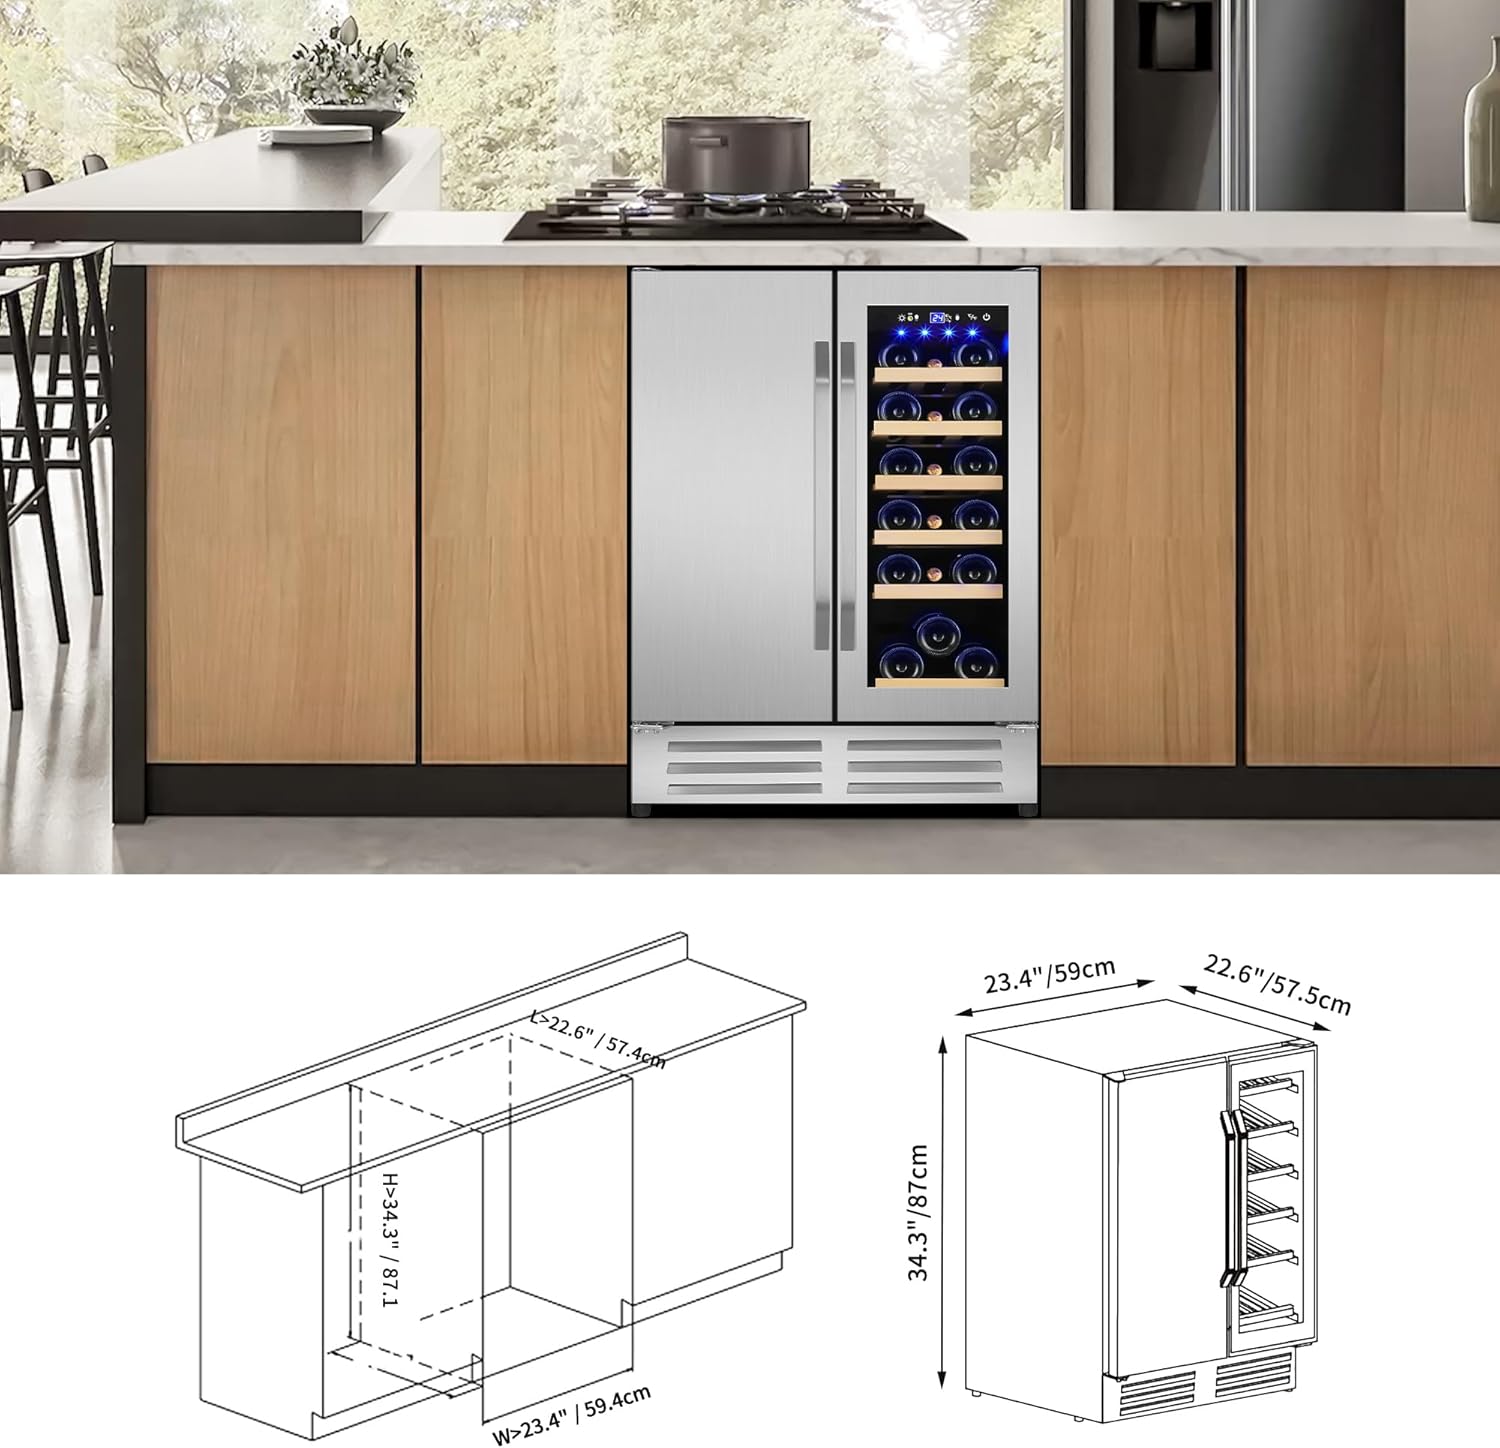
Image: Detailed dimensional drawings for the refrigerator, including depth, width, and height, along with a diagram for built-in installation under a counter.
4. Operating Instructions
4.1 Control Panel
The refrigerator features an LCD touch control panel located at the top of the interior for easy temperature adjustment and lighting control.

Image: A close-up view of the digital touch control panel, showing buttons for light, temperature up/down, Fahrenheit/Celsius switch, and power, along with the display window.
- Power Button: Press to turn the unit on or off.
- Temperature Up/Down: Use the ▲ and ▼ buttons to adjust the desired temperature for each zone.
- Lighting Button: Press to turn the interior blue LED ambient light on or off.
- Fahrenheit/Celsius Switch: Toggle between ℉ and ℃ display.
4.2 Temperature Settings
- Beverage Zone (Left): Adjustable from 35℉ to 50℉ (1.7℃ to 10℃).
- Wine Zone (Right): Adjustable from 41℉ to 64℉ (5℃ to 17.8℃).
- Allow the refrigerator to reach the set temperature before loading items.
4.3 Loading Capacity
This model can hold up to 20 standard Bordeaux bottles and 88 standard 12oz/330ml cans. The wooden shelves are designed for wine bottles, and wire shelves are for beverages. Shelves are removable to accommodate larger items if needed.
5. Maintenance
5.1 Cleaning
- Interior: Unplug the unit. Wash the interior surfaces with a solution of warm water and baking soda (2 tablespoons of baking soda to 1 quart of water). Rinse and dry thoroughly.
- Exterior: Clean the exterior with a mild detergent and warm water. Wipe dry with a soft cloth. For stainless steel surfaces, use a stainless steel cleaner.
- Door Gaskets: Clean door gaskets regularly to ensure a proper seal.
5.2 Defrosting
This appliance features a frost-free defrost system, which minimizes ice buildup. Manual defrosting is generally not required. If excessive frost accumulates, unplug the unit and allow it to defrost naturally, then wipe away any moisture.
5.3 Shelf Care
The wooden and wire shelves can be removed for cleaning. Wash with mild soap and water, then dry completely before returning them to the unit.
6. Troubleshooting
Before contacting support, review the following common issues and solutions:
| Problem | Possible Cause | Solution |
|---|---|---|
| Appliance does not operate. | No power; circuit breaker tripped. | Check power connection; reset circuit breaker. |
| Temperature is not cold enough. | Door not closed properly; excessive door openings; unit overloaded; poor ventilation; temperature setting too high. | Ensure door is sealed; reduce door openings; do not overload; ensure proper clearance; adjust temperature setting lower. |
| Excessive noise. | Unit not level; items vibrating inside; fan obstruction. | Adjust leveling legs; rearrange items; check for fan obstruction. |
| Light not working. | Light switch off; LED failure. | Press the light button on the control panel; contact support if issue persists. |
7. Specifications
| Feature | Detail |
|---|---|
| Model Name | KMYL120-2 |
| Product Dimensions (D x W x H) | 22.6" x 23.4" x 34.2" |
| Capacity | 4.24 Cubic Feet (approx. 20 bottles & 88 cans) |
| Beverage Zone Temperature Range | 35℉-50℉ (1.7℃-10℃) |
| Wine Zone Temperature Range | 41℉-64℉ (5℃-17.8℃) |
| Installation Type | Undercounter/Freestanding |
| Defrost System | Frost Free |
| Voltage | 115 Volts (AC) |
| Annual Energy Consumption | 162.2 Kilowatt Hours Per Year |
| Shelf Type | Wire and Wood |
| Number of Doors | 2 |
| Cooling Method | Compressor |
| Special Features | Digital Temperature Control, Front Ventilation, LED Display, Low Noise |
8. Warranty Information
This Velieta appliance comes with a 1-year limited warranty from the date of purchase. This warranty covers manufacturing defects in materials and workmanship under normal use. Please retain your proof of purchase for warranty claims. The warranty does not cover damage resulting from misuse, accident, alteration, neglect, or improper installation.
9. Customer Support
For any questions, assistance, or troubleshooting not covered in this manual, please contact Velieta customer support:
- Support Email: support@velieta.com
- Support Phone: (213) 432-5433

Image: Various scenarios depicting the Velieta refrigerator in use, from home entertainment to professional settings, highlighting its versatility.