1. Setup and Installation
This ARCORA bathroom faucet is designed for 3-hole, 4-inch centerset configurations. Ensure your sink is compatible before beginning installation.
Included Components:
- Bathroom Faucet
- Drain Assembly and Supply Hoses
- Installation Instruction (this manual)
- A pair of gloves
- Installation Accessories (Teflon tape, wrench, lock nuts, gaskets)

Figure 1: All components included with the ARCORA 4-inch centerset bathroom faucet.
Dimensions and Hole Requirements:
The faucet requires three pre-drilled holes with a size of 1"-1.5". The maximum countertop thickness without a deck plate is 0.2"-1.2". Standard supply hose size is G1/2, 3/8, 24'' in length.

Figure 2: Faucet dimensions and sink hole requirements.
Installation Steps:
- Ensure water supply is turned off before beginning installation.
- Remove any existing faucet and clean the sink area.
- Install the faucet body onto the sink, securing it from underneath with the provided lock nuts and gaskets.
- Connect the hot and cold water supply hoses to the faucet inlets and your water supply lines. Use Teflon tape on threaded connections to prevent leaks.
- Install the lift rod drain assembly according to the instructions provided.
- Once all connections are secure, slowly turn on the water supply and check for leaks.
Video: How to Install Lift Rod Drain
This video demonstrates the process of installing the lift rod drain assembly for a bathroom faucet, providing visual guidance for users.

Figure 3: Example of installed ARCORA faucets.
2. Operating Instructions
The ARCORA faucet features a two-handle design for precise control over water temperature and flow, along with a 360° rotating spout for convenience.
- Water Temperature Control: Use the left handle for hot water and the right handle for cold water. Turn the handles to adjust the desired temperature.
- Water Flow Control: The handles also control the water flow. Turn them further to increase flow and closer to the off position to reduce flow.
- 360° Swivel Spout: The high-arc spout can rotate 360 degrees, providing flexibility for various bathroom tasks such as washing hands or brushing teeth.

Figure 4: Faucet handles for hot/cold water and 360° swivel spout.

Figure 5: Faucet in operation.
Video: Faucet Operation Overview
This video provides an overview of the ARCORA centerset bathroom faucet, demonstrating its features and operation.
3. Maintenance
Regular maintenance ensures the longevity and optimal performance of your ARCORA faucet. The faucet features a drip-free ceramic disc cartridge and a removable aerator for easy cleaning.
Cleaning the Aerator:
- The aerator can be easily removed by hand for cleaning.
- Unscrew the aerator from the spout.
- Rinse any debris or mineral buildup from the aerator screen under running water.
- If necessary, use a soft brush or a mixture of vinegar and water to remove stubborn deposits.
- Reattach the clean aerator to the spout, ensuring it is hand-tightened.
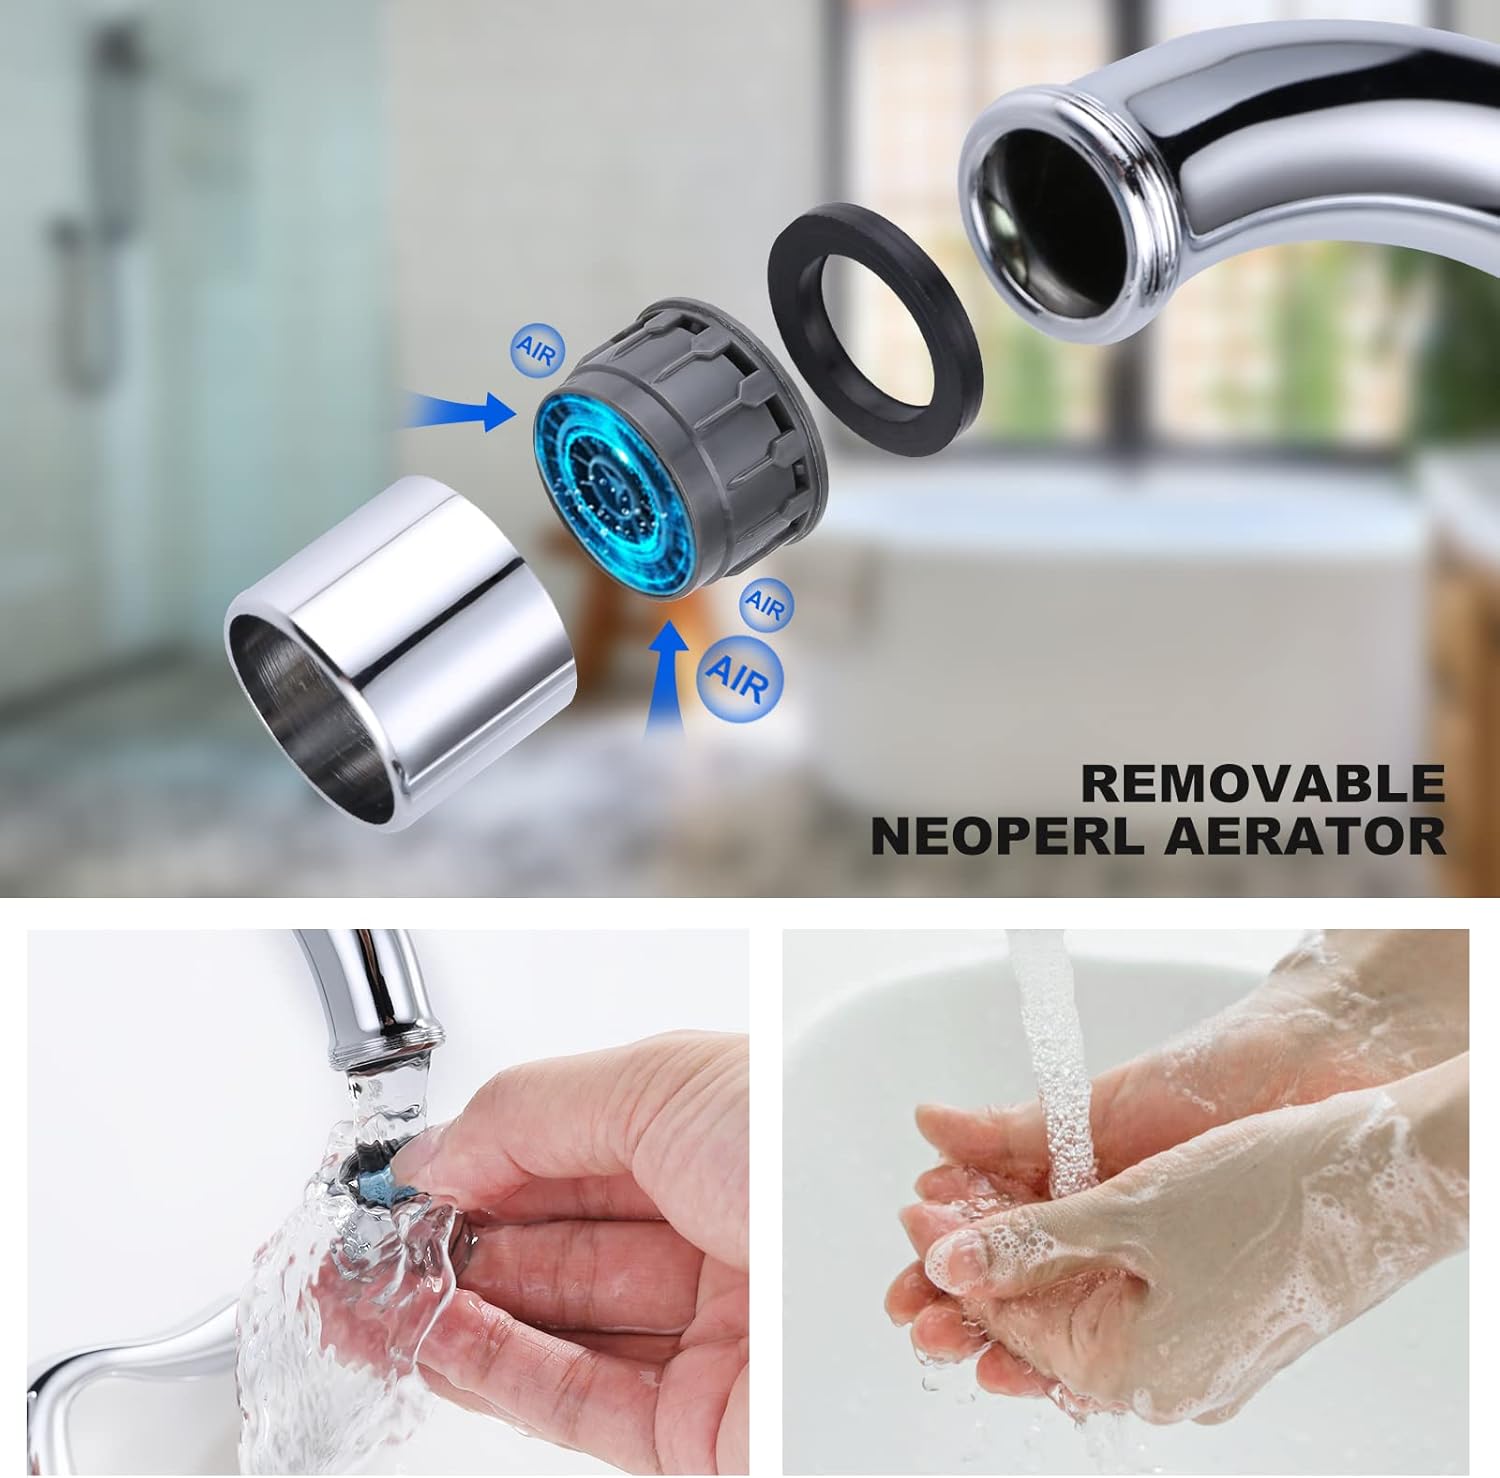
Figure 6: Removable Neoperl Aerator for easy cleaning.
General Cleaning:
- Clean the faucet regularly with a soft cloth and mild soap.
- Avoid abrasive cleaners, harsh chemicals, or scouring pads, as these can damage the chrome finish.
- Wipe the faucet dry after each use to prevent water spots and mineral buildup.
4. Troubleshooting
If you encounter any issues with your ARCORA faucet, refer to the following common troubleshooting tips:
- Low Water Flow: Check if the aerator is clogged with debris or mineral deposits. Clean the aerator as described in the Maintenance section. Also, ensure that the water supply valves are fully open.
- Leaking from Spout: A persistent drip from the spout may indicate a worn-out ceramic disc cartridge. Contact customer support for replacement parts.
- Leaking from Base: Check all connections under the sink to ensure they are tight. If the leak persists, the gaskets may need to be replaced.
- Difficulty Adjusting Temperature: Ensure both hot and cold water supply lines are connected correctly and that the shut-off valves are open.
For issues not covered here, please contact ARCORA customer support.
5. Specifications
| Feature | Specification |
|---|---|
| Brand | ARCORA |
| Model Name | 991514C |
| Recommended Uses | Bathroom |
| Mounting Type | Deck Mount |
| Finish Type | Chrome |
| Material | Metal |
| Color | Chrome |
| Number of Handles | 2 |
| Hole Count | 3 |
| Special Feature | 360 Swivel |
| Installation Type | Centerset |
| Spout Height | 4.84 Inches |
| Spout Reach | 4.68 Inches |
| Item Weight | 2.81 pounds (1.28 Kilograms) |
| Product Dimensions | 4.68"D x 9.09"W x 8"H |
| Hose Length | 24 Inches |
6. Warranty
The ARCORA 4-Inch Centerset 2-Handle Chrome Bathroom Faucet comes with a limited warranty. For specific details regarding coverage, duration, and terms, please refer to the warranty information provided on the product packaging or the official ARCORA website.
7. Support
For further assistance, technical support, or to inquire about replacement parts, please contact ARCORA customer service. You can typically find contact information on the product packaging or by visiting the official ARCORA brand store online.
Visit the ARCORA Store: ARCORA Store on Amazon