ENGINDOT ENGiNDOT
ENGINDOT Bill Counter User Manual
Model: ENGiNDOT
1. Introduction
This manual provides detailed instructions for the safe and efficient operation of your ENGINDOT Bill Counter. Please read this manual thoroughly before using the device to ensure proper functionality and to prevent damage. This bill counter is designed for accurate counting and counterfeit detection of banknotes.

Figure 1.1: Front view of the ENGINDOT Bill Counter, showcasing its compact design and user interface.
2. What's in the Box
Upon unpacking, please verify that all the following items are included:
- ENGINDOT Bill Counter Unit
- User Manual (this document)
- Power Cord
- External Display
- Cleaning Brush
- Replacement Belt
- Money Bands
- Counterfeit Detection Pen
Video 2.1: An unboxing video demonstrating the contents included with the ENGINDOT Bill Counter.
3. Product Overview
Familiarize yourself with the main components of the bill counter:
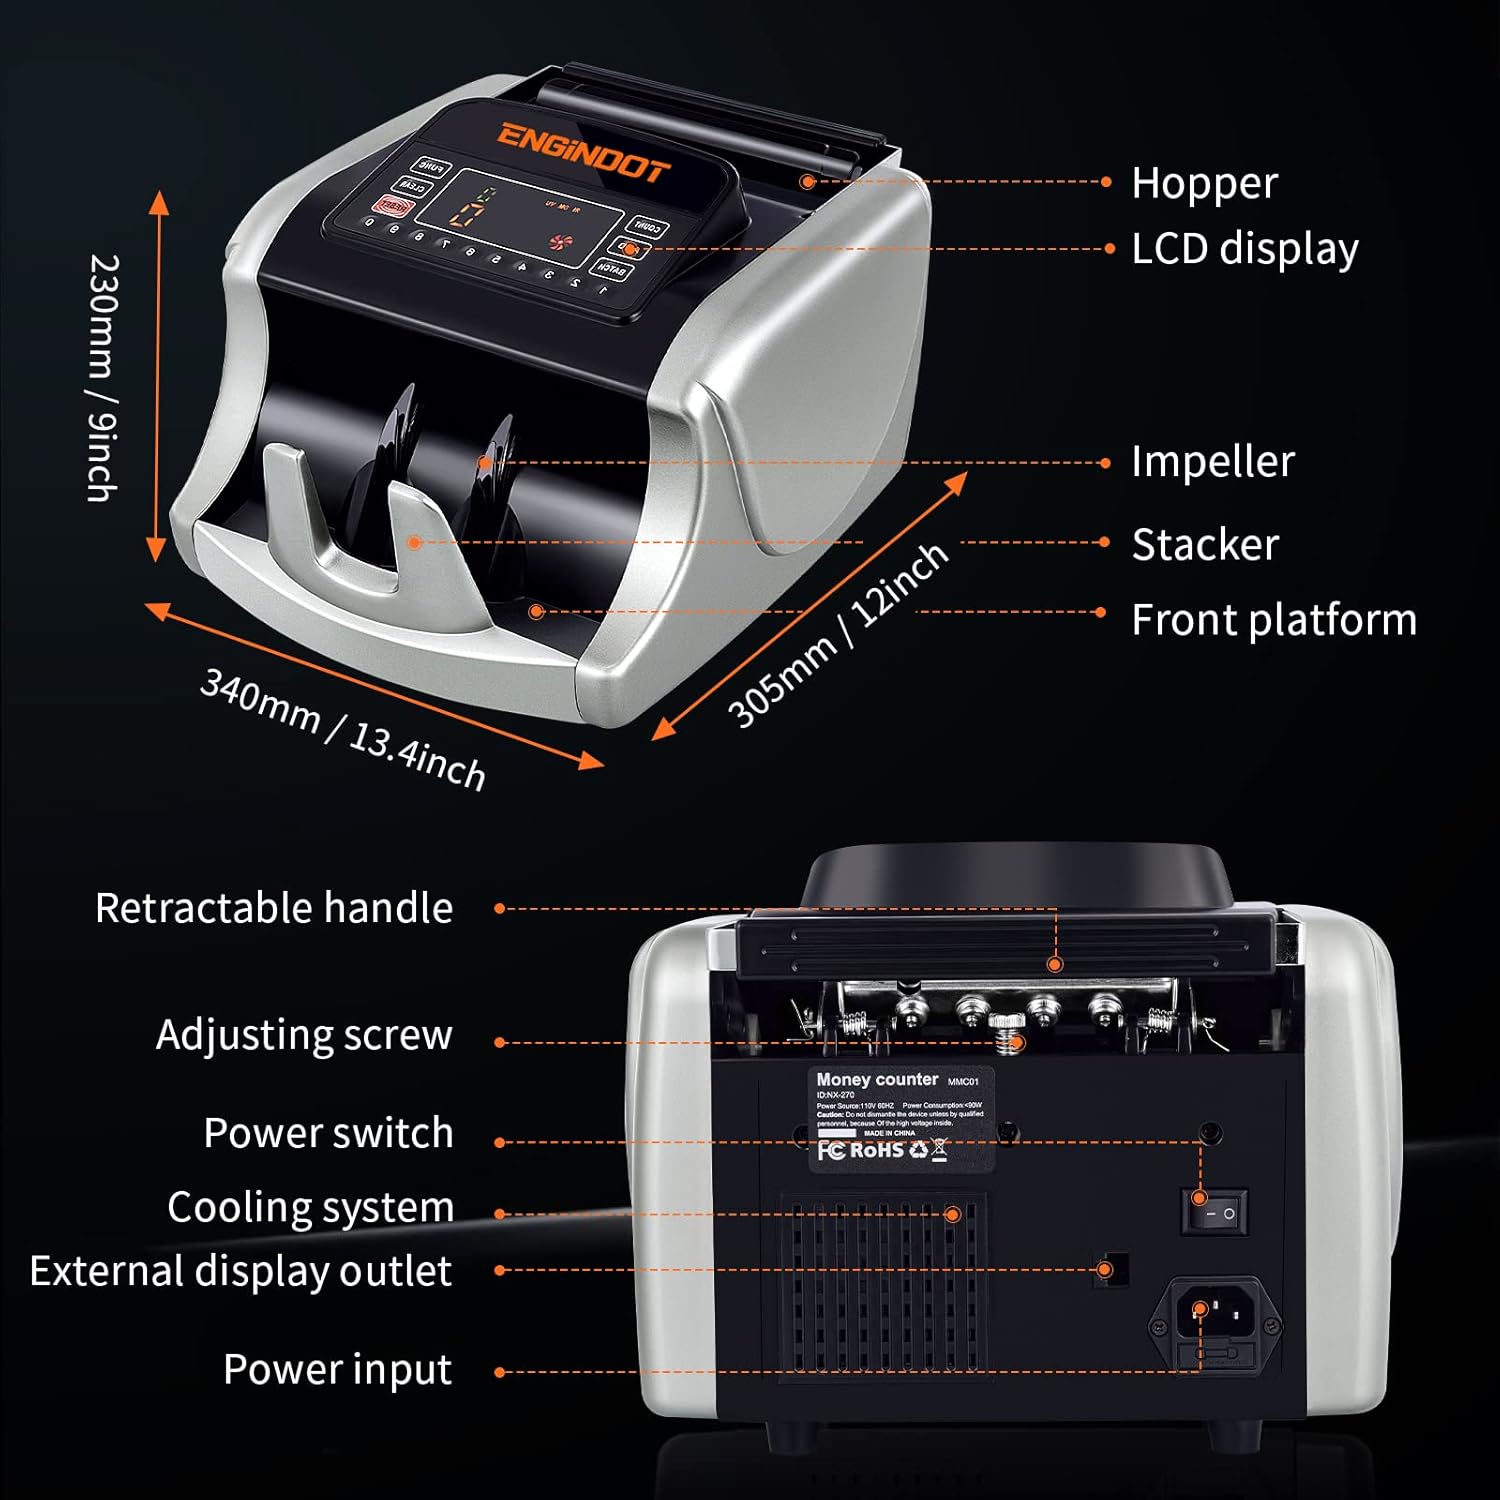
Figure 3.1: Diagram illustrating the key components of the bill counter, including the hopper, LCD display, impeller, stacker, and front platform, along with overall dimensions.
3.1 Key Features
- High-Speed Counting: Processes up to 1000 notes per minute.
- Large Capacity: 200-bill stacker and hopper capacity.
- Counterfeit Detection: Equipped with UV, MG, IR, DBL, HLF, CHN, and DD image detection.
- User-Friendly Display: Large LED display for clear readings.
- Portable Design: Features a retractable handle for easy transport.
- Durable Construction: Built with robust metal components.

Figure 3.2: Visual representation of the bill counter's core benefits, including fast counting speed, time-saving capabilities, counterfeit detection, quiet operation, and portability.
4. Setup
Follow these steps to set up your ENGINDOT Bill Counter:
- Unpack the Unit: Carefully remove the bill counter and all accessories from the packaging.
- Place on a Stable Surface: Position the bill counter on a flat, stable, and dry surface.
- Connect Power: Insert the power cord into the power input port on the back of the machine and plug the other end into a suitable power outlet.
- Connect External Display (Optional): If desired, connect the external display to the external display outlet on the back of the unit.
- Power On: Flip the power switch located on the back of the machine to the 'ON' position. The machine will perform a self-test.
Figure 4.1: The bill counter positioned on a surface, ready for initial setup and connection.
5. Operating Modes
The ENGINDOT Bill Counter offers multiple operating modes to suit various counting needs:
- Count Mode: Simply counts the number of bills inserted.
- Add Mode: Accumulates the count of multiple batches of bills.
- Reset Mode: Clears the current count.
- Auto Mode: Automatically starts counting when bills are placed in the hopper.
- Batch Mode: Counts bills into preset batches (e.g., 100 bills per batch).
- Clear Mode: Resets the display to zero.

Figure 5.1: The large LCD screen of the bill counter displaying the six available working modes, indicating simple operation and comprehensive functions.

Figure 5.2: A visual guide to the six optional operating modes, emphasizing stable and smooth banknote counting performance.
5.1 Loading Bills
Ensure bills are neatly stacked and free from tears or folds. Place the stack of bills into the hopper. The machine will automatically begin counting in Auto Mode, or you can press the 'COUNT' button to start in other modes.

Figure 5.3: The bill counter in action, illustrating its high-speed capability of 1000 notes per minute and its 200-bill stacker and hopper capacity for efficient and accurate counting.

Figure 5.4: An illustration showing the correct orientation for inserting bills into the hopper to prevent jams and ensure accurate counting.
6. Counterfeit Detection
The ENGINDOT Bill Counter employs multiple professional detection methods to identify counterfeit, ripped, or damaged bills:
- UV (Ultraviolet) Security Thread Detection: Checks for UV features embedded in banknotes.
- MG (Magnetic) Ink Verification: Detects magnetic properties in the ink.
- IR (Infrared) Sensor: Verifies infrared patterns on bills.
- DBL (Double-Note Detection): Identifies instances where two bills are counted as one.
- HLF (Half-Note Detection): Detects torn or half bills.
- CHN (Chain-Note Detection): Identifies bills that are stuck together end-to-end.
- DD (Dimensional Detection): Checks for discrepancies in bill dimensions.

Figure 6.1: A visual overview of the various counterfeit detection technologies integrated into the bill counter, ensuring precise and complete verification of banknotes.
7. Maintenance
Regular maintenance ensures the longevity and optimal performance of your bill counter:
- Cleaning: Use the provided cleaning brush to regularly remove dust and debris from the bill path, sensors, and internal components. Ensure the machine is powered off and unplugged before cleaning.
- Sensor Cleaning: Gently wipe the sensors with a soft, lint-free cloth.
- Belt Replacement: If the bill feeding mechanism shows signs of wear or slippage, replace the belt using the provided replacement and following instructions in the detailed PDF manual.

Figure 7.1: The cleaning brush and replacement belt included with the bill counter, facilitating easy maintenance and ensuring prolonged operational efficiency.
8. Troubleshooting
The bill counter features an error self-check system. If an error occurs, an error code will be displayed on the screen. Refer to the table below for common error codes and their solutions:
| Error Code | Description | Solution |
|---|---|---|
| EE1 | Counterfeit detected by UV | Remove the suspected bill and re-count. |
| EE2 | Counterfeit detected by MG | Remove the suspected bill and re-count. |
| EE4 | Broken bill detected & Counting sensors don't work or are dirty | Clean the sensors and ensure bills are in good condition. |
| EE5 | Two bills are counting as one | Adjust the bill stack, ensure bills are not stuck together. |
| EE6 | The magnetic stripe of the bills on different sites are detected | Check bill quality and sensor cleanliness. |
| EE8 | Bills width size is smaller than 30 mm | Ensure correct bill size is used. |
| EE9 | Bills width size is longer than 85mm | Ensure correct bill size is used. |
| EEA | Chain notes detected | Separate chained bills and re-feed. |

Figure 8.1: The bill counter's display showing an error code, accompanied by a list of common error messages and their corresponding causes for easy troubleshooting.
9. Specifications
| Feature | Detail |
|---|---|
| Brand | ENGINDOT |
| Model Number | ENGiNDOT |
| Color | Silver |
| Item Weight | 13.37 pounds |
| Product Dimensions | 13.4 x 12 x 9 inches |
| Counterfeit Detection | UV, MG, IR, DBL, HLF, CHN, DD |
| Date First Available | September 22, 2021 |
10. Warranty & Support
For detailed warranty information and customer support, please refer to the full User Manual PDF available for download or contact ENGINDOT customer service. Keep your purchase receipt as proof of purchase for warranty claims.
You can access the comprehensive User Manual (PDF) here.
Ask a question about this manual
Ask about setup, troubleshooting, compatibility, parts, safety, or missing instructions. Manuals+ will review the question and use this page’s manual context to help answer it.