YIHUA 929D-V
YIHUA 929D-V Electric Desoldering Iron User Manual
Brand: YIHUA | Model: 929D-V
1. Introduction
The YIHUA 929D-V Electric Desoldering Iron is an integrated tool designed for efficient and continuous desoldering of through-hole components and removal of excess solder. It combines a soldering iron and a desoldering pump into a single, easy-to-use device, featuring a short loading handle for comfortable one-handed operation. This manual provides detailed instructions for the safe and effective use, maintenance, and troubleshooting of your 929D-V desoldering iron.

Figure 1: YIHUA 929D-V Electric Desoldering Iron. This image shows the complete desoldering iron with its power cord, cleaning rod, and stand with cleaning sponge.
2. Safety Information
WARNING: This model operates on 230V ONLY. DO NOT connect this device to a 110~127V electrical network.
- Always ensure the desoldering iron is connected to a power outlet with the correct voltage (230V) and a proper ground connection.
- The desoldering iron operates at high temperatures. Avoid direct contact with the nozzle and heating element to prevent burns.
- Use in a well-ventilated area to avoid inhaling solder fumes.
- Always place the desoldering iron on its heat-resistant stand when not in use.
- Allow the iron to cool down completely before performing any maintenance or changing nozzles.
- During first use, the product may emit white fumes for up to 20 minutes. This is normal and expected due to the electrical insulator protective material (mica) and is not a defect. Ensure adequate ventilation during this initial period.
- Keep out of reach of children.
3. Package Contents
Verify that all items listed below are included in your package:
- 1 x YIHUA 929D-V Desoldering Iron
- 2 x Desoldering Nozzles (Ø1.0mm & Ø1.2mm)
- 1 x Heat-Resistant Iron Stand
- 1 x Cleaning Sponge
- 1 x Cleaning Rod (for nozzle and heating element)
4. Product Overview
Familiarize yourself with the components of the YIHUA 929D-V desoldering iron:
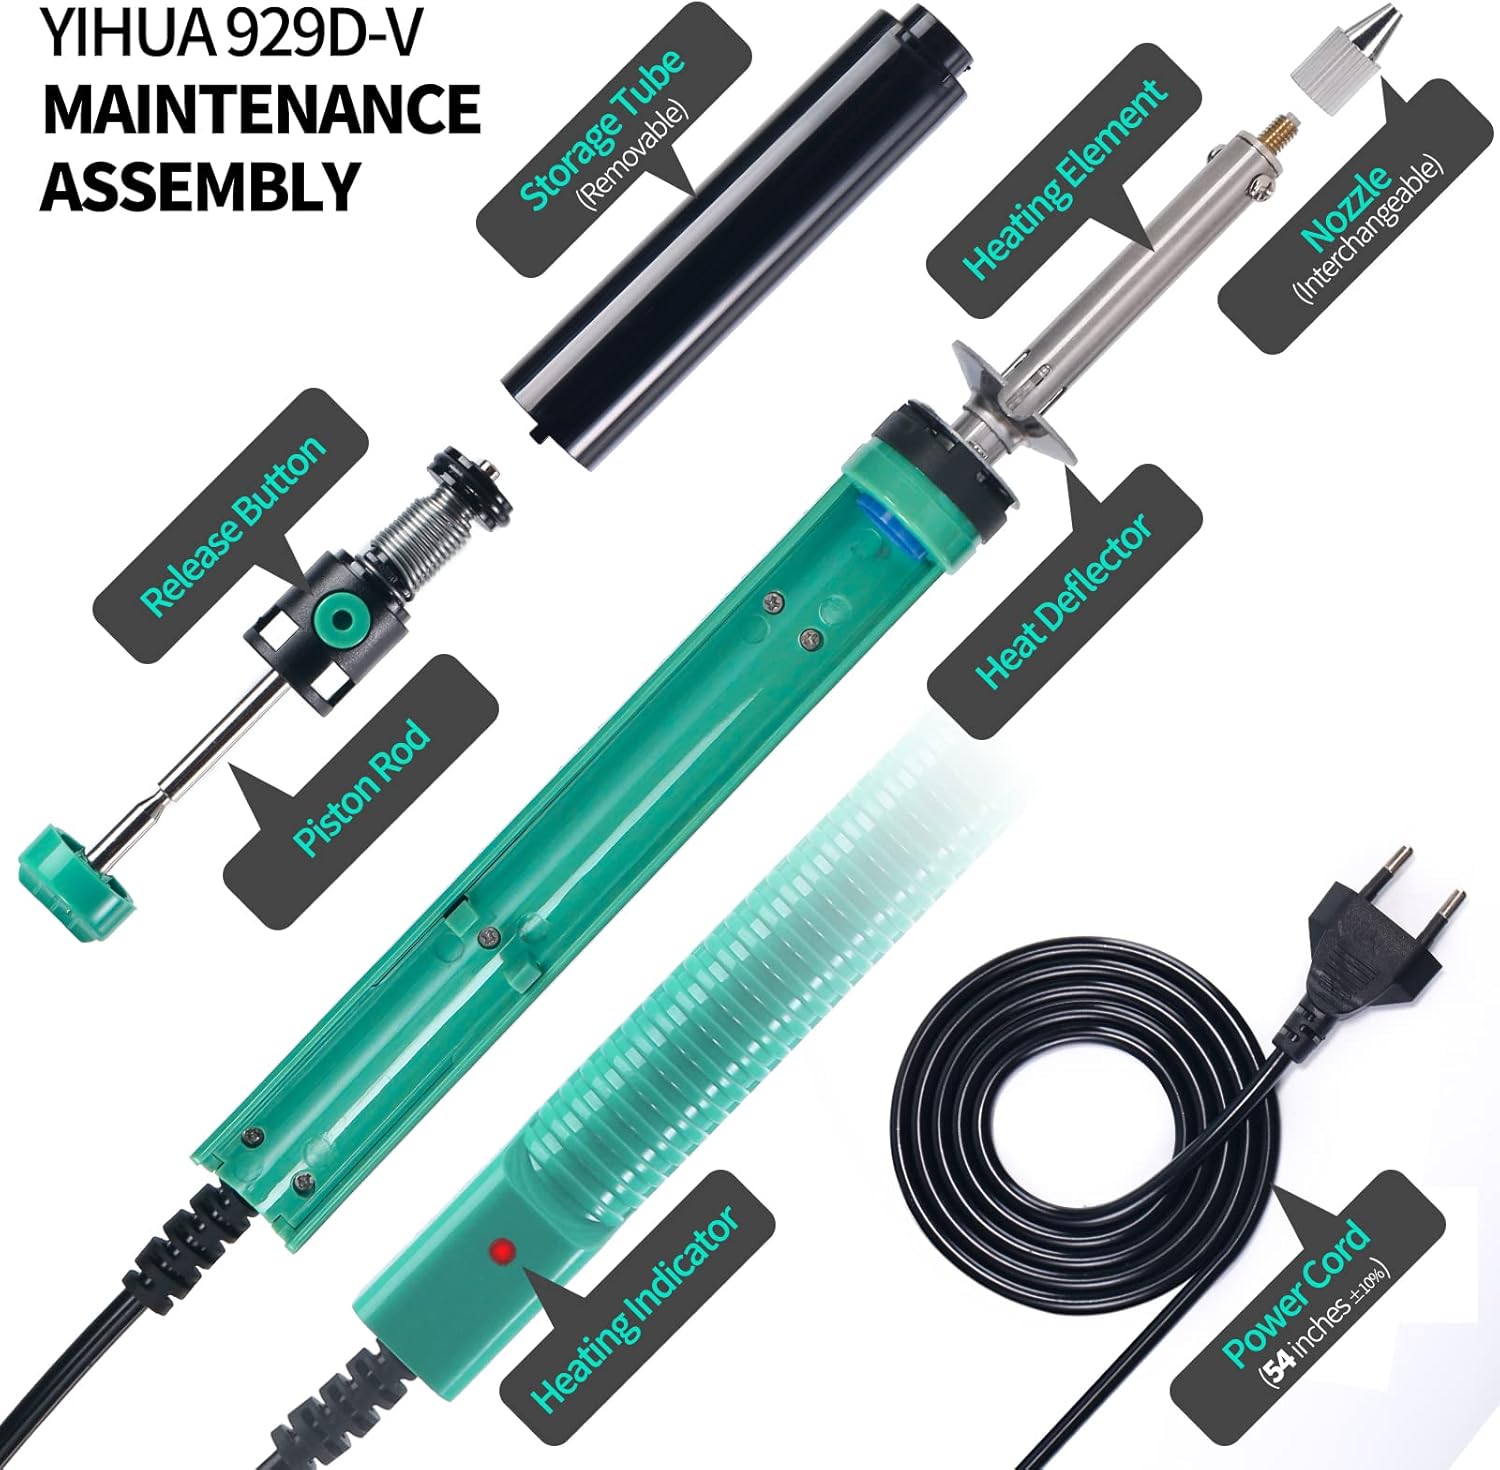
Figure 2: YIHUA 929D-V Maintenance Assembly. This diagram illustrates the main components including the storage tube, heating element, nozzle, heat deflector, heating indicator, power cord, release button, and piston rod.
- Nozzle: The tip that contacts the solder joint and through which solder is vacuumed. Interchangeable for different sizes.
- Heating Element: Heats the nozzle to melt solder.
- Heat Deflector: Prevents excess heat transfer to the handle during prolonged use.
- Piston Rod: Creates the vacuum when released.
- Release Button: Activates the vacuum action.
- Storage Tube: Collects desoldered solder. Removable for cleaning.
- Heating Indicator: Light that indicates the iron is powered on and heating.
- Shorter Charging Handle: Designed for comfortable one-handed operation and continuous desoldering without changing grip.

Figure 3: Shorter Charging Handle. This image highlights the ergonomic design of the handle, allowing for efficient single-handed desoldering.
5. Setup
- Connect Power: Plug the power cord into a 230V electrical outlet. The heating indicator light will illuminate.
- Preheat: Allow the desoldering iron to preheat for approximately 3 minutes. This ensures the nozzle reaches the optimal temperature to melt solder effectively. The automatic temperature regulation system will maintain a fixed temperature.
- Tin the Nozzle: It is recommended to keep the nozzle tinned with solder at all times to prevent oxidation and ensure efficient heat transfer.

Figure 4: Initial Setup and Operation Steps. This image shows the process of plugging in, preheating, and preparing the iron for use, including the recommendation to tin the nozzle.

Figure 5: Preheat Time. This image visually emphasizes the recommended 3-minute preheating period for optimal performance.
6. Operating Instructions
The YIHUA 929D-V is designed for continuous, jam-free desoldering of through-hole components.
- Prepare the Solder Joint: Ensure the solder joint you wish to desolder is accessible. If necessary, add a small amount of fresh solder to the joint to help it melt more easily and flow into the nozzle.
- Position the Nozzle: Place the desoldering iron's nozzle directly over the solder joint, ensuring it completely covers the component's pin and the surrounding solder pad.
- Melt the Solder: Apply gentle pressure and allow the heat from the nozzle to melt the solder. This typically takes a few seconds.
- Activate Vacuum: Once the solder is fully molten, press the release button on the handle. The internal pump will create a strong vacuum, sucking the molten solder into the storage tube.
- Remove Component: With the solder removed, the component's pin should be free. Carefully remove the component from the PCB.
- Repeat as Needed: For multi-pin components, repeat the process for each pin. The short loading handle allows for continuous desoldering without needing to reposition your grip.

Figure 6: Continuous Desoldering. This image demonstrates the desoldering iron in action, effectively removing solder from a circuit board without jamming.

Figure 7: Desoldering Effectiveness. This image shows a before and after comparison of a desoldered joint, illustrating clean solder removal.
7. Maintenance
Regular cleaning and maintenance will ensure the longevity and optimal performance of your desoldering iron.
7.1. Cleaning the Solder Storage Tube
The storage tube collects desoldered solder and should be cleaned regularly to prevent blockages.
- Cool Down: Ensure the desoldering iron has completely cooled down before attempting to clean.
- Lift and Extract: Gently lift and extract the black solder storage tube from the main body of the desoldering iron.
- Empty and Clean: Empty any accumulated solder debris from the tube. You can use the supplied cleaning rod or a small brush to remove stubborn residue.
- Reassemble: Once clean, reinsert the storage tube firmly back into place.

Figure 8: Cleaning the Storage Tube. This image demonstrates the two-step process of lifting and extracting the storage tube, then cleaning out the collected solder debris.
7.2. Cleaning the Nozzle and Heating Element
Regular cleaning of the nozzle and heating element is crucial for consistent suction and heating.
- Cool Down: Ensure the desoldering iron has completely cooled down.
- Remove Nozzle and Storage Tube: First, remove the storage tube as described above. Then, carefully unscrew or detach the nozzle from the heating element.
- Clean Nozzle Hole: Use the supplied cleaning rod to clear any blockages from the nozzle hole. You may need to preheat the iron briefly (approx. 3 mins) to soften any hardened solder before using the cleaning pin, but ensure it's cool enough to handle safely when cleaning.
- Clean Heating Element Inner Hole: Use the cleaning rod to clean the inner hole of the heating element where the nozzle connects.
- Reassemble: Once clean, reattach the nozzle and storage tube.
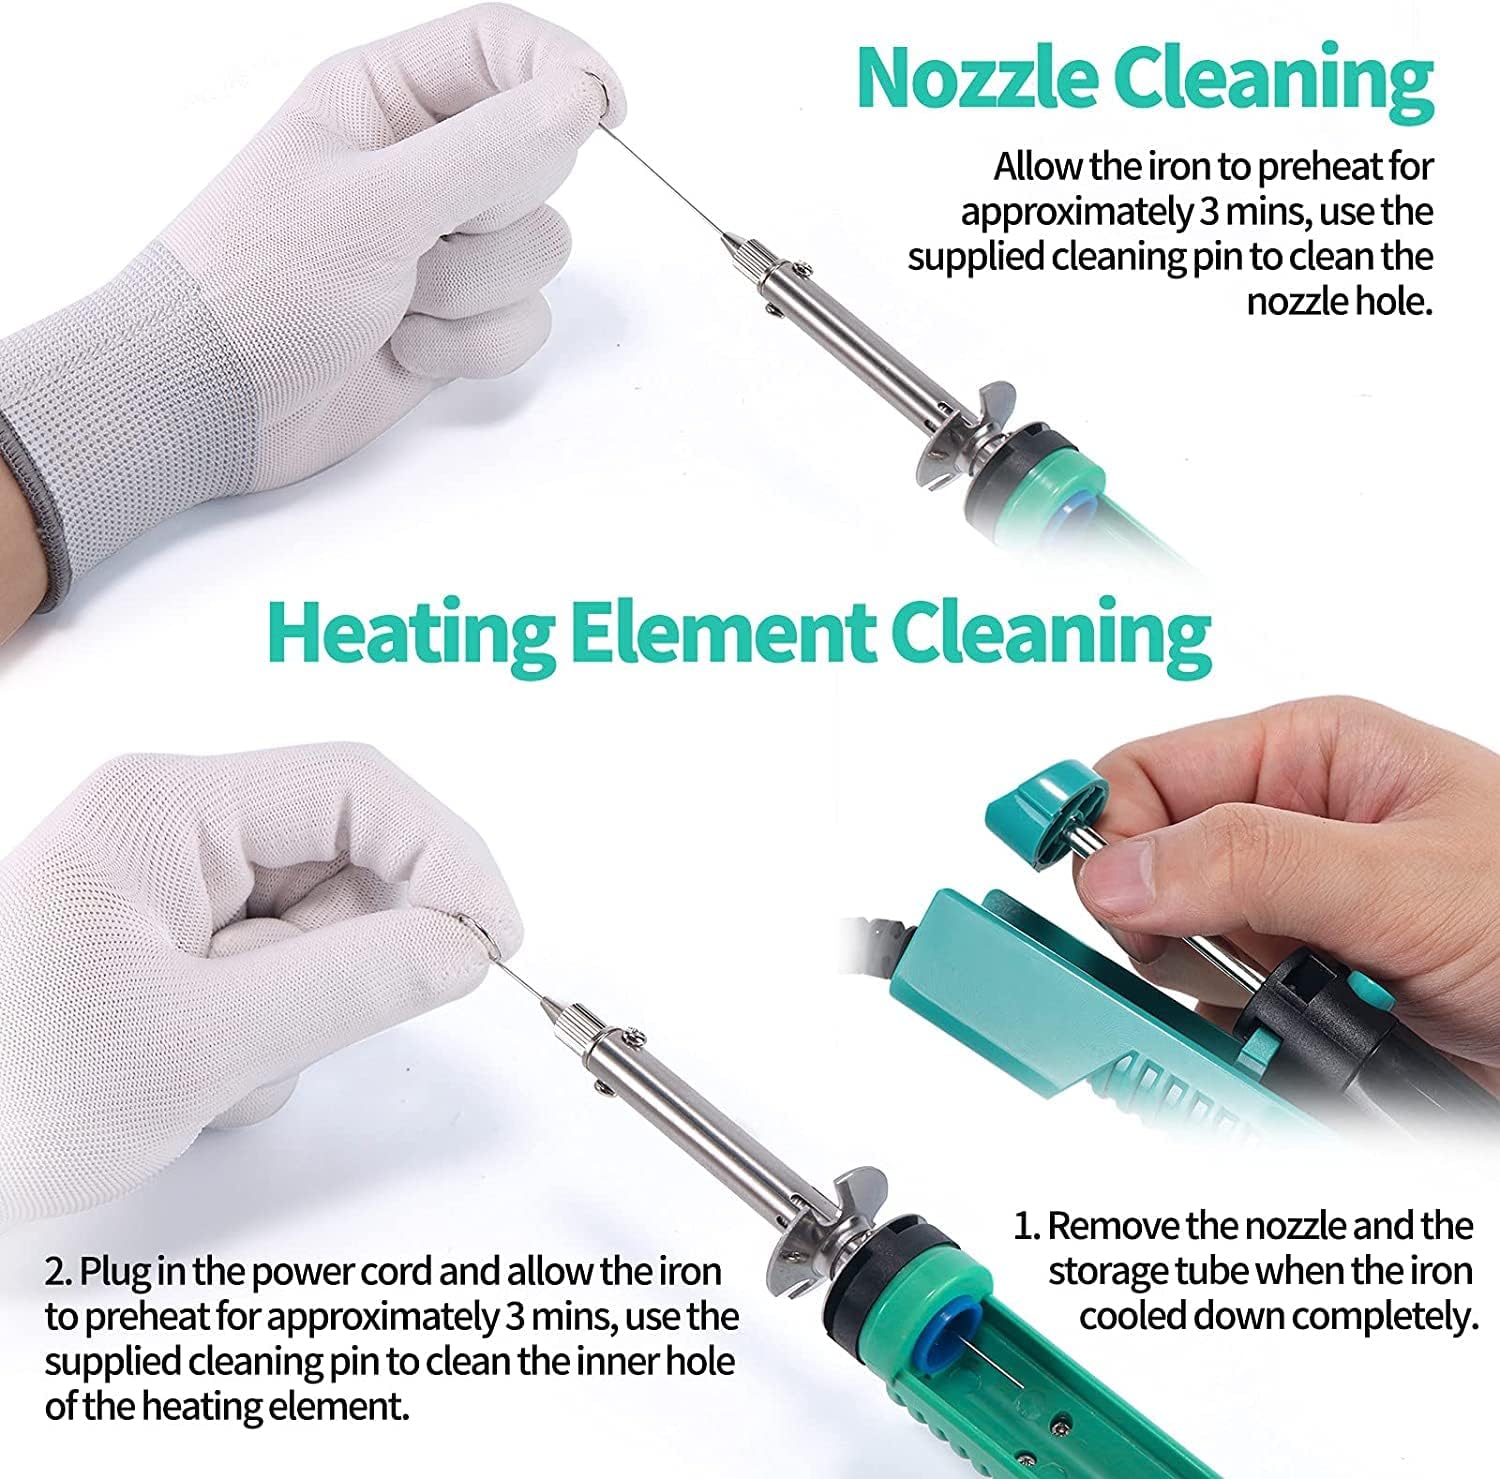
Figure 9: Nozzle and Heating Element Cleaning. This image shows how to use the cleaning rod to clear blockages from both the nozzle and the inner part of the heating element.
7.3. Nozzle Replacement
The product includes two interchangeable desoldering nozzles (Ø1.0mm & Ø1.2mm) for different component sizes.
- Cool Down: Always ensure the desoldering iron has completely cooled down before changing the nozzle.
- Remove Old Nozzle: Carefully unscrew or detach the current nozzle.
- Attach New Nozzle: Screw or attach the desired new nozzle firmly into place.

Figure 10: Desoldering Nozzles. This image displays a set of desoldering nozzles, indicating their compatibility with the YIHUA 929D-V.
8. Troubleshooting
| Problem | Possible Cause | Solution |
|---|---|---|
| Iron does not heat up. | Not plugged in, power outlet issue, internal fault. | Ensure power cord is securely plugged into a 230V outlet. Check if the heating indicator light is on. If not, try a different outlet. If the issue persists, contact support. |
| No suction or weak suction. | Clogged nozzle, clogged heating element, full storage tube. | Clean the solder storage tube (Section 7.1). Clean the nozzle and heating element using the supplied cleaning rod (Section 7.2). Ensure the nozzle is securely attached. |
| Solder does not melt easily. | Insufficient preheating time, oxidized nozzle, low temperature. | Allow the iron to preheat for at least 3 minutes. Ensure the nozzle is clean and tinned. The temperature is fixed and non-adjustable; ensure proper contact with the solder joint. |
| White fumes during first use. | Normal burning off of protective material. | This is normal and expected for up to 20 minutes. Ensure adequate ventilation. This is not a defect. |
9. Specifications
| Feature | Detail |
|---|---|
| Model Number | 929D-V |
| Manufacturer | Guangzhou Yihua Electronic Equipment Co., Ltd. |
| Power Type | AC |
| Voltage | 230V (EU Plug) |
| Power | 50W |
| Dimensions (L x W x H) | 26 x 3.5 x 2.7 cm (10.24 x 1.38 x 1.06 inches) |
| Weight | 280 grams |
| Handle Material | Glass fiber reinforced plastic |
| Special Feature | Short loading handle for one-handed operation |
| Included Components | Desoldering iron, 2 nozzles (1.0mm, 1.2mm), heat-resistant stand, cleaning sponge, cleaning rod |
| Max Rated Temperature | 450 Degrees Celsius |
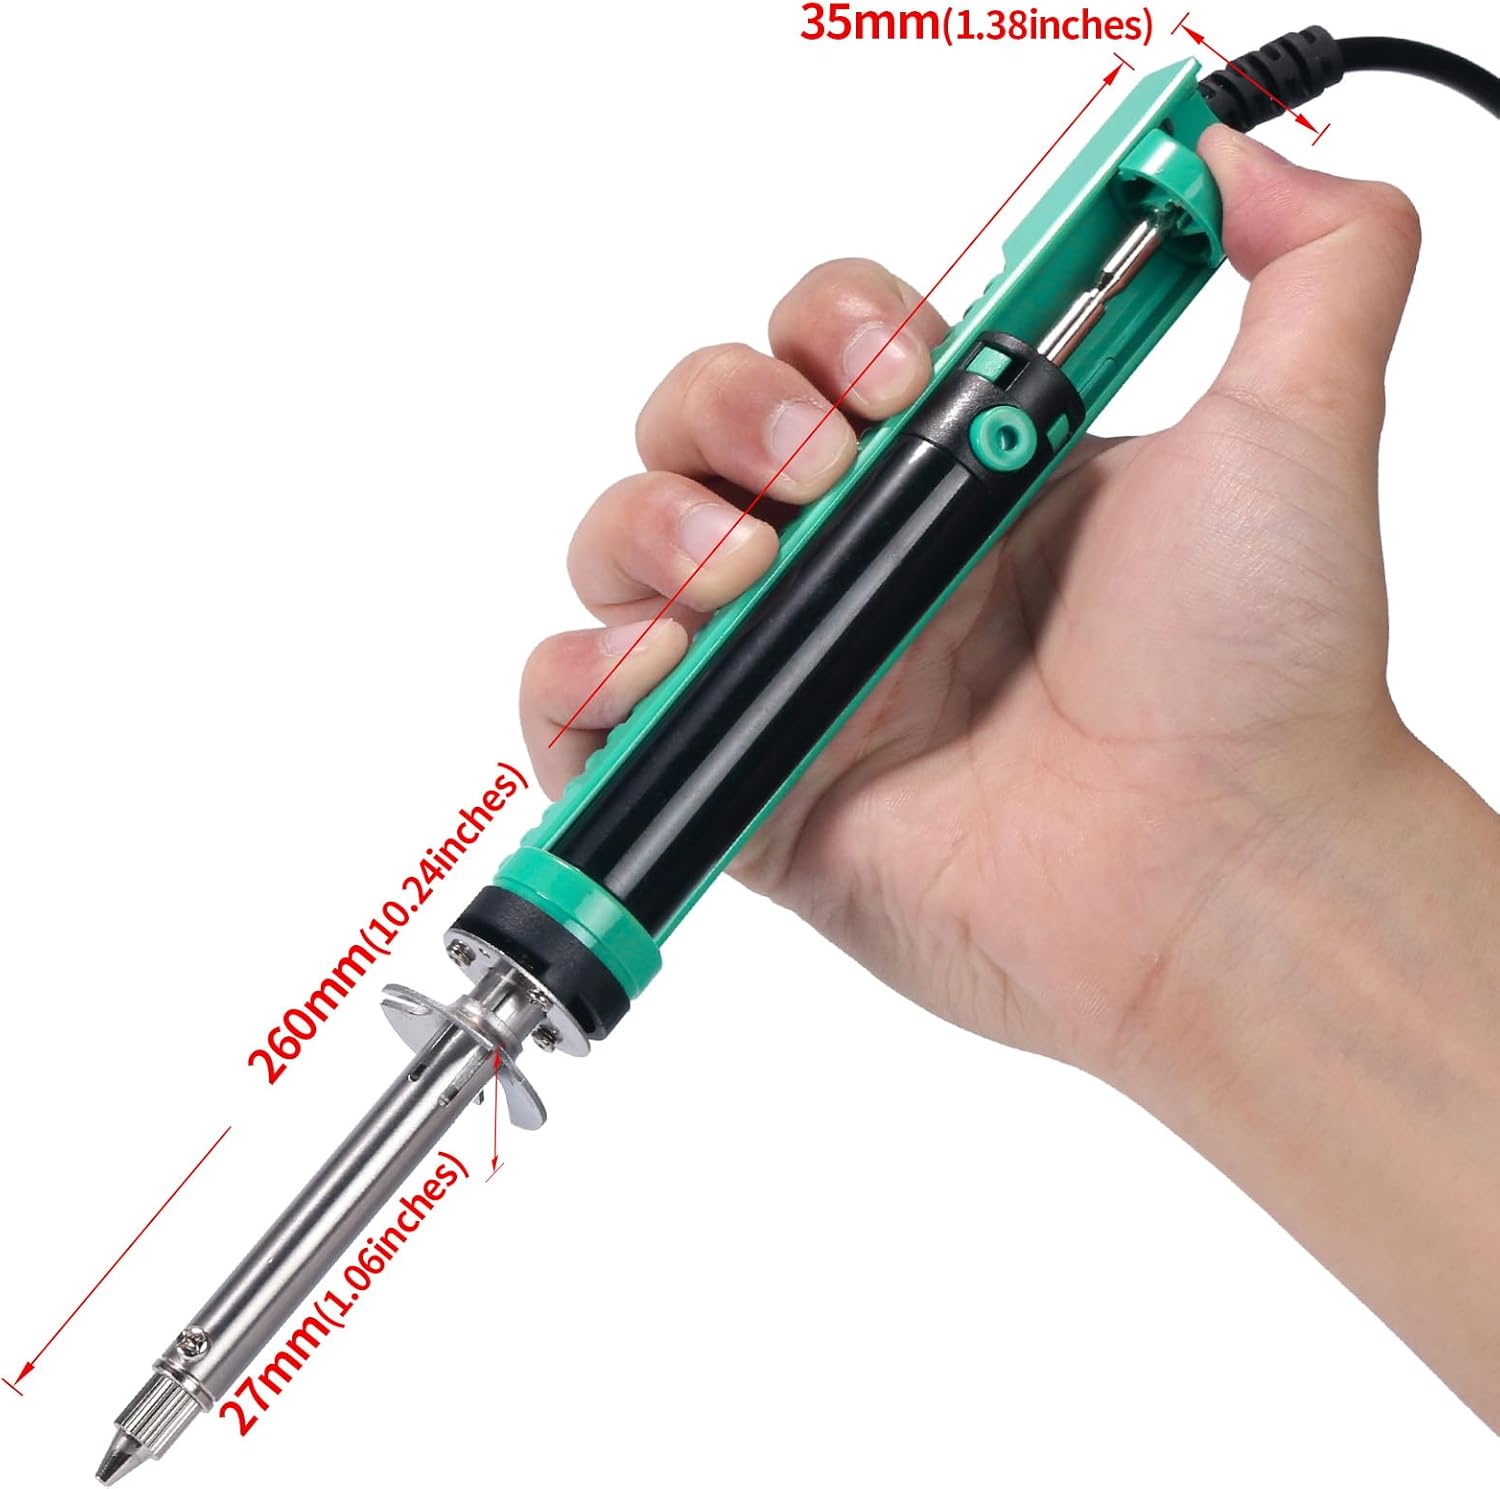
Figure 11: Product Dimensions. This image provides a visual representation of the desoldering iron's length, width, and height.
10. Warranty and Support
YIHUA offers a 12-month warranty, exclusive to the EU, for your purchase of the 929D-V Electric Desoldering Iron. This warranty covers manufacturing defects and ensures product quality.
For any questions, technical assistance, or warranty claims, please contact our support team. Our team provides 24/7 assistance on Amazon.
For further information or to purchase replacement parts, please visit the official YIHUA store on Amazon or contact the seller directly.
Note: Please retain your proof of purchase for warranty purposes.
Related Documents - 929D-V
 |
YIHUA 948D-V 5-in-1 Multi-functional Precision Soldering Station - Operation Manual Comprehensive operation instruction manual for the YIHUA 948D-V 5-in-1 multi-functional precision soldering station. Covers specifications, safety guidelines, applications, operation, maintenance, and troubleshooting for hot air rework, hot tweezer, precision soldering, and desoldering functions. |
 |
YIHUA 948D IV Multi-functional Desoldering Tool Operation Manual Comprehensive operation instructions for the YIHUA 948D IV 5-in-1 ESD-Safe Multi-functional Desoldering Tool, covering applications, operation, maintenance, troubleshooting, and safety guidelines. |
 |
YIHUA 948 II: Operation Manual for Multi-Function Desoldering, Soldering & Rework Station Official operation manual for the YIHUA 948 II, a 4-in-1 ESD-safe station featuring desoldering, soldering, and hot air rework functions. Includes detailed instructions, maintenance, and troubleshooting for electronics repair and assembly. |
 |
982D III 2-in-1 Micro Soldering Rework Station Operation Manual Operation instructions and safety guidelines for the Yihua 982D III 2-in-1 Micro Soldering Rework Station, covering specifications, applications, operation, maintenance, and troubleshooting. |
 |
YIHUA 982D SE Precision Soldering Station ESD Safe - Operation Manual Comprehensive operation instructions and safety guidelines for the YIHUA 982D SE Precision Soldering Station with ESD Safe features. Learn about specifications, applications, maintenance, and troubleshooting. |
 |
YIHUA 948D-i ESD-Safe Desoldering Station Operation Manual Detailed operation instructions, maintenance guide, troubleshooting tips, and specifications for the YIHUA 948D-i ESD-Safe Desoldering Station. Learn about its applications, calibration, and component replacement. |
Ask a question about this manual
Ask about setup, troubleshooting, compatibility, parts, safety, or missing instructions. Manuals+ will review the question and use this page’s manual context to help answer it.