Grouptronics GTMC-101mk2-BLACK
Grouptronics GTMC-101 MK2 CD Player Stereo Micro Compact HiFi User Manual
Model: GTMC-101mk2-BLACK
Introduction
The Grouptronics GTMC-101 MK2 is a versatile micro compact HiFi system designed for various audio playback needs. It features a CD player, FM radio, USB playback for MP3 files, and an AUX IN connection for external devices. This system also includes a clock with dual alarm functions and offers flexible placement options, including desktop and wall mounting. This manual provides detailed instructions for setting up, operating, and maintaining your GTMC-101 MK2 system.

Figure 1: Overview of the GTMC-101 MK2's 4-in-1 audio capabilities.
Safety Information
- Read all instructions carefully before operating the unit.
- Do not expose the unit to rain or moisture to prevent fire or electric shock.
- Ensure proper ventilation; do not block any ventilation openings.
- Place the unit on a stable, flat surface.
- Unplug the unit during lightning storms or when unused for long periods.
- Do not open the casing. Refer all servicing to qualified personnel.
- Keep the unit away from direct sunlight, heat sources, and strong magnetic fields.
What's in the Box
Carefully unpack all components and ensure all items listed below are present and in good condition.
- GTMC-101 MK2 Main Unit (Stereo)
- Detachable Speakers (2 units)
- Power Supply (UK plug)
- Remote Control
- User Manual

Figure 2: Contents included with the GTMC-101 MK2 HiFi system.
Setup
1. Placement Options
The GTMC-101 MK2 offers flexible placement options:
- Desktop Stand: Use the integrated rear kickstand to place the unit on a flat surface such as a desk, shelf, or window sill.
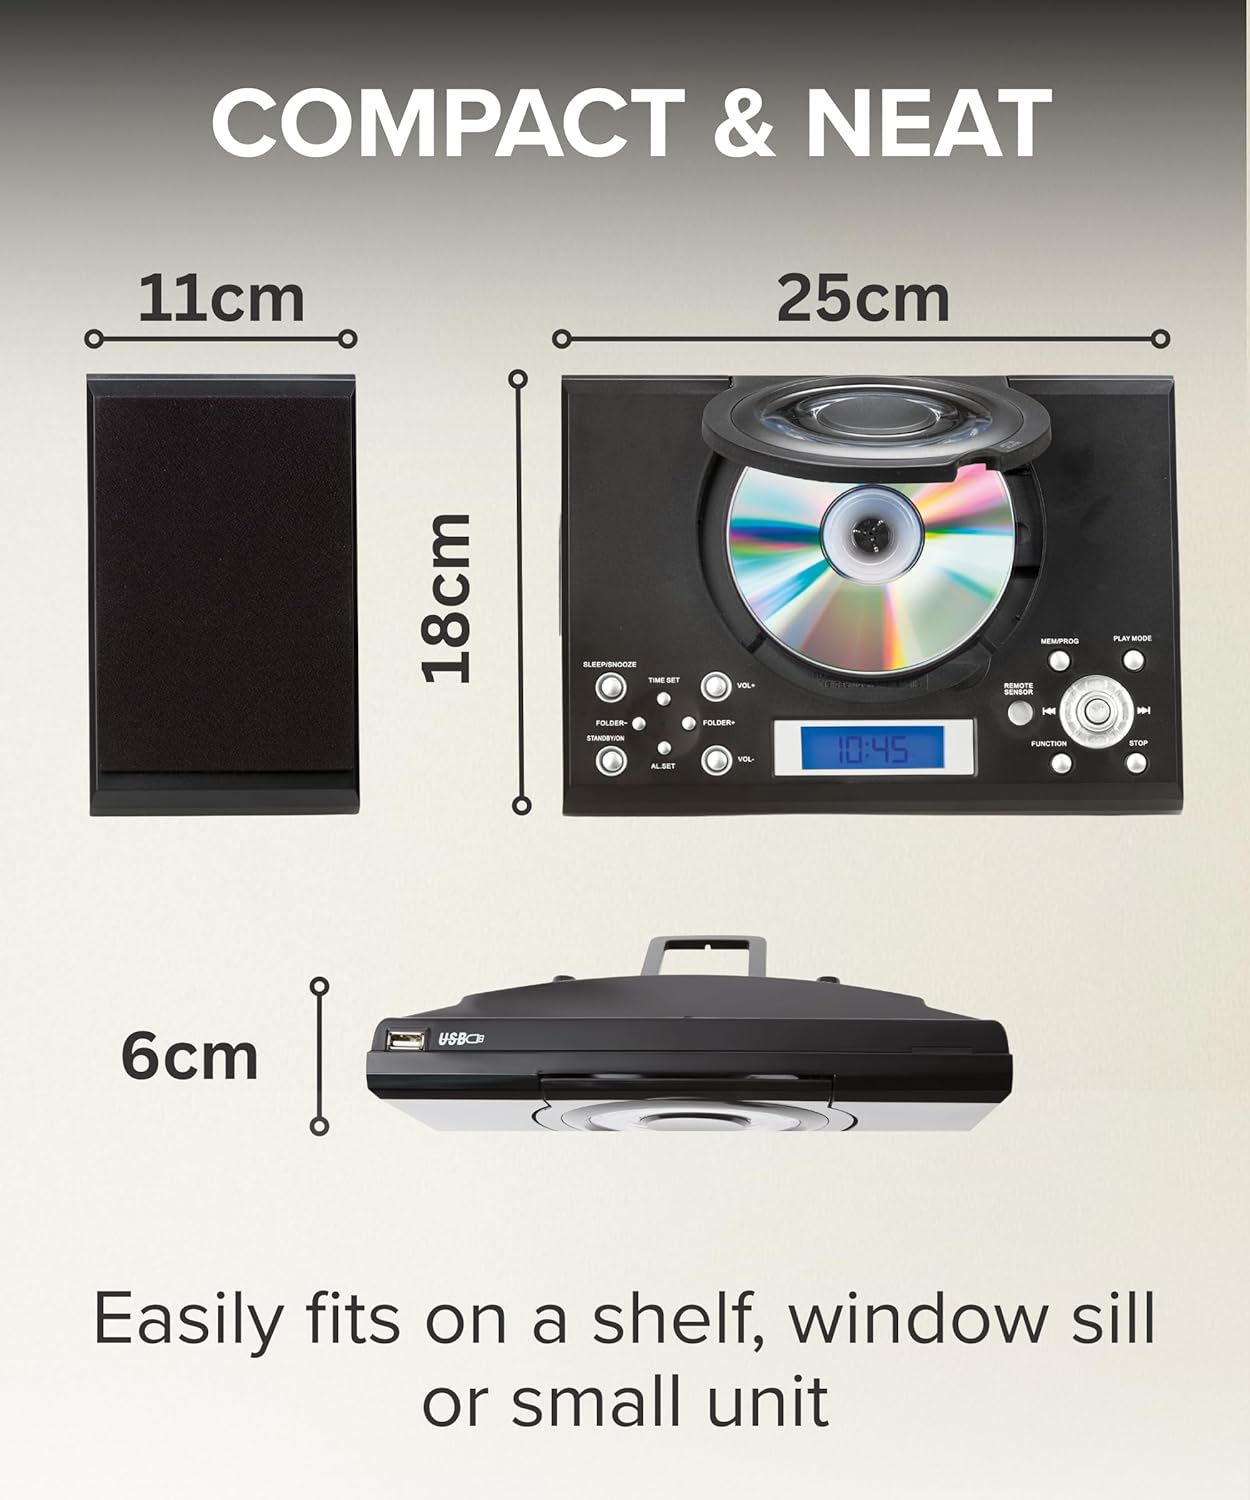
Figure 3: The compact size of the unit allows for easy placement.
- Wall Mount: The main unit and speakers have dedicated wall mount points. This allows for a space-saving installation. Ensure the wall can support the unit's weight (approx. 1.57 kg).
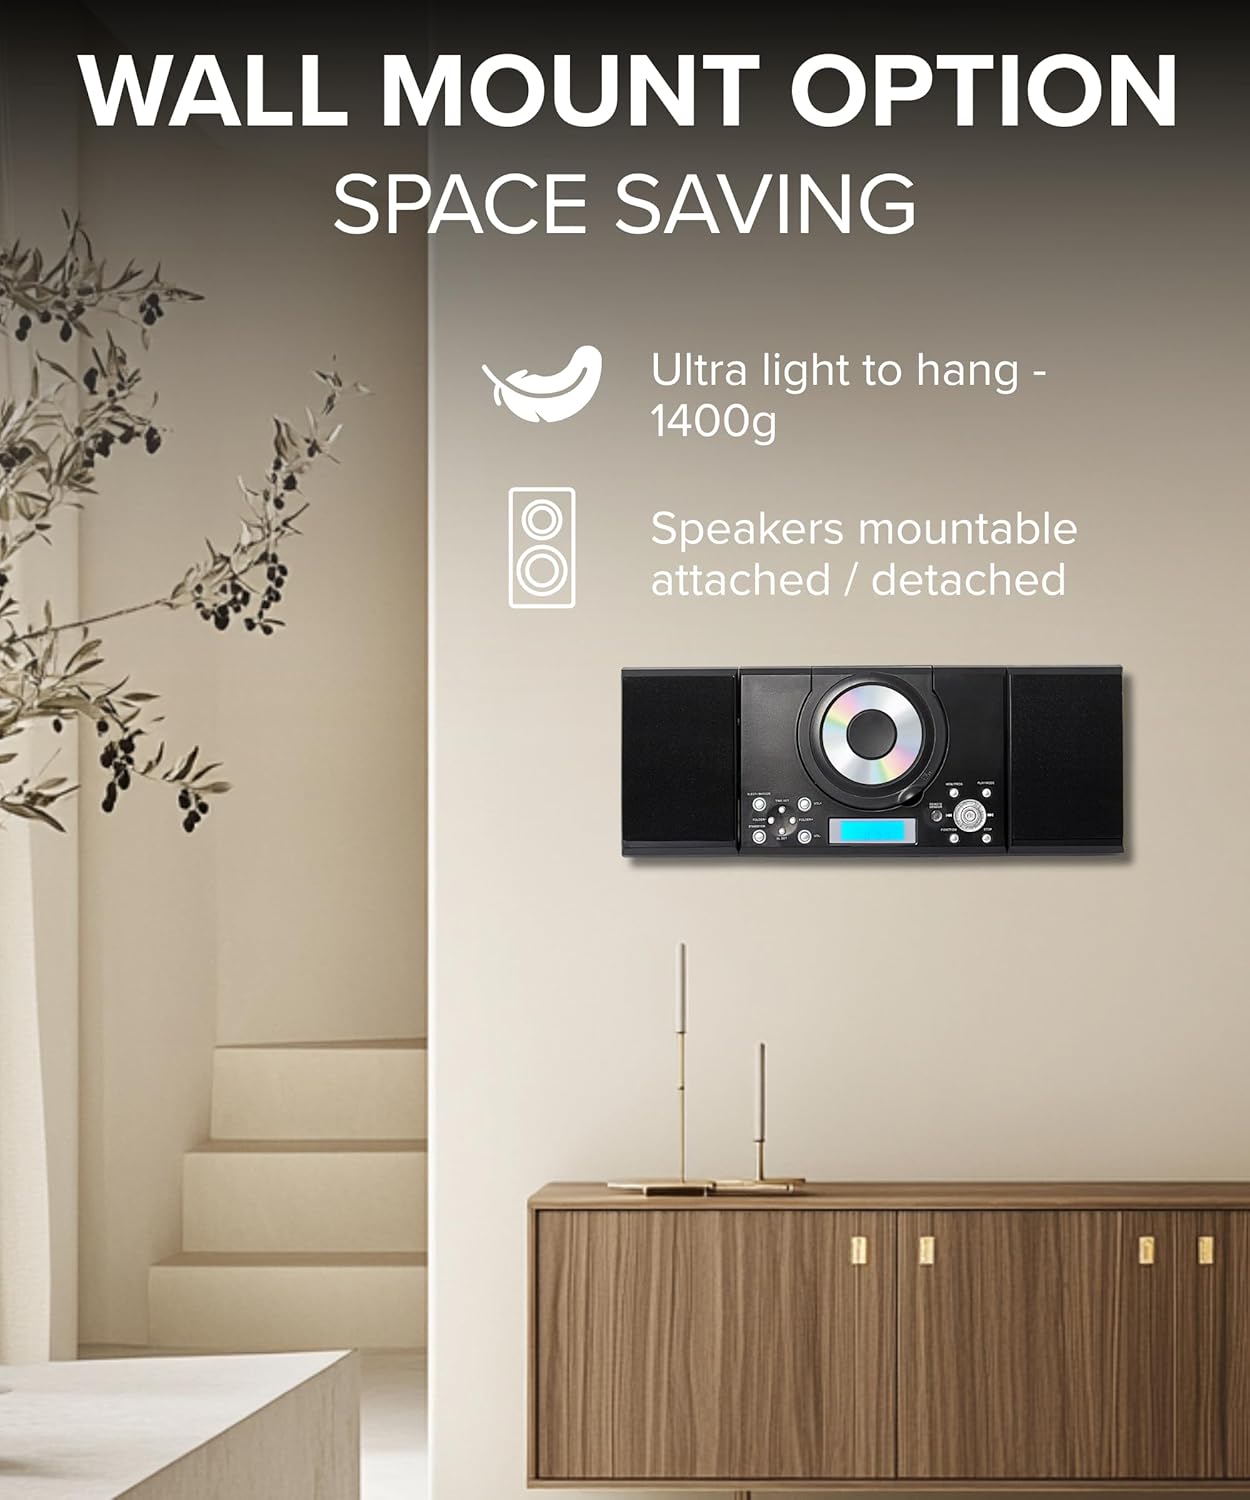
Figure 4: Wall mount option for space-saving installation.
2. Connecting Speakers
The speakers can be attached directly to the main unit or detached for wider stereo separation using the provided speaker cables.
- Attached Configuration: Secure the speakers onto the retractable mounts on the sides of the main unit.
- Detached Configuration: Pull the speakers away from the main unit. Connect the speaker cables from the speakers to the "SPEAKERS" output ports on the rear of the main unit. The cables are approximately 85cm long, allowing for wider placement.

Figure 5: Speaker attachment and detachment options.
3. Power Connection
Connect the provided power supply cable to the "MAINS POWER" input on the rear of the unit, then plug it into a standard wall outlet.
4. Battery Backup (for Clock/Alarm Settings)
The unit requires 1 CR2 battery (not included) for battery backup functionality. This ensures that clock, alarm, and radio settings are retained during a power cut or when the unit is unplugged. Insert the battery into the battery compartment located on the rear of the unit, observing correct polarity.

Figure 6: Rear connections and setup points.
Operating Instructions
1. General Controls
The unit can be operated using the buttons on the front panel or the included remote control. Familiarize yourself with the layout of the buttons for power, volume, mode selection, playback controls, and alarm settings.
2. CD Player Operation
- Press the POWER button to turn on the unit.
- Press the FUNCTION button repeatedly until "CD" mode is selected on the display.
- Open the front-loading CD door and insert a CD with the label side facing up. Close the door.
- The CD will begin playing automatically. If not, press the PLAY/PAUSE button.
- Use the SKIP/SEARCH buttons (◀◀ / ▶▶) to skip tracks. Hold them down to fast forward/rewind.
- Programmable Playback: In stop mode, press MEM/PROG to program up to 20 tracks.
- Repeat Playback: Press REPEAT to repeat the current track or the entire CD.
- Random Playback: Press RANDOM for shuffled playback.
3. FM Radio Operation
- Press the FUNCTION button repeatedly until "FM" mode is selected.
- Extend the FM antenna fully for optimal reception.
- Press the TUNE+ or TUNE- buttons to manually tune to a station.
- Hold down TUNE+ or TUNE- to automatically scan for the next available station.
- Preset Stations: To store a station, tune to the desired frequency, then press MEM/PROG. Use SKIP/SEARCH buttons to select a preset number, then press MEM/PROG again to confirm.
4. AUX IN Usage
Connect an external audio device (e.g., MP3 player, phone, tablet, iPod) to the "AUX IN" port on the rear of the unit using a 3.5mm audio cable (not included).
- Press the FUNCTION button repeatedly until "AUX" mode is selected.
- Play audio from your connected device. The sound will be output through the GTMC-101 MK2 speakers.
- Adjust volume using the unit's volume controls or your external device.
5. USB MP3 Playback
Insert a USB flash drive containing MP3 files into the USB port on the front of the unit.
- Press the FUNCTION button repeatedly until "USB" mode is selected.
- The unit will automatically detect and begin playing MP3 files from the USB drive.
- Use the SKIP/SEARCH buttons to navigate between tracks.
6. Clock and Alarm Settings
The unit features an integrated clock and dual alarm functions.
- Setting the Clock: In standby mode, press and hold the TIME SET button. Use the SKIP/SEARCH buttons to adjust hours and minutes, pressing TIME SET to confirm each step.
- Setting Alarms: Press the AL SET button to select Alarm 1 or Alarm 2. Press and hold AL SET to enter alarm setting mode. Use SKIP/SEARCH buttons to set the alarm time and wake-up source (CD, Radio, or Buzzer). Press AL SET to confirm each step.
- Snooze Function: When the alarm sounds, press the SLEEP/SNOOZE button to activate snooze.
- Sleep Timer: Press the SLEEP/SNOOZE button repeatedly to set a sleep timer (e.g., 15, 30, 60, 90 minutes) after which the unit will automatically turn off.

Figure 7: Clock Radio Alarm with multiple wake-up settings.
7. Headphone Usage
For private listening, connect headphones with a 3.5mm jack to the "HEADPHONES" port on the rear of the unit. Audio will automatically switch from speakers to headphones.
Maintenance
- Cleaning: Wipe the unit with a soft, dry cloth. Do not use abrasive cleaners, waxes, or solvents.
- CD Care: Handle CDs by their edges. Clean them with a soft, lint-free cloth, wiping from the center outwards.
- Storage: If storing the unit for an extended period, unplug it from the power outlet and remove the battery backup.
Troubleshooting
| Problem | Possible Cause | Solution |
|---|---|---|
| No power | Power cord not connected; Power outlet faulty. | Ensure power cord is securely plugged in; Try a different power outlet. |
| No sound | Volume too low; Speakers not connected; Headphones connected. | Increase volume; Check speaker connections; Disconnect headphones. |
| CD not playing / Skipping | CD inserted incorrectly; CD dirty or scratched; Unit in wrong mode. | Re-insert CD correctly; Clean or replace CD; Select "CD" mode. |
| Poor FM reception | Antenna not extended; Weak signal. | Extend FM antenna fully; Reposition unit for better signal. |
| Remote control not working | Batteries dead or inserted incorrectly; Obstruction between remote and unit. | Replace batteries, check polarity; Remove obstructions; Ensure remote is pointed at the unit's sensor. |
| Clock/Alarm settings lost | No battery backup; Battery backup dead. | Install or replace the CR2 battery for backup. |
Specifications
| Feature | Detail |
|---|---|
| Model | GTMC-101mk2-BLACK |
| Brand | Grouptronics |
| Compatible Devices | MP3 Player, Smartphone, Tablet, iPod |
| Audio Output Mode | Stereo |
| Supported Audio Formats | CD, MP3 |
| Speaker Configuration | 2.0 Channel |
| Power Source | Corded Electric |
| Battery Backup | Requires 1 CR2 battery (not included) for clock/alarm retention |
| Connector Type | Auxiliary (3.5mm), USB |
| Compatible Media Type | CD |
| Product Dimensions (L x W x H) | 47 x 6 x 18 cm (assembled with speakers) |
| Item Weight | 1.57 kg |
| Colour | Black |
Warranty and Support
For warranty information and technical support, please refer to the contact details provided on the product packaging or the official Grouptronics website. Keep your purchase receipt as proof of purchase for any warranty claims.
no relevant documents
Ask a question about this manual
Ask about setup, troubleshooting, compatibility, parts, safety, or missing instructions. Manuals+ will review the question and use this page’s manual context to help answer it.