1. Introduction
Thank you for choosing the Birsppy OmniBreeze Tower Fan. This manual provides essential information for the safe and efficient operation of your new fan. Please read it thoroughly before use and retain it for future reference.
2. Important Safety Instructions
- Always unplug the fan before cleaning or performing any maintenance.
- Do not operate the fan with a damaged cord or plug.
- Keep the fan away from water and moisture. Do not immerse in water.
- Ensure the fan is placed on a stable, level surface to prevent tipping.
- Keep fingers and other objects away from the fan grilles when in operation.
- Do not block air openings.
- This fan is for indoor use only.
3. Package Contents
- OmniBreeze Tower Fan
- Remote Control
- User Manual
4. Product Overview
Familiarize yourself with the components of your OmniBreeze Tower Fan.

Figure 1: Front view of the OmniBreeze Tower Fan.
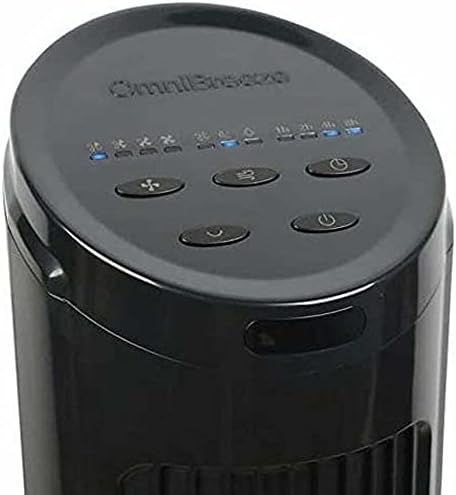
Figure 2: Top control panel with power, speed, mode, oscillation, and timer buttons.

Figure 3: Remote control for the OmniBreeze Tower Fan.

Figure 4: Integrated remote control storage slot on the fan body.
5. Setup
- Unpack: Carefully remove all components from the packaging.
- Base Assembly (if required): If the base is separate, align it with the bottom of the fan body and secure it according to the included quick start guide (not provided in this manual, but typically involves twisting or screwing).
- Placement: Place the fan on a firm, level surface. Ensure there is adequate space around the fan for proper airflow and oscillation.
- Power Connection: Plug the power cord into a standard electrical outlet.
6. Operating Instructions
Your OmniBreeze Tower Fan can be operated using the control panel on top of the unit or the remote control.
Control Panel Functions:
- Power Button (U): Press to turn the fan ON or OFF.
- Speed Button (Fan icon): Press repeatedly to cycle through 4 fan speeds (Low, Medium, High, Turbo). Corresponding indicators will light up.
- Mode Button (Wave icon): Press to select from 3 breeze modes (Normal, Natural, Sleep).
- Oscillation Button (Curved arrow icon): Press to activate or deactivate the widespread oscillation feature.
- Timer Button (Clock icon): Press to set the auto-off timer for 1, 2, 4, or 8 hours. The selected duration will be indicated.
Remote Control:
The remote control duplicates all functions of the control panel for convenient operation from a distance. Ensure the remote has working batteries (not included, typically 2x AAA). Store the remote in the designated slot on the fan when not in use.
7. Maintenance
Cleaning:
- Always unplug the fan before cleaning.
- Use a soft, damp cloth to wipe the exterior surfaces. Do not use abrasive cleaners or solvents.
- Use a vacuum cleaner with a brush attachment to gently clean dust from the air intake and exhaust grilles.
- Do not allow water to drip into the interior of the fan.
Storage:
When not in use, store the fan in a cool, dry place. It is recommended to store it in its original box to protect it from dust and damage.
8. Troubleshooting
- Fan does not turn on: Check if the power cord is securely plugged into a working outlet. Ensure the power button is pressed.
- Weak airflow: Increase the fan speed. Check for any obstructions around the air intake or exhaust grilles. Clean the grilles if dusty.
- Fan is noisy: Ensure the fan is on a stable, level surface. Check for any loose parts or foreign objects inside the fan (unplug first).
- Remote control not working: Check and replace batteries if necessary. Ensure there are no obstructions between the remote and the fan's sensor.
If problems persist, please contact customer support.
9. Specifications
| Feature | Detail |
|---|---|
| Brand | Birsppy |
| Model Name | OmniBreeze |
| Electric Fan Design | Floor Fan |
| Power Source | Battery Powered (for remote) |
| Speed Settings | 4 |
| Breeze Modes | 3 |
| Special Feature | Oscillating |
| Timer | 1h, 2h, 4h, 8h |
| Control Method | Remote Control |
| Indoor/Outdoor Usage | Indoor |
| Color | Black |
10. Warranty and Support
This product comes with a standard manufacturer's warranty. For specific warranty details, please refer to the product packaging or contact Birsppy customer support. If you encounter any issues or have questions not covered in this manual, please reach out to our support team for assistance.


