
1. Introduction
This manual provides essential information for the safe and efficient operation, setup, and maintenance of your STAYER LOM 180 Orbital Sander. Please read these instructions carefully before using the tool and keep them for future reference.
The STAYER LOM 180 is designed for sanding wood and drywall surfaces, featuring a 260 W motor and an aluminum base for durability and lightweight handling.
2. General Safety Instructions
Always follow basic safety precautions to reduce the risk of fire, electric shock, and personal injury. Keep your work area clean and well-lit. Do not operate power tools in explosive atmospheres, such as in the presence of flammable liquids, gases, or dust.
- Wear appropriate personal protective equipment (PPE) including safety glasses, dust mask, and hearing protection.
- Ensure the power switch is off before connecting to a power source, making adjustments, or changing accessories.
- Secure the workpiece to prevent movement during sanding.
- Keep hands away from the sanding pad during operation.
- Do not force the tool. Let the tool work at its intended speed.
- Disconnect the plug from the power source before performing any maintenance or when the tool is not in use.
- The tool features a safety lock switch to prevent accidental startup. Always engage this lock when not actively sanding.
3. Product Overview and Components
Familiarize yourself with the parts of your STAYER LOM 180 Orbital Sander:
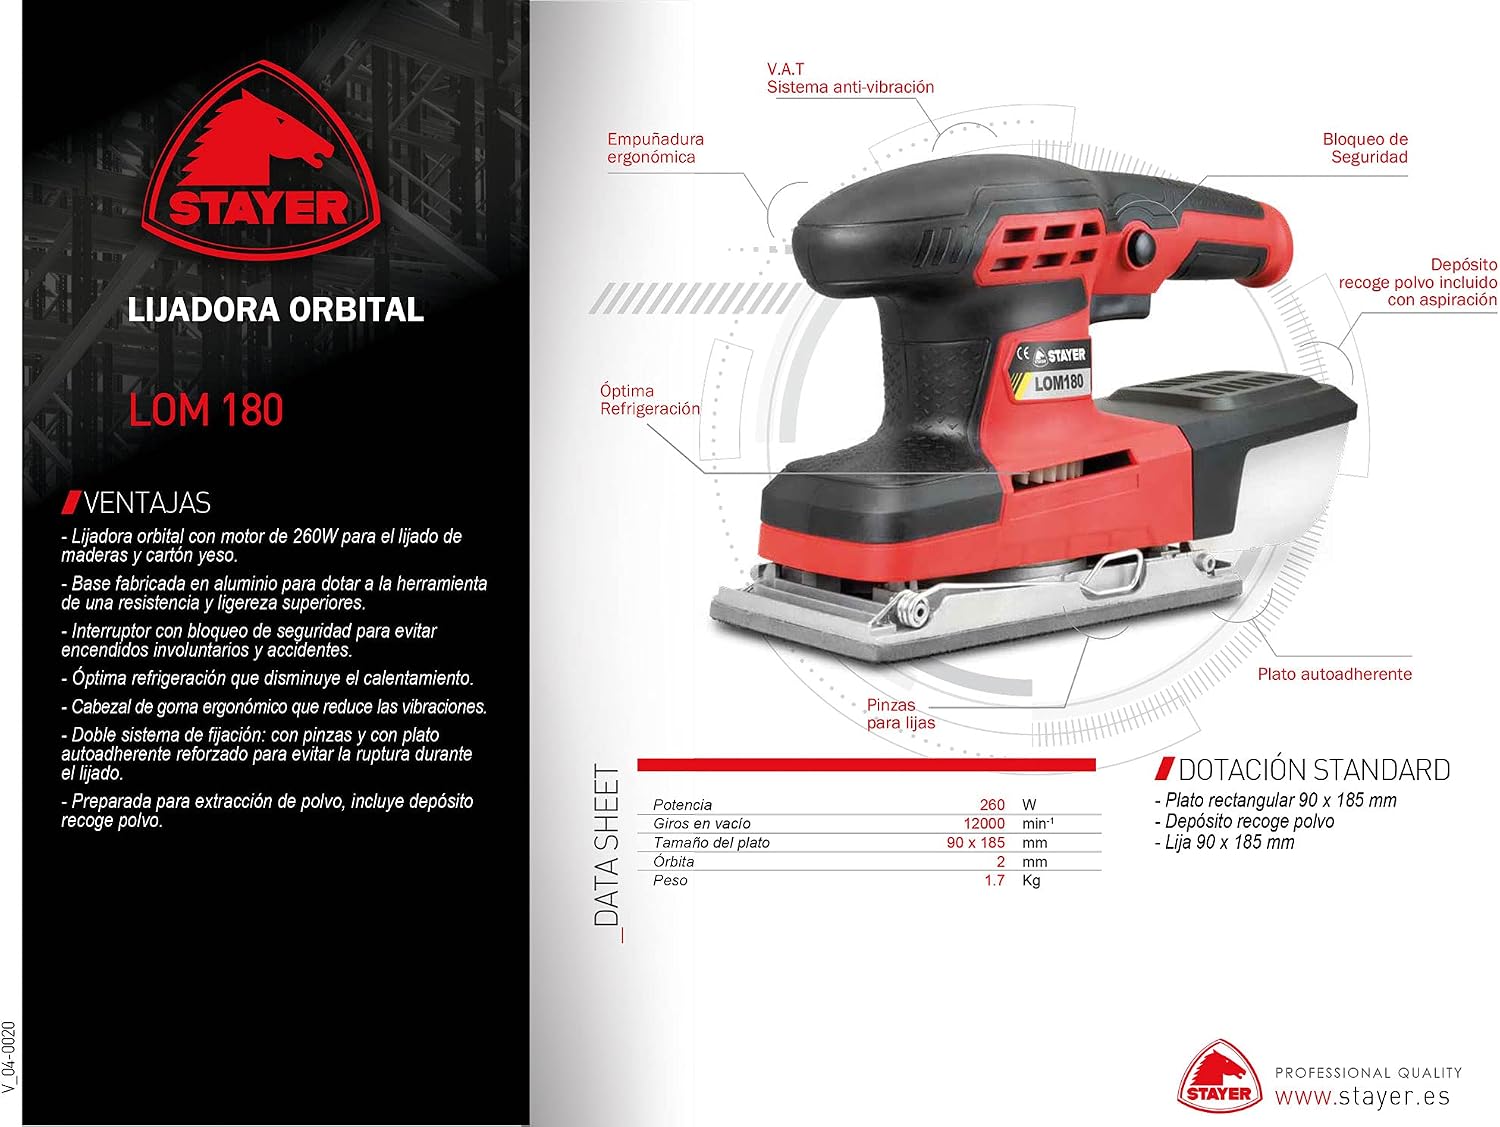
Figure 1: STAYER LOM 180 Orbital Sander with key components highlighted.
- Ergonomic Handle: Designed for comfortable grip and reduced vibration.
- Anti-Vibration System (V.A.T.): Minimizes user fatigue during extended use.
- Safety Lock Switch: Prevents unintentional activation.
- Optimal Cooling System: Reduces heat buildup during operation.
- Dust Collection Box: Collects sanding dust for a cleaner work environment.
- Self-Adhesive Pad: For quick and easy attachment of sandpaper.
- Clamps for Sandpaper: Provides an alternative method for securing sandpaper.
- Aluminum Base: Ensures durability and lightweight performance.
4. Setup and Sandpaper Installation
Before starting, ensure the sander is disconnected from the power supply.
4.1. Attaching Sandpaper (Self-Adhesive Pad)
- Ensure the sanding pad is clean and free of debris.
- Align the sandpaper with the self-adhesive pad, ensuring any dust extraction holes on the sandpaper match those on the pad.
- Press the sandpaper firmly onto the pad to secure it.
4.2. Attaching Sandpaper (Clamps)
- Lift the clamps on both sides of the sanding pad.
- Insert one end of the sandpaper under the clamp and secure it.
- Pull the sandpaper taut across the pad and insert the other end under the second clamp, securing it firmly.
- Ensure the sandpaper is tight and flat against the pad to prevent tearing during operation.
4.3. Dust Collection Box
Attach the dust collection box to the designated port on the sander. Ensure it is securely fitted to optimize dust extraction.
5. Operating Instructions
Follow these steps for safe and effective operation:
- Prepare the Workpiece: Ensure the material to be sanded is clean, dry, and securely fastened.
- Connect Power: Plug the sander into a suitable power outlet.
- Start the Sander: Hold the sander firmly with both hands. Press the power switch to turn it on. Release the safety lock if engaged.
- Begin Sanding: Gently place the sanding pad flat onto the workpiece. Apply even, moderate pressure and move the sander in smooth, overlapping strokes. Avoid pressing too hard, as this can reduce efficiency and damage the surface or the tool.
- Maintain Control: The ergonomic rubber head helps reduce vibrations, allowing for better control.
- Stop the Sander: Lift the sander from the workpiece, then release the power switch to turn it off. Engage the safety lock.
6. Maintenance
Regular maintenance ensures optimal performance and extends the life of your tool. Always disconnect the sander from the power supply before any maintenance.
6.1. Cleaning
- Empty Dust Collection Box: Regularly empty the dust collection box to maintain effective dust extraction.
- Clean Air Vents: Use compressed air to clear dust from the motor's cooling vents to prevent overheating.
- Wipe Down Tool: Clean the exterior of the tool with a soft, damp cloth. Do not use harsh chemicals or solvents.
6.2. Sandpaper Replacement
Replace sandpaper when it becomes worn or clogged to ensure efficient sanding and prevent damage to the workpiece.
6.3. Inspection
Periodically inspect the power cord for damage. Check the sanding pad for wear or damage and replace if necessary.
7. Troubleshooting
| Problem | Possible Cause | Solution |
|---|---|---|
| Sander does not start | No power supply; Safety lock engaged; Damaged power cord | Check power outlet; Disengage safety lock; Inspect and replace cord if damaged (contact service) |
| Poor sanding performance | Worn or clogged sandpaper; Incorrect grit sandpaper; Excessive pressure | Replace sandpaper; Use appropriate grit; Apply moderate, even pressure |
| Excessive vibration | Loose sandpaper; Damaged sanding pad; Internal issue | Re-secure sandpaper; Replace sanding pad; Contact service if issue persists |
| Poor dust extraction | Full dust box; Clogged vents; Loose dust box connection | Empty dust box; Clean vents; Ensure dust box is securely attached |
8. Technical Specifications
| Feature | Specification |
|---|---|
| Brand | STAYER |
| Model Number | 12553 (LOM 180) |
| Power | 260 W |
| No-Load Speed | 12000 Revolutions per minute (min⁻¹) |
| Sanding Pad Size | 90 x 185 mm |
| Orbit Diameter | 2 mm |
| Item Weight | 1.7 Kilograms |
| Standard Equipment | Rectangular plate 90 x 185 mm, Dust collection box, Sandpaper 90 x 185 mm |
9. Warranty and Support
For warranty information, technical support, or service inquiries, please contact STAYER customer service or your authorized dealer. Keep your purchase receipt as proof of purchase.
For more information, visit the official STAYER website: www.stayer.es
