1. Introduction
This manual provides comprehensive instructions for the safe and efficient operation, installation, and maintenance of your VEVOR Double Door Security Safe Box, Model T-75E. Please read this manual thoroughly before using the product and retain it for future reference.
2. Safety Information
- Do not store the emergency keys inside the safe. Keep them in a secure, separate location.
- Ensure the safe is installed on a stable surface or securely mounted to a wall or floor to prevent unauthorized removal.
- Keep the safe away from moisture and direct heat sources.
- Do not attempt to force the safe open if the lock mechanism malfunctions. Use the emergency key or contact customer support.
- Replace batteries promptly when the low battery indicator appears to avoid being locked out.
3. Package Contents
Verify that all items listed below are included in your package:
- 1 x VEVOR Double Door Security Safe Box
- 4 x Steel Expansion Bolts
- 2 x Interior Pads (Carpet)
- 4 x Emergency Keys (2 for each door)
- 1 x Instruction Manual
4. Product Overview
The VEVOR Double Door Security Safe Box (Model T-75E) features a robust steel construction and a digital locking system, providing secure storage for your valuables. It includes two independent compartments for organized storage.

Figure 4.1: Front view of the VEVOR Double Door Security Safe Box with both doors open, revealing the interior compartments and the included expansion bolts for mounting.
Key Features:
- Solid Steel Construction: Built from heavy-duty steel to resist tampering.
- Dual Locking System: Each door features an electronic keypad and an emergency key override.
- 2.6 Cubic Feet Capacity: Two separate compartments offer ample storage space.
- Pre-drilled Mounting Holes: For secure installation to a wall or floor.

Figure 4.2: Detail of the digital keypad and emergency key access point on the safe door, illustrating the two unlocking methods.
5. Setup
5.1 Battery Installation
- Locate the battery compartment on the inside of each safe door.
- Insert 4 x 1.5V AA batteries (not included) into each compartment, ensuring correct polarity.
- Close the battery compartment cover.
Note: Always use new batteries. If the safe will not be used for an extended period, remove the batteries to prevent leakage.
5.2 Mounting the Safe
For optimal security, it is recommended to mount the safe to a wall or floor using the provided expansion bolts.
- Choose a suitable location for the safe.
- Open the safe door and locate the pre-drilled holes on the back or bottom panel.
- Position the safe and mark the drilling points on the wall or floor through the pre-drilled holes.
- Drill holes at the marked positions using an appropriate drill bit for your wall/floor material.
- Align the safe with the drilled holes and insert the expansion bolts.
- Tighten the bolts securely to fix the safe in place.
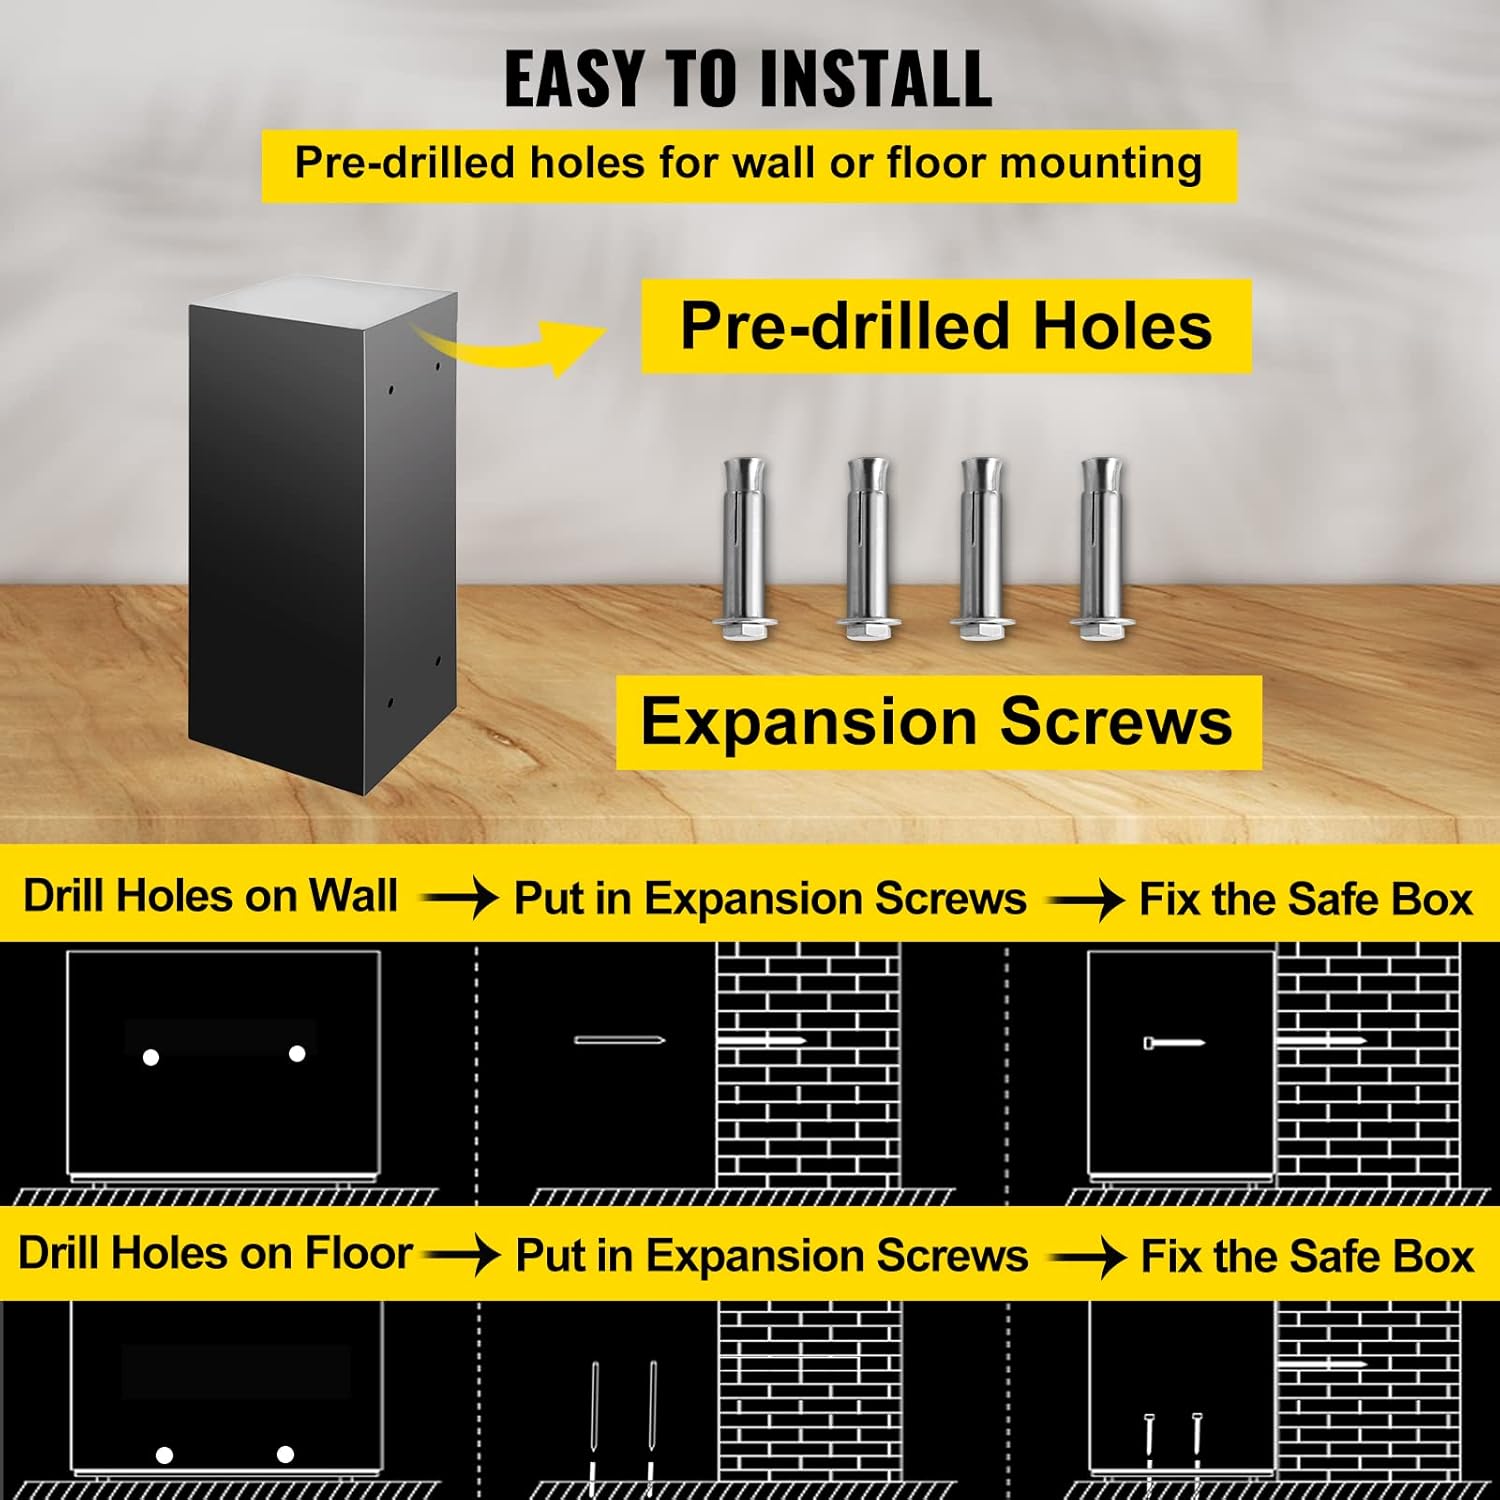
Figure 5.1: Illustration of the mounting process for securing the safe to a wall or floor.
6. Operating Instructions
6.1 Initial Opening (First Use)
For the first opening, use the emergency key:
- Locate the emergency keyhole, usually hidden behind a cover on the keypad panel.
- Insert the emergency key and turn it clockwise.
- While the key is turned, rotate the knob clockwise to open the door.
6.2 Setting the User Passcode
Each door has an independent locking mechanism and passcode.
- With the door open, locate the red reset button on the inside of the door, near the hinge.
- Press the red reset button. The indicator light on the keypad will flash.
- Enter your desired 3-8 digit passcode on the keypad.
- Press the "#" button to confirm. The indicator light will stop flashing, confirming the new passcode is set.
- Test the new passcode with the door open before closing it.
6.3 Opening the Safe with Passcode
- Enter your 3-8 digit passcode on the keypad.
- Press the "#" button. The indicator light will turn green.
- Within 5 seconds, rotate the knob clockwise to open the door.
6.4 Emergency Key Access
In case of battery failure or forgotten passcode, the emergency key can be used:
- Remove the cover over the emergency keyhole on the keypad panel.
- Insert the emergency key and turn it clockwise.
- While the key is turned, rotate the knob clockwise to open the door.
Important: Do not store emergency keys inside the safe.
7. Maintenance
- Cleaning: Wipe the safe's exterior with a soft, damp cloth. Avoid abrasive cleaners or solvents.
- Battery Replacement: Replace all 4 AA batteries in each door's compartment when the low battery warning appears or at least once a year to prevent corrosion.
- Lock Mechanism: Do not lubricate the lock mechanism. If it becomes stiff, contact customer support.
8. Troubleshooting
| Problem | Possible Cause | Solution |
|---|---|---|
| Safe does not open with passcode. | Incorrect passcode entered. Batteries are low or dead. Knob not turned within 5 seconds. | Re-enter passcode carefully. Replace batteries. Enter passcode and turn knob immediately. |
| Keypad does not respond. | Batteries are completely dead or incorrectly installed. | Replace batteries, ensuring correct polarity. Use emergency key to open. |
| Door cannot be closed. | Obstruction in the door frame. Locking bolts are extended. | Check for any items blocking the door. Ensure the knob is in the open position before closing. |
| Emergency key does not work. | Incorrect key used. Keyhole obstructed. | Ensure you are using the correct emergency key for the specific door. Check for debris in the keyhole. |
9. Specifications
| Feature | Detail |
|---|---|
| Model Number | T-75E |
| Brand | VEVOR |
| Capacity | 2.6 Cubic Feet (74L) |
| Product Dimensions (D x W x H) | 16.5" x 31.9" x 16.5" (41.9 cm x 81 cm x 41.9 cm) |
| Item Weight | 39.7 Pounds (18 kg) |
| Material | Alloy Steel |
| Lock Type | Electronic with Key Override |
| Power Source | 4 x 1.5V AA Batteries (per door, not included) |
| Color | Black |
| Water Resistance Level | Not Water Resistant |
| UPC | 700721039210 |

Figure 9.1: Product dimensions of the VEVOR Double Door Security Safe Box.
10. Warranty and Support
For warranty information or technical support, please refer to the official VEVOR website or contact their customer service directly. Keep your purchase receipt as proof of purchase.
VEVOR Official Website: www.vevor.com