1. Introduction
Thank you for choosing the Orange Super Crush 100 Combo Amplifier. This 100-watt solid-state amplifier is designed to deliver a wide range of tones, from pristine cleans to high-gain distortion, utilizing high-quality analog circuitry. It features two independent channels, a Celestion G12H-150 12-inch speaker, and a balanced XLR output with CabSim speaker emulation. This manual will guide you through the proper setup, operation, and maintenance of your amplifier to ensure years of reliable performance.

Figure 1: Front view of the Orange Super Crush 100 Combo Amplifier.
2. Important Safety Instructions
Please read and follow all safety instructions before operating this product. Retain this manual for future reference.
- Power Source: Connect the amplifier only to a power supply of the type described in this manual or marked on the unit. Ensure the voltage is correct for your region.
- Grounding: This appliance must be grounded. Do not defeat the safety purpose of the polarized or grounding-type plug.
- Ventilation: Do not block any ventilation openings. Install in accordance with the manufacturer's instructions. Do not install near any heat sources such as radiators, heat registers, stoves, or other apparatus (including amplifiers) that produce heat.
- Water and Moisture: Do not use this apparatus near water. Do not expose to dripping or splashing. No objects filled with liquids, such as vases, shall be placed on the apparatus.
- Cleaning: Clean only with a dry cloth.
- Cables: Protect the power cord from being walked on or pinched, particularly at plugs, convenience receptacles, and the point where they exit from the apparatus.
- Servicing: Refer all servicing to qualified service personnel. Servicing is required when the apparatus has been damaged in any way, such as power-supply cord or plug is damaged, liquid has been spilled or objects have fallen into the apparatus, the apparatus has been exposed to rain or moisture, does not operate normally, or has been dropped.
- Hearing Protection: Prolonged exposure to high volume levels can cause permanent hearing damage. Use caution when setting volume levels.
3. What's in the Box
Upon unpacking your Orange Super Crush 100 Combo Amplifier, please ensure all items are present:
- Orange Super Crush 100 Combo Amplifier
- Power Cable
- User Manual (this document)
If any items are missing or damaged, please contact your retailer or Orange customer support immediately.
4. Setup
4.1 Unpacking
Carefully remove the amplifier from its packaging. Retain all packaging materials for future transport or servicing needs.
4.2 Placement
Place the amplifier on a stable, level surface. Ensure adequate ventilation around the unit to prevent overheating. Avoid placing the amplifier in direct sunlight or near sources of excessive heat or moisture.
4.3 Connecting Power
Before connecting the power cable, ensure the amplifier's power switch is in the 'OFF' position. Connect the supplied power cable to the AC input on the rear panel of the amplifier and then to a grounded electrical outlet.
4.4 Connecting Your Instrument
Connect your guitar or other instrument to the INPUT jack on the front panel using a high-quality instrument cable.

Figure 2: Side view of the Orange Super Crush 100 Combo Amplifier, showing its robust construction.
5. Controls and Features
The Orange Super Crush 100 Combo Amplifier features a user-friendly control layout. Familiarize yourself with the following controls:

Figure 3: Top-front view of the amplifier, highlighting the control panel.
5.1 Front Panel Overview
- INPUT: 1/4-inch jack for connecting your instrument.
- CLEAN CHANNEL CONTROLS:
- VOLUME: Adjusts the overall output level of the Clean Channel.
- BASS, MIDDLE, TREBLE: 3-band EQ for shaping the tone of the Clean Channel.
- DIRTY CHANNEL CONTROLS:
- GAIN: Controls the amount of overdrive/distortion.
- BASS, MIDDLE, TREBLE: 3-band EQ for shaping the tone of the Dirty Channel.
- VOLUME: Adjusts the overall output level of the Dirty Channel.
- MASTER SECTION:
- REVERB: Controls the amount of built-in digital reverb.
- MASTER VOLUME: Controls the overall output volume of the entire amplifier.
- CHANNEL SWITCH: Toggles between the Clean and Dirty channels.
- POWER SWITCH: Turns the amplifier ON or OFF.
5.2 Rear Panel Overview
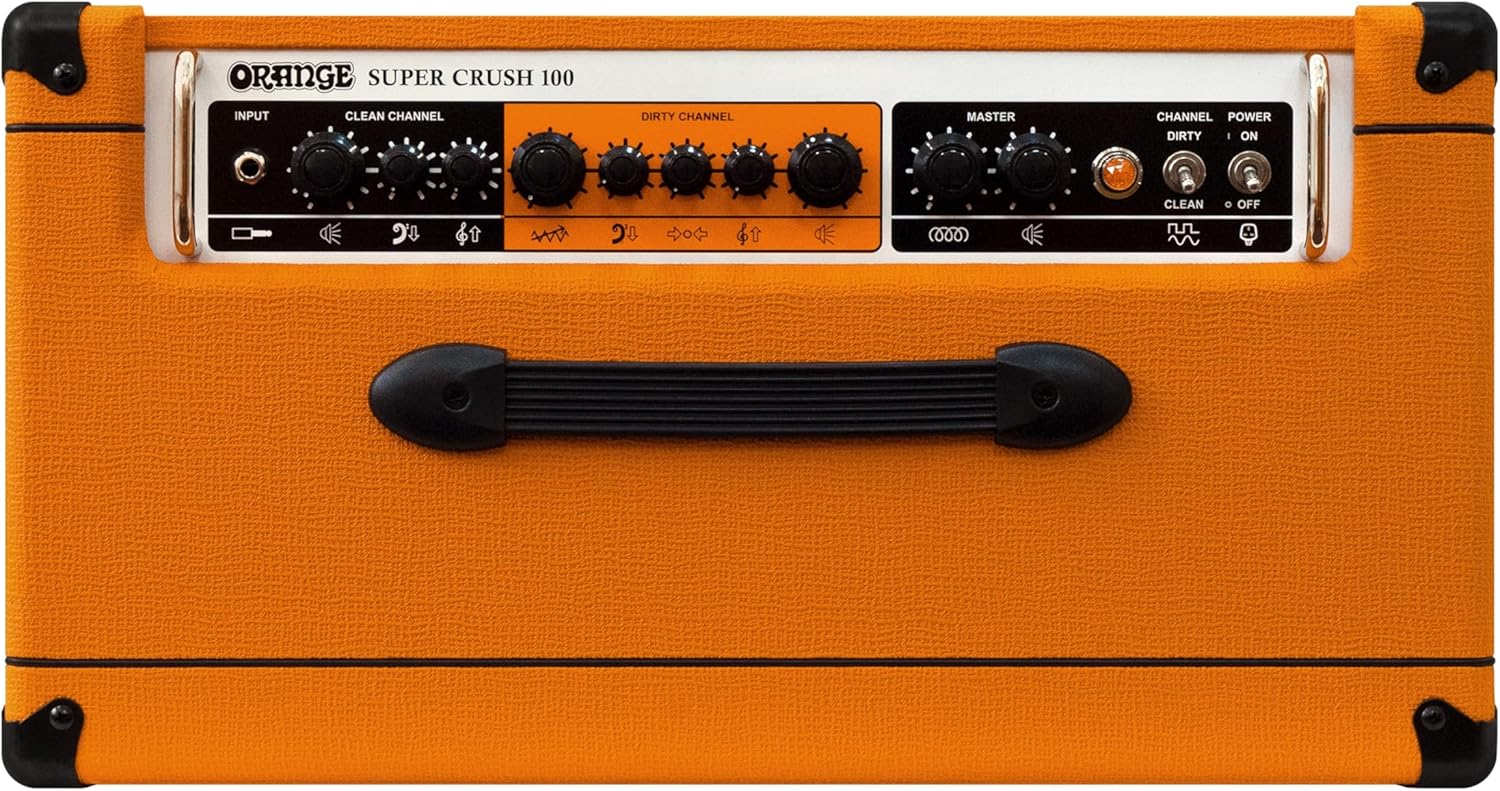
Figure 4: Rear view of the amplifier, showing the various input/output connections.
- FX LOOP (SEND/RETURN): For connecting external effects pedals.
- CABSIM OUT (XLR): Balanced XLR output with speaker cabinet emulation for direct connection to a mixing console or audio interface.
- SPEAKER OUTPUTS: Connect external speaker cabinets. Ensure correct impedance matching.
- FOOTSWITCH: Input for an optional footswitch to control channel switching and reverb.
- AC INPUT: For connecting the power cable.
6. Operating Instructions
6.1 Powering On/Off
- Ensure all connections (instrument, power) are secure.
- Turn the MASTER VOLUME control to its minimum setting.
- Flip the POWER SWITCH to the 'ON' position. The indicator light will illuminate.
- Slowly increase the MASTER VOLUME to your desired listening level.
- To power off, reverse these steps: turn down MASTER VOLUME, then flip the POWER SWITCH to 'OFF'.
6.2 Selecting Channels
Use the CHANNEL SWITCH on the front panel to toggle between the Clean and Dirty channels. An optional footswitch (sold separately) can also be used for remote channel switching.
6.3 Adjusting Tone
Each channel features independent BASS, MIDDLE, and TREBLE controls. Experiment with these to find your desired sound. The GAIN control on the Dirty Channel allows you to dial in the amount of overdrive, from subtle crunch to heavy distortion.
6.4 Using Reverb
The built-in digital reverb can be adjusted using the REVERB control in the Master section. Turn the knob clockwise to increase the reverb effect.
6.5 Effects Loop Usage
The buffered effects loop allows you to integrate external effects pedals into your signal chain after the preamp section. Connect the SEND jack to the input of your effects pedal and the output of your effects pedal to the RETURN jack.
7. Maintenance
7.1 Cleaning
Wipe the amplifier's exterior with a soft, dry cloth. Do not use abrasive cleaners, solvents, or waxes, as these can damage the finish. Avoid spraying liquids directly onto the amplifier.
7.2 Storage
When not in use for extended periods, store the amplifier in a cool, dry place, away from extreme temperatures and humidity. If possible, cover the amplifier to protect it from dust.
7.3 Speaker Care
The Celestion speaker is robust, but avoid physical impact to the speaker cone. Do not attempt to clean the speaker cone directly.
8. Troubleshooting
If you encounter issues with your Orange Super Crush 100, consult the table below for common problems and solutions.
| Problem | Possible Cause | Solution |
|---|---|---|
| No sound | Power not connected, volume too low, instrument cable faulty, speaker cable disconnected. | Check power connection, increase Master Volume, test instrument cable, ensure speaker is connected. |
| Distorted or weak sound | Incorrect gain settings, faulty instrument/cable, external effects issue. | Adjust Gain and Volume controls, test with a different instrument/cable, bypass effects loop. |
| Humming or buzzing noise | Ground loop, faulty power cable, interference from other electronics. | Try a different power outlet, ensure proper grounding, move amplifier away from other electronics. |
| Reverb not working | Reverb control set to minimum. | Increase the Reverb control. |
If the problem persists after attempting these solutions, please contact Orange customer support or a qualified service technician.
9. Specifications
- Output Wattage: 100 Watts
- Speaker: 1 x 12-inch Celestion G12H-150
- Channels: Two (Clean, Dirty)
- Preamp: All-analogue circuitry
- EQ: 3-band (Bass, Middle, Treble) per channel
- Effects: Built-in Reverb, Fully-buffered Effects Loop
- Outputs: Balanced XLR output with CabSim speaker emulation
- Dimensions (Product): 18 x 25 x 24 inches (approximate)
- Item Weight: 49 pounds (approximate)
- Model Number: SUPER-CRUSH-100-C
- Brand: Orange
10. Warranty and Support
10.1 Warranty Information
Orange products are manufactured to high standards and are warranted against defects in materials and workmanship for a specified period from the date of purchase. Please refer to the warranty card included with your product or visit the official Orange Amplification website for detailed warranty terms and conditions specific to your region.
10.2 Contact Support
For technical assistance, service inquiries, or to purchase accessories, please contact Orange customer support through their official website or your local distributor.
10.3 Online Resources
Visit the Orange Store on Amazon for additional product information and accessories.


