1. Introduction
The BIQU H2 V2S is a lightweight, high-performance dual gear direct drive extruder designed for 3D printers. It offers enhanced precision, improved filament compatibility, and efficient thermal management for a superior printing experience. This manual provides essential information for the installation, operation, and maintenance of your H2 V2S extruder.

The BIQU H2 V2S Dual Gear Extruder, showcasing its compact design and integrated fan.
2. Product Features
- Lightweight Design: Weighing approximately 195g, the H2 V2S reduces inertia, leading to more accurate positioning and higher printing precision.
- Adjustable Filament Loading Tension: A tension screw allows for easy adjustment to accommodate various filament types, improving printing success rates, especially for flexible filaments.
- Powerful Dual Gear Feeding: Features a robust extrusion system with dual gears and a 7:1 gear ratio, providing an exceptional pushing force of 770N for smooth feeding and precise retractions.
- Efficient Heat Dissipation: Constructed with a lightweight, wear-resistant aluminum alloy housing, high thermal conductivity heatsinks, and an integrated fan for effective cooling.
- Versatile Mounting Options: Includes four screw mounting holes for installing an auto-leveling sensor or an additional cooling fan, expanding functionality.
- High-Temperature Printing: Equipped with a bi-metal heatbreak, enabling stable printing at temperatures up to 270°C, with a silicone sock for insulation.
- Wide Compatibility: Compatible with a broad range of 3D printers, including BIQU B1, BIQU BX, Creality Ender-3, Voron 2.4, Voron V0, Vzbot, Anycubic Mega S, Geeetech printers, and Prusa I3 DIY Kits.

An overview of the key features of the BIQU H2 V2S Extruder, emphasizing its design for enhanced 3D printing performance.

The H2 V2S extruder weighs 195 grams, demonstrating its lightweight design for reduced inertia and improved printing accuracy.

An internal view of the powerful dual-gear extrusion system, featuring a 7:1 gear ratio and 770N extrusion force for consistent filament feeding and precise retractions.

The integrated fan and heatsink design provide efficient cooling for stable operation during extended prints.
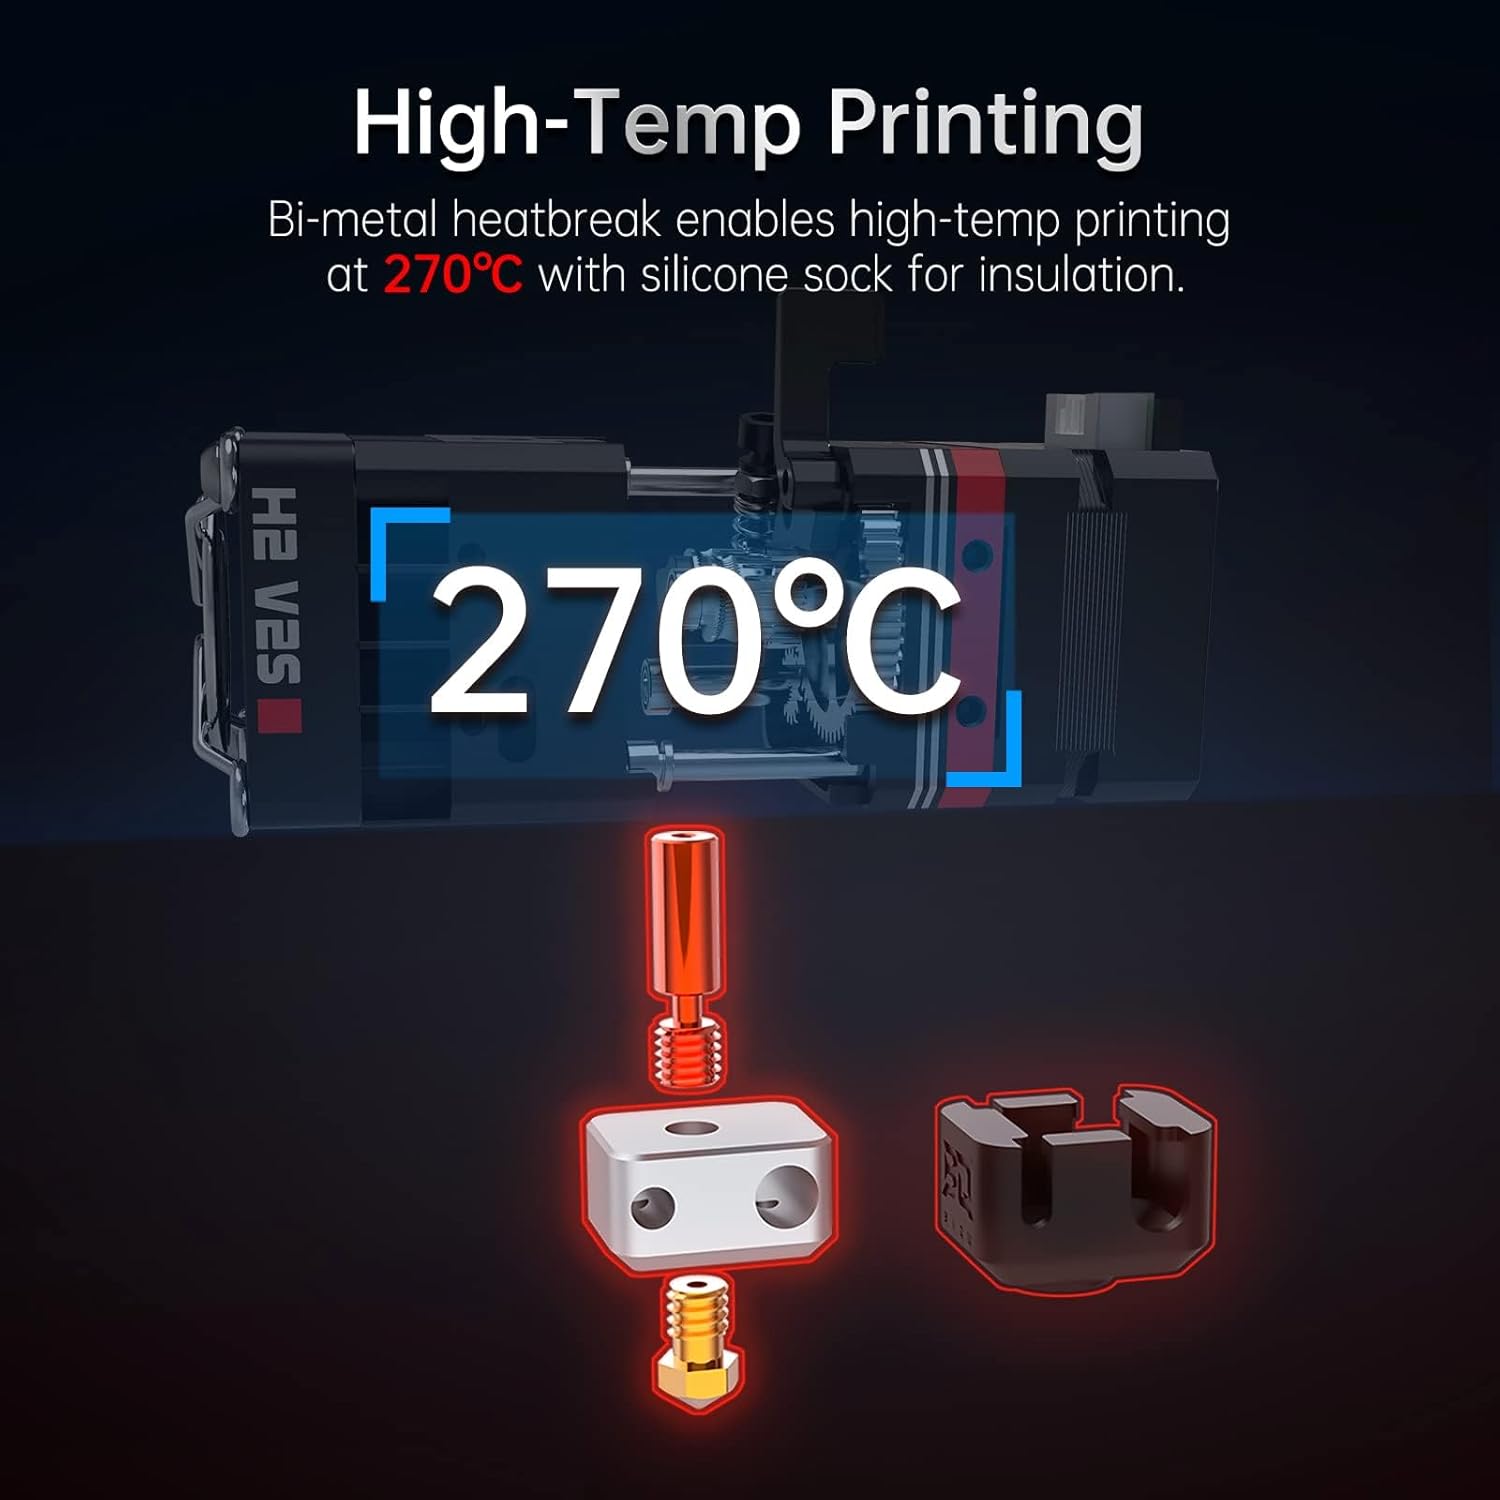
The bi-metal heatbreak design enables stable high-temperature printing up to 270°C, supported by a silicone sock for thermal insulation.
3. Setup and Installation
Installation of the BIQU H2 V2S Extruder requires mechanical mounting and electrical connection to your 3D printer's control board. Due to the variety of 3D printer models, specific mounting brackets and wiring configurations may vary. Refer to your 3D printer's documentation and the H2 V2S wiring diagram for detailed instructions.
3.1 Mounting
- Ensure your printer is powered off and disconnected from the power source.
- Remove your existing extruder and hotend assembly.
- Attach the H2 V2S extruder to your printer's carriage using appropriate mounting hardware. Custom brackets may be required for certain printer models.
- Utilize the four available mounting holes on the H2 V2S for additional accessories like auto-leveling sensors or part cooling fans.
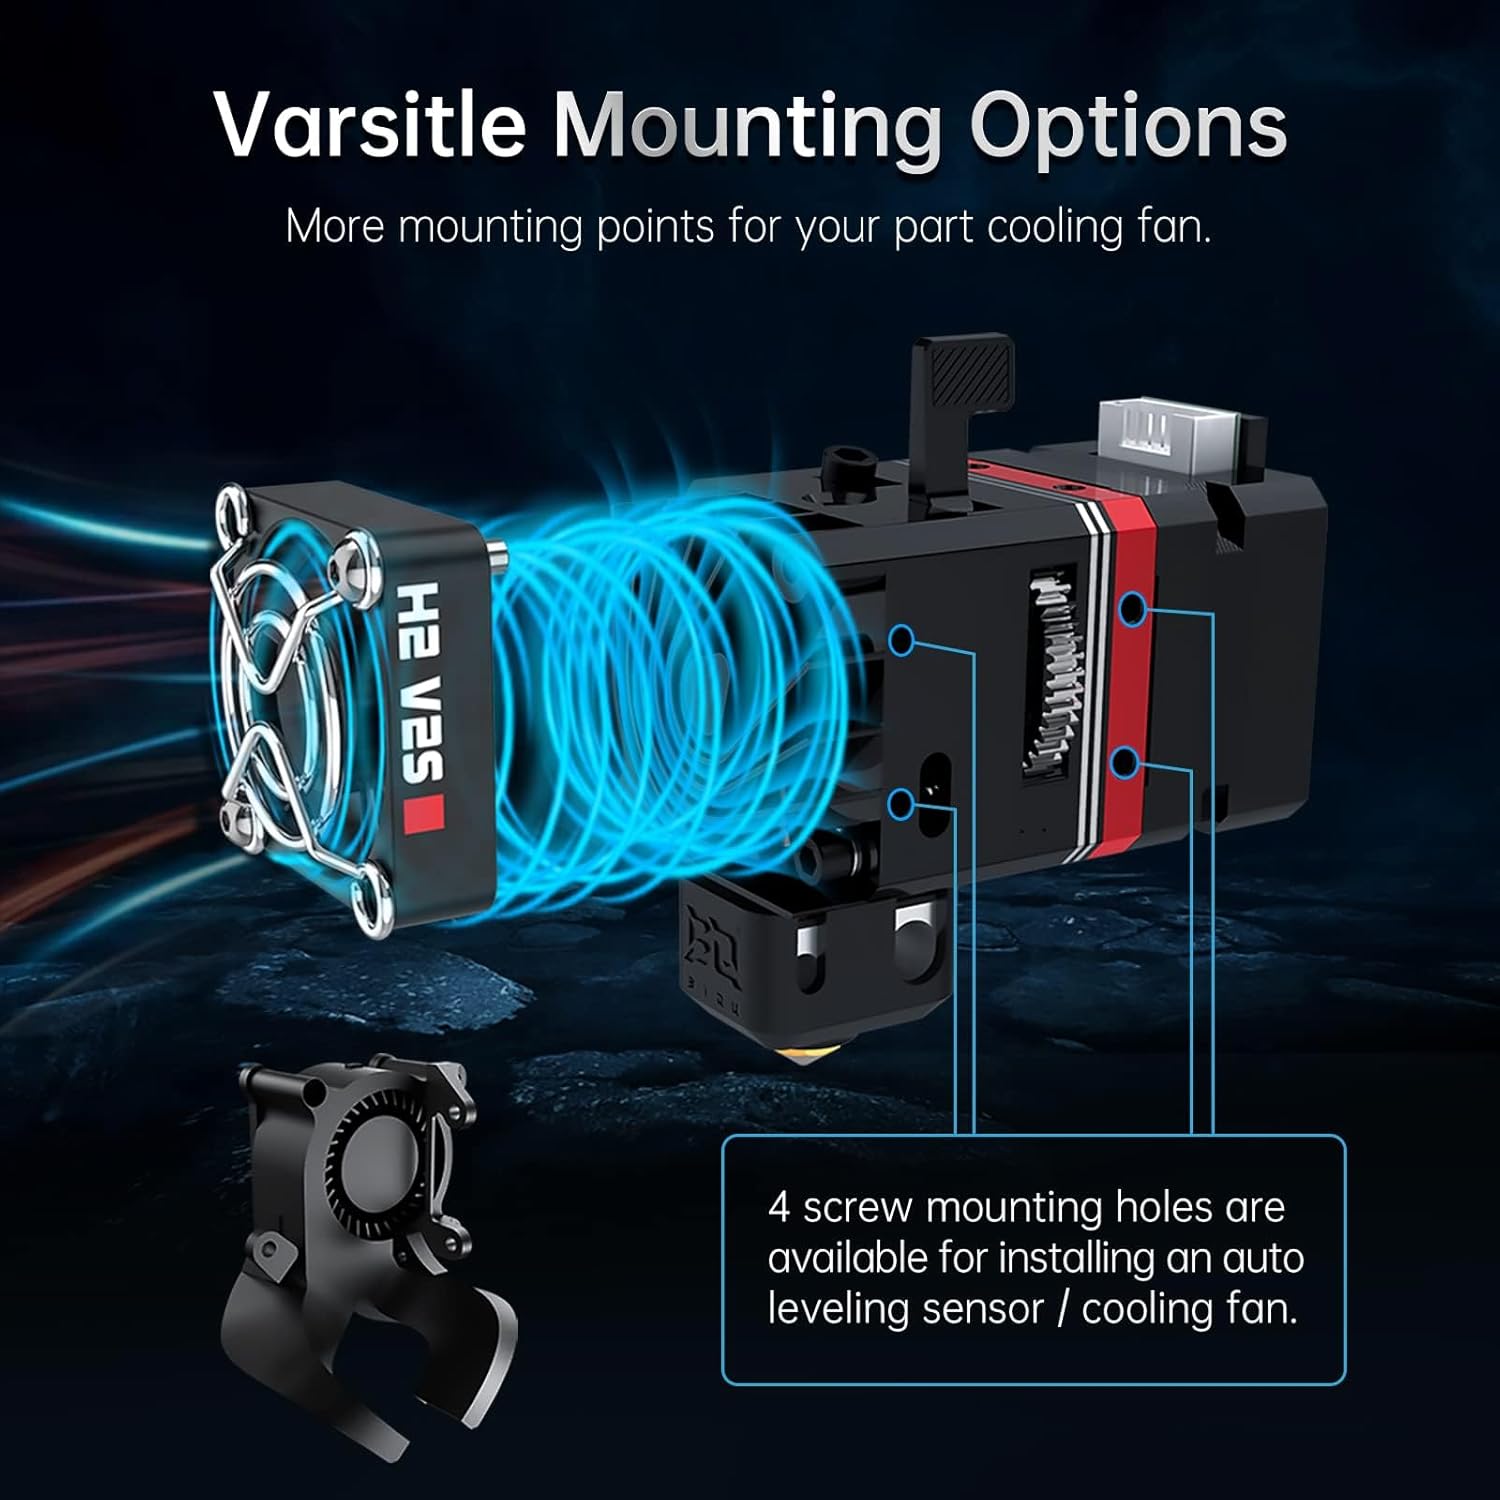
This diagram highlights the multiple screw mounting holes available for installing an auto-leveling sensor or an additional cooling fan, enhancing functionality.
3.2 Wiring
- Connect the stepper motor, heater cartridge, thermistor, and cooling fan cables to your printer's control board. Pay close attention to polarity and pin assignments.
- Verify all connections are secure before proceeding.
3.3 Firmware Configuration
- Update your 3D printer's firmware to reflect the new extruder's E-steps (932 steps/mm at 16 microstep is a recommended starting point, calibration is advised).
- Adjust PID tuning for the hotend to ensure stable temperature control.
- If using Klipper firmware, set `rotation_distance: 3.433` and `gear_ratio: 7:1` (or `32:16, 56:16` as per some community recommendations, verify with BIQU documentation or Klipper setup guides).
4. Operation
4.1 Filament Loading
- Preheat the hotend to the appropriate temperature for your filament.
- Press the ingenious switch lever to open the filament path.
- Insert the filament into the extruder until it reaches the hotend.
- Release the lever.
- Manually extrude a small amount of filament to ensure it flows smoothly and is purged of any previous material.

The switch lever mechanism facilitates easy and quick filament loading and unloading.
4.2 Adjusting Filament Tension
The H2 V2S features an adjustable screw tensioner. Rotate the screw to increase or decrease the pressure on the filament. For flexible filaments, a slightly higher tension may be beneficial, while for brittle filaments, a lower tension can prevent grinding.

The internal spring mechanism ensures consistent pressure on the filament for reliable extrusion.

The adjustable screw tensioner allows for optimal grip on various filaments, improving printing performance, especially with flexible materials.
5. Maintenance
- Regular Cleaning: Periodically clean the extruder gears and filament path to prevent debris buildup, which can lead to grinding or clogging. Use a small brush or compressed air.
- Nozzle Inspection: Inspect the nozzle for wear or blockages. Replace the nozzle if it shows signs of damage or significant wear.
- Heatbreak Condition: Ensure the bi-metal heatbreak is free from clogs and properly seated.
- Fan Check: Verify the cooling fan is operating correctly and free from obstructions to maintain efficient heat dissipation.
6. Troubleshooting
- Filament Grinding: This often indicates too much tension, a partially clogged nozzle, or incorrect print temperature. Adjust tension, clean the nozzle, or increase hotend temperature.
- Under-extrusion: Check for clogs, ensure proper filament tension, verify E-steps calibration, and confirm the hotend temperature is sufficient for the filament.
- Over-extrusion: Recalibrate E-steps, reduce flow rate in your slicer, or check for incorrect filament diameter settings.
- Temperature Instability: Perform PID tuning for the hotend. Ensure the thermistor and heater cartridge connections are secure.
- Fan Noise/Failure: Inspect the fan for obstructions. If the fan is excessively noisy or has stopped working, it may need replacement.
- Poor Flexible Filament Printing: Adjust the screw tensioner to find the optimal grip. Ensure print speed is reduced and retraction settings are minimized (e.g., 1mm retraction at 25mm/s).
7. Specifications
| Feature | Specification |
|---|---|
| Extrusion Method | Dual Gear Extrusion |
| Nozzle Diameter | 0.4mm (Standard) |
| Maximum Printing Temperature | 270°C |
| Weight | 195g (including aluminum heater block) |
| Maximum Extrusion Force | 7.5kg (depending on filaments) / 770N |
| Extrusion (based on existing) | 600mm³/min (depending on filaments) |
| E-step | 932mm at 16 microstep (calibration recommended) |
| Gear Ratio | 7:1 |
| Klipper Rotation Distance | 3.433 |
| Recommended Motor Current | 800mA |
| Drive Gear Circumference | 24.5mm |
| Filament Diameter and Tolerance | 1.75 ± 0.05 mm |
| Thermistor Type | NTC100K |
| Heater Cartridge Power | 40W |
| Heater Cartridge Voltage | 24V |
| Note | Not compatible with standard NEMA14 motor. |

A comprehensive table outlining the technical specifications of the BIQU H2 V2S Extruder.

Detailed technical drawing providing the precise dimensions of the BIQU H2 V2S Extruder for integration planning.
8. Package Contents
The BIQU H2 V2S Extruder package typically includes the following items:
- BIQU H2 V2S Upgrade Dual Gear Extruder
- Cooling Fan
- Fan Guard
- Mounting Screws and Nuts
- Hex Wrenches
- Open-end Wrenches
- Heater Cartridge
- Thermistor
- Connection Cables

The package includes the BIQU H2 V2S Extruder, mounting hardware, wrenches, and connection cables for installation.
9. Warranty and Support
For warranty information and technical support, please refer to the official BIQU website or contact your retailer. Keep your proof of purchase for any warranty claims.