Yaheetech YA-00109071
Yaheetech Coat Rack with Bench and Large Entryway Hall Tree
Model: YA-00109071
Introduction
This manual provides detailed instructions for the assembly, operation, and maintenance of your Yaheetech Coat Rack with Bench and Large Entryway Hall Tree. Please read this manual thoroughly before assembly and use to ensure proper function and safety.
Safety Information
- Warning: Do not overload the hooks or shelves to prevent the unit from tipping over.
- Important: Ensure that the anti-tipping kits are correctly installed before using the product.
- Keep all small parts and packaging materials away from children and pets.
- Assemble the unit on a soft, clean surface to prevent scratches.
- Regularly check all connections and tighten screws as needed.
Package Contents
Please verify that all components listed below are present before beginning assembly.
- 1 x Entryway Coat Rack Unit
- 1 x Instruction Manual
- 1 x Accessory Kit (screws, tools, etc.)
- 2 x Anti-tipping Kits
Note: Some small screws for attaching hooks might be missing as per customer feedback. Please check your accessory kit carefully.
Setup and Assembly
Follow these steps carefully for proper assembly. It is recommended to have two people for assembly.
Step 1: Unpack and Identify Parts
Carefully unpack all components and lay them out on a soft, clean surface. Identify each part by comparing it with the parts list in your instruction manual. Metal tubes and screw bags are typically numbered for easy identification.

Image: Detailed view of the product components, including the main frame, wooden panels, and hooks.
Step 2: Assemble the Main Frame
Connect the vertical metal tubes to the base and top horizontal bars using the provided screws. Ensure all connections are secure but do not fully tighten screws until all parts are aligned.
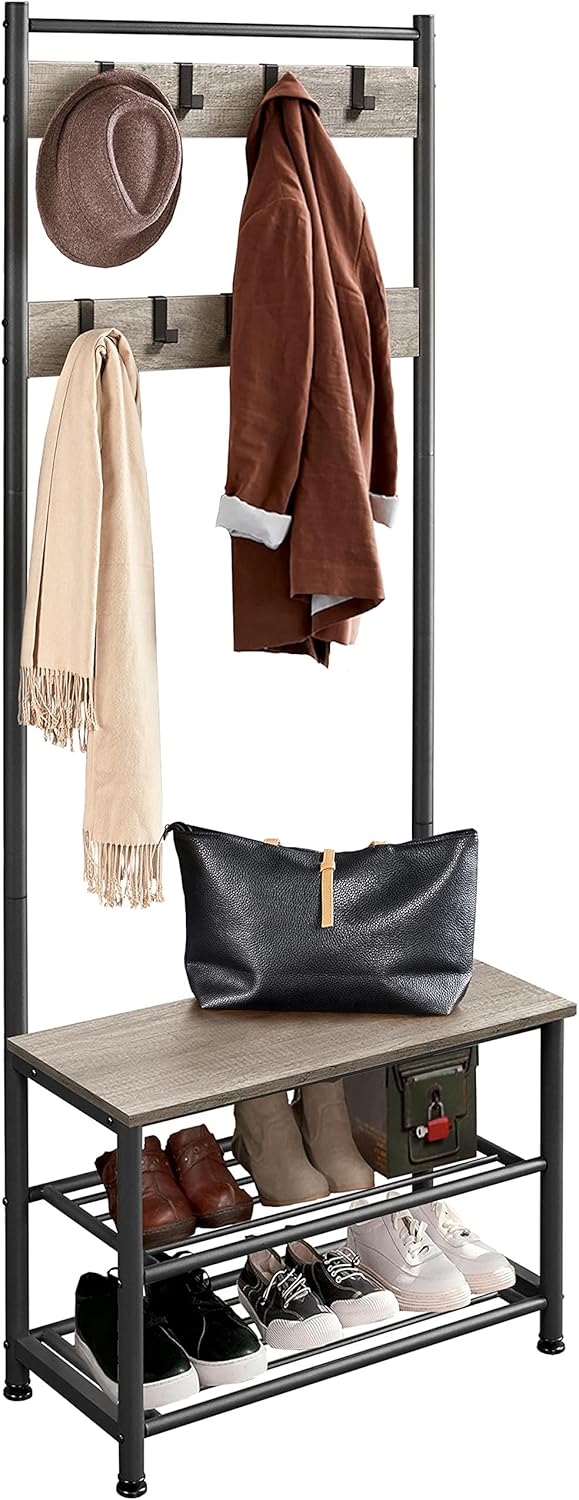
Image: Fully assembled coat rack, demonstrating its structure and capacity.
Step 3: Attach Wooden Panels and Bench
Secure the wooden bench panel and the upper wooden panels (for hooks) to the metal frame using the designated screws. Make sure the bench is level and firmly attached.
Step 4: Install Shoe Racks
Slide or attach the two metal shoe rack shelves into their designated slots or supports beneath the bench. Ensure they are stable and can bear weight.

Image: Detail of the two-tier shoe rack, showing its metal bar construction.
Step 5: Attach Movable Hooks
The 9 metal hooks are designed to be movable. Attach them to the upper wooden panels. You can slide them along the panels to adjust their position according to your needs. Each hook can support up to 1kg.

Image: Close-up of a hand demonstrating the movable hook feature.
Step 6: Install Anti-Tipping Kit
For safety, it is crucial to install the anti-tipping kit. Secure the straps to the top of the unit and then to a wall stud using the provided hardware. This prevents accidental tipping, especially in households with children or pets.

Image: Detail of the anti-tipping strap installation for enhanced stability.
Step 7: Adjust Leveling Feet
The unit is equipped with adjustable protective feet. Rotate these feet at the bottom of the frame to level the unit on uneven floors and prevent scratches.
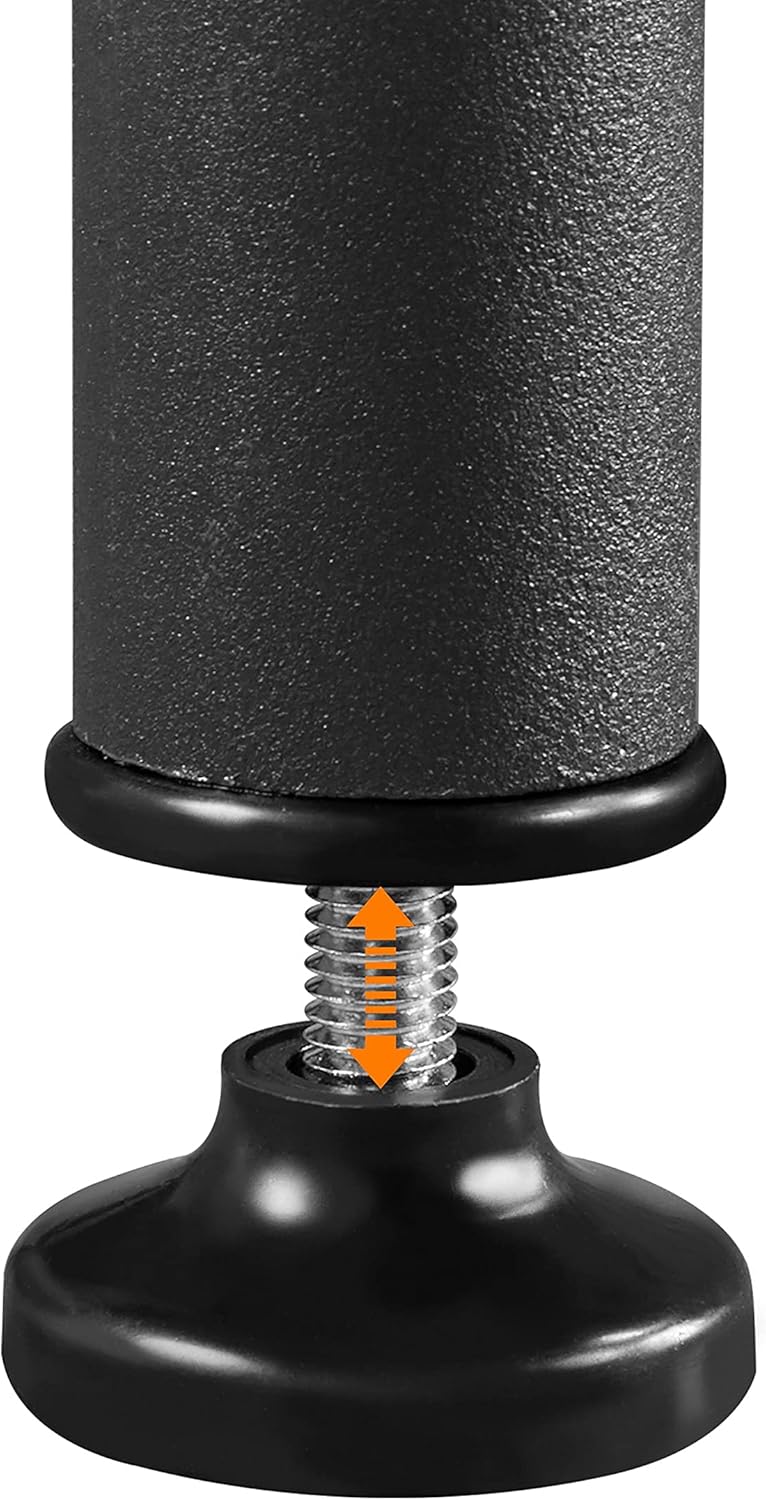
Image: Detail of the adjustable foot, showing its mechanism for leveling.
Step 8: Final Tightening
Once all parts are assembled and aligned, fully tighten all screws. Do not overtighten.
Operating Instructions
This multi-functional entryway unit is designed to organize your belongings efficiently.
- Coat and Hat Hanging: Use the 9 movable hooks to hang coats, hats, scarves, bags, and other accessories. Distribute weight evenly across the hooks.
- Shoe Storage: Utilize the two metal shelves below the bench for organizing shoes.
- Seating Bench: The sturdy bench provides a convenient spot to sit while putting on or taking off shoes. The bench has a maximum load capacity of 125 kg.

Image: The coat rack in a home environment, showcasing its functionality for coats, hats, and shoes.
Maintenance
- Cleaning: Wipe the metal frame and wooden panels with a soft, damp cloth. Avoid using harsh chemicals or abrasive cleaners.
- Inspection: Periodically check all screws and connections to ensure they remain tight. Retighten if necessary.
- Placement: Place the unit on a flat, stable surface. Avoid direct sunlight or extreme humidity to prolong the life of the materials.
Troubleshooting
| Problem | Possible Cause | Solution |
|---|---|---|
| Unit wobbles or is unstable. | Uneven floor; loose screws; anti-tipping kit not installed. | Adjust leveling feet; tighten all screws; install anti-tipping kit securely. |
| Hooks slide too easily or fall off. | Incorrect installation; excessive weight. | Ensure hooks are properly seated on the panel; do not exceed 1kg per hook. |
| Difficulty during assembly. | Parts misidentified; screws not aligned. | Refer to the instruction manual's diagrams; ensure parts are correctly oriented before tightening. |
Specifications
| Feature | Detail |
|---|---|
| Material | Metal, MDF (Medium-Density Fiberboard) |
| Color | Grey |
| Overall Dimensions (L x W x H) | 72.5 x 33 x 184.5 cm (28.5 x 13 x 72.6 inches) |
| Bench Dimensions (L x W) | 72.5 x 33 cm (28.5 x 13 inches) |
| Bench Height | 48 cm (18.9 inches) |
| Number of Hooks | 9 (movable) |
| Number of Shelves | 2 (shoe shelves) |
| Max. Load Capacity (Bench) | 125 kg (275 lbs) |
| Max. Load Capacity (Each Shelf) | 10 kg (22 lbs) |
| Max. Load Capacity (Each Hook) | 1 kg (2.2 lbs) |
| Net Weight | 10.4 kg (22.9 lbs) |
| Model Number | YA-00109071 |

Image: Dimensional drawing with key measurements and load capacities.
Warranty and Support
For warranty information or technical support, please contact Yaheetech customer service. Refer to your purchase documentation for specific contact details or visit the official Yaheetech website.
Return Policy: This product typically has a 30-day refund/replacement return policy from the date of purchase.
Ask a question about this manual
Ask about setup, troubleshooting, compatibility, parts, safety, or missing instructions. Manuals+ will review the question and use this page’s manual context to help answer it.