1. Product Overview
The YUIMER Mini Electric Guitar Looper Effect Pedal is a compact and powerful tool designed for guitarists and other electric musical instrument players. It offers up to 5 minutes of clear looping with unlimited overdubbing, allowing for complex and layered soundscapes. All core functions such as Record, Undo/Redo, Stop, and Erase are conveniently controlled via intuitive foot commands.

Image: Front view of the YUIMER Mini Electric Guitar Looper Effect Pedal, showcasing its compact size and simple interface with a single 'LEVEL' knob and a footswitch.

Image: Front and back views of the looper pedal, highlighting its input/output jacks, power input, and regulatory markings on the rear.
2. Controls and Connections
Familiarize yourself with the various components of your looper pedal for optimal use.
- LEVEL Knob: Adjusts the playback volume of the recorded loop.
- IN Jack: 1/4" mono input for connecting your instrument.
- OUT Jack: 1/4" mono output for connecting to an amplifier or other effects.
- 9V DC Input: Power supply connection (center negative).
- Pilot Lamp (LED Indicator): Indicates the pedal's status (recording, playback, etc.).
- Foot Switch: Multi-functional switch for controlling recording, playback, undo/redo, stop, and erase operations.
- USB Port: For connecting to a computer to import/export WAV loop files.

Image: Diagram illustrating the key components of the looper pedal, including the power input, pilot lamp, and foot switch.
3. Setup
Follow these steps to set up your YUIMER Mini Looper Pedal:
- Connect your instrument (e.g., electric guitar) to the IN jack of the looper pedal using a 1/4" mono cable.
- Connect the OUT jack of the looper pedal to your amplifier or next effect pedal in your signal chain using another 1/4" mono cable.
- Connect a standard 9V DC power adapter (center negative) to the 9V DC Input. Ensure the power supply meets the pedal's requirements to avoid damage.
- Once powered, the pilot lamp will illuminate, indicating the pedal is ready for use.
4. Operation
The YUIMER Mini Looper Pedal offers intuitive control over its looping functions using a single foot switch.
Basic Looping Functions:
- Record: Press the foot switch once to start recording. The LED will turn red.
- Play: Press the foot switch once again to stop recording and start playback. The LED will turn green.
- Overdub: While playing back, press the foot switch once to start overdubbing. The LED will turn red. Press again to stop overdubbing and continue playback (LED green).
- Undo/Redo: During playback, press and hold the foot switch for 2 seconds to undo the last overdub. The LED will flash green. Press and hold again for 2 seconds to redo the undone overdub.
- Stop: Double-press the foot switch quickly to stop playback. The LED will flash green.
- Erase: While the loop is stopped (LED flashing green), press and hold the foot switch for 2 seconds to erase the current loop. The LED will turn off.

Image: The YUIMER Mini Electric Guitar Looper Effect Pedal connected to a guitar and amplifier, demonstrating its use in a typical setup. The image highlights its 5-minute looping capability with unlimited overdubbing.
Demonstration Video:
Video: A demonstration of the YUIMER Mini Electric Guitar Looper Effect Pedal in action, showcasing its looping and overdubbing capabilities with a guitar.
5. Connecting to PC
The looper pedal features a USB port for easy import and export of WAV loop files to and from your computer.
- Connect the looper pedal to your computer using a standard USB cable.
- The pedal will appear as a removable storage device.
- You can then drag and drop WAV files to upload to the pedal or download recorded loops from the pedal to your computer.
- Ensure WAV files are 24-bit uncompressed high-quality audio for best results.

Image: The looper pedal connected to a laptop via its USB port, illustrating the import/export functionality for WAV loop files.
6. Compatibility
This looper pedal is designed to be compatible with most electric musical instruments, providing versatile looping capabilities for various setups.
- Guitars: Electric guitars, bass guitars.
- Keyboards: Synthesizers, digital pianos.
- Other Instruments: Violins with pickups, electronic drums, and instruments that can connect via a 1/4" mono jack.
- Vocals: Can be used with a microphone connected through a mixer to the pedal's input.

Image: Visual representation of various musical instruments (keyboard, violin, guitar, drum, mixer, vocal) indicating the looper pedal's broad compatibility.
7. Maintenance
To ensure the longevity and optimal performance of your looper pedal, follow these maintenance guidelines:
- Cleaning: Use a soft, dry cloth to wipe down the pedal's exterior. Avoid using abrasive cleaners or solvents.
- Storage: Store the pedal in a cool, dry place away from direct sunlight and extreme temperatures.
- Power: Always use the specified 9V DC (center negative) power adapter. Disconnect power when not in use or during electrical storms.
- Connections: Ensure all cables are securely connected but do not overtighten. Regularly check cables for damage.
8. Troubleshooting
If you encounter any issues with your looper pedal, refer to the following common problems and solutions:
| Problem | Possible Cause | Solution |
|---|---|---|
| No sound output | Incorrect cable connection, no power, amplifier off. | Check all cable connections (IN/OUT), ensure power adapter is connected and working, turn on amplifier. |
| Loop not recording/playing | Incorrect foot switch operation, full memory. | Refer to 'Operation' section for correct foot switch commands. Erase existing loops if memory is full. |
| Distorted or low-quality loop | Input signal too high/low, incorrect WAV file format (for PC transfer). | Adjust instrument volume or pedal's LEVEL knob. Ensure WAV files are 24-bit uncompressed. |
| Pedal not recognized by PC | Faulty USB cable, incorrect USB port. | Try a different USB cable or a different USB port on your computer. |
9. Technical Specifications
Detailed specifications for the YUIMER Mini Electric Guitar Looper Effect Pedal:
- Input Type: Standard 1/4" Interface mono/TS
- Output Type: Standard 1/4" Interface mono/TS
- Input Power: Standard 9V alternating current (DC 9V, center negative)
- Working Current: 5mA (DC 9V)
- Looping Time: Up to 5 minutes
- Overdubs: Unlimited
- Audio Quality: 24-bit uncompressed high-quality audio
- Weight: Approximately 300g
- Color: Clear (referring to the product's finish/color name)
- Style: Compact
- Signal Format: Analog
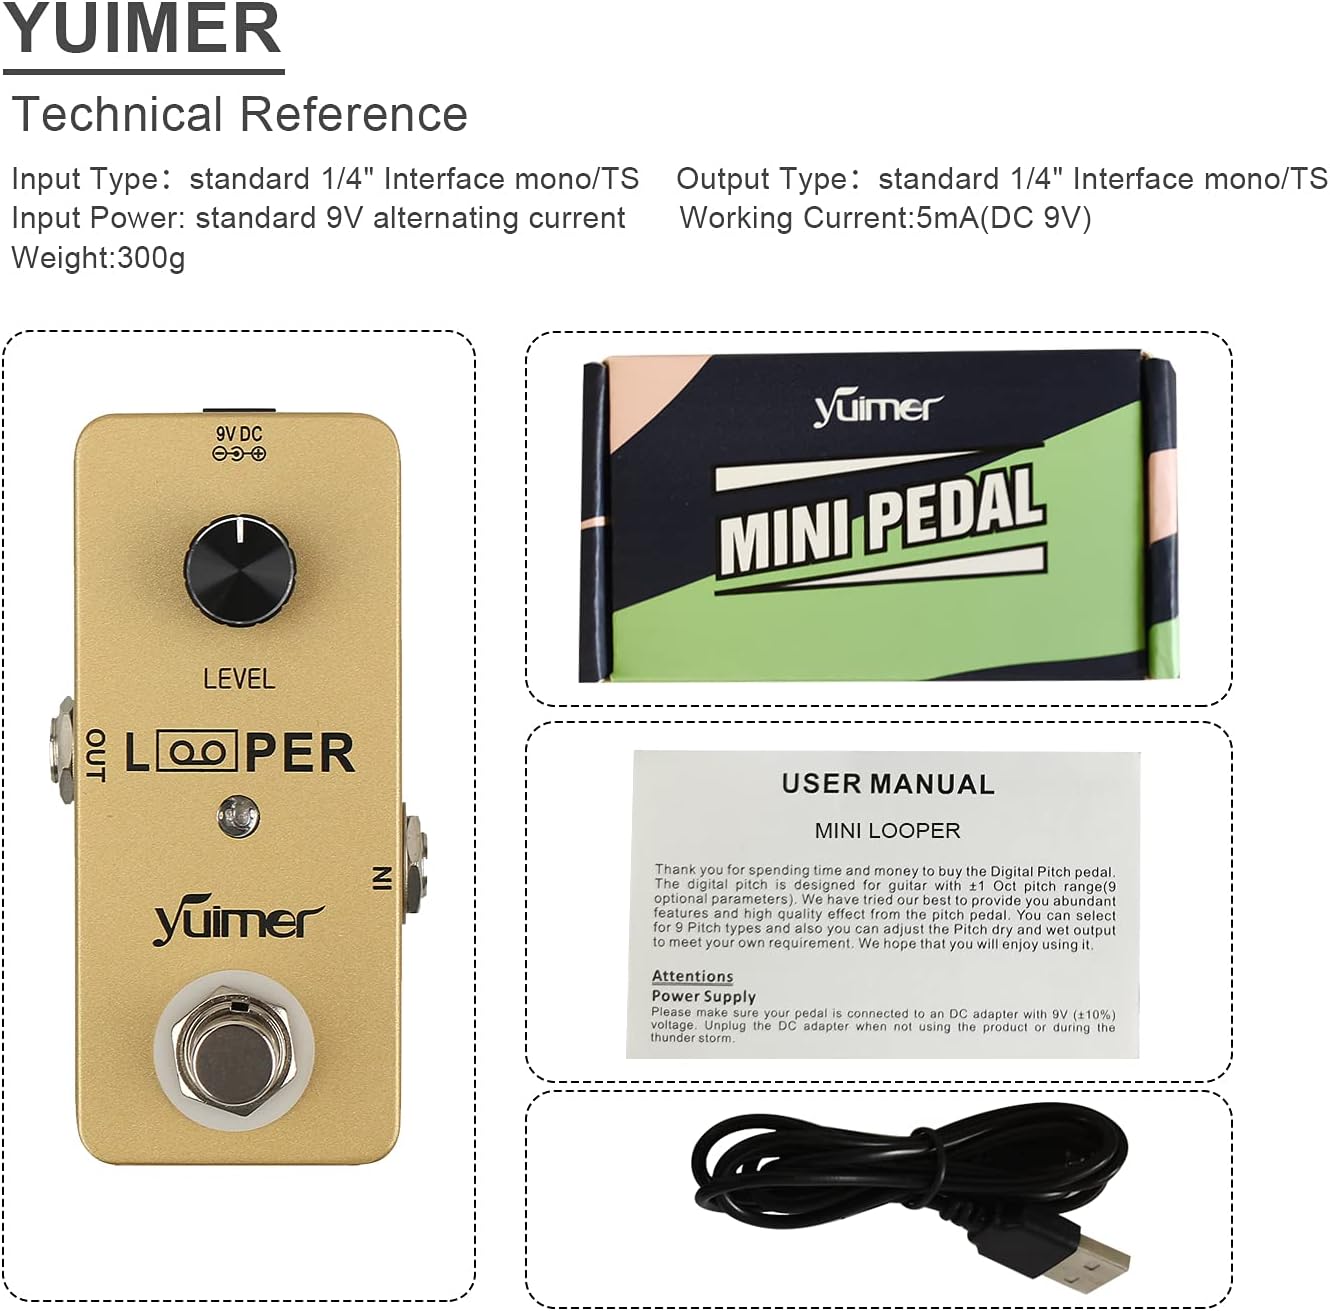
Image: A visual reference showing the technical specifications alongside the looper pedal and its packaging, including a glimpse of the user manual and USB cable.
10. Warranty and Support
For warranty information, technical support, or any inquiries regarding your YUIMER Mini Electric Guitar Looper Effect Pedal, please refer to the contact information provided with your purchase or visit the official YUIMER website. Keep your proof of purchase for warranty claims.