1. Introduction and Overview
Thank you for choosing the PowerPac PPFZ99 90L Upright Freestanding Freezer. This manual provides essential information for the safe and efficient operation, installation, and maintenance of your new appliance. Please read these instructions thoroughly before using the freezer and retain them for future reference.
The PowerPac PPFZ99 is a compact 90-liter upright freestanding freezer designed for convenient storage of frozen foods. Its efficient design and reliable performance make it suitable for various household needs.

Figure 1: The PowerPac PPFZ99 90L Upright Freestanding Freezer. This image shows the exterior of the white freestanding freezer, highlighting its compact and modern design.
2. Safety Information
To ensure safe operation, always adhere to the following safety precautions:
- Electrical Safety: Ensure the power supply matches the voltage specified on the appliance's rating label. Do not use extension cords or multiple socket adapters. Always plug the freezer into a grounded outlet.
- Ventilation: Maintain adequate space around the freezer for proper air circulation. Blocked vents can lead to overheating and reduced efficiency.
- Flammable Materials: Do not store explosive substances or flammable materials inside or near the freezer.
- Children: This appliance is not intended for use by persons (including children) with reduced physical, sensory or mental capabilities, or lack of experience and knowledge, unless they have been given supervision or instruction concerning use of the appliance by a person responsible for their safety. Children should be supervised to ensure that they do not play with the appliance.
- Defrosting: Do not use mechanical devices or other means to accelerate the defrosting process, other than those recommended by the manufacturer.
- Maintenance: Unplug the freezer before cleaning or performing any maintenance.
3. Product Components
The PowerPac PPFZ99 freezer features a practical design for optimal storage. Key components include:
- Freezer Compartment: The main storage area for frozen goods.
- Drawer Compartments: Multiple transparent drawers for organized storage and easy access to items.
- Temperature Control Dial: Located externally or internally, used to adjust the freezer's temperature.
- Door Seal: Ensures an airtight closure to maintain internal temperature.
- Levelling Feet: Adjustable feet at the base to ensure the appliance is stable and level.

Figure 2: Interior view of the freezer. This image displays the freezer's interior with its front-opening design and four clear drawer compartments, ideal for organizing various frozen items.
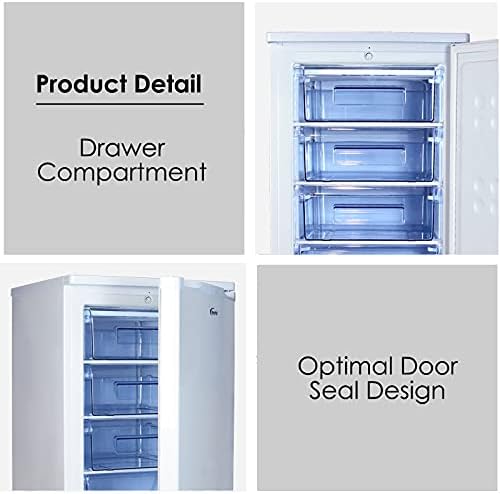
Figure 3: Product Detail: Drawer Compartment and Optimal Door Seal Design. This image provides a closer look at the transparent drawer compartments and highlights the effective door seal, crucial for maintaining coldness.
4. Setup
Follow these steps for proper installation of your freezer:
- Unpacking: Carefully remove all packaging materials, including protective films and tapes. Keep packaging out of reach of children.
- Placement: Choose a dry, well-ventilated location away from direct sunlight, heat sources (e.g., oven, radiator), and extreme cold. Ensure there is at least 10 cm of space around the back and sides for adequate air circulation.
- Levelling: Use the adjustable levelling feet at the bottom of the freezer to ensure it stands firmly and level on the floor. A level appliance operates more efficiently and quietly.
- Cleaning: Before first use, clean the interior and exterior of the freezer with a damp cloth and mild detergent. Wipe dry thoroughly.
- Initial Wait Time: After placing the freezer in its final position, wait for at least 2-4 hours before plugging it into the power outlet. This allows the refrigerant to settle.
- Power Connection: Plug the freezer into a dedicated, grounded electrical outlet.

Figure 4: Product Measurement. This diagram illustrates the dimensions of the freezer: 850mm height, 525mm width, and 505mm depth, crucial for planning placement.

Figure 5: Temperature Control and Levelling Feet. This image highlights the temperature control dial for adjusting settings and the adjustable levelling feet at the base of the freezer.
5. Operating Instructions
Once the freezer is set up, follow these guidelines for operation:
- Temperature Setting: Locate the temperature control dial (refer to Figure 5). Turn the dial to your desired setting. A colder setting is typically indicated by a higher number or a 'Max' position. Allow several hours for the freezer to reach the set temperature before loading food.
- Loading Food: Do not overload the freezer. Ensure there is space for air to circulate around items. Avoid placing hot food directly into the freezer; allow it to cool down first.
- Door Opening: Minimize the frequency and duration of door openings to maintain a stable internal temperature and conserve energy.
- Freezing Fresh Food: For optimal freezing, place fresh food in the upper compartments or directly on the shelves (if applicable) to allow for faster freezing.
6. Maintenance
Regular maintenance ensures the longevity and efficiency of your freezer:
- Cleaning: Unplug the freezer before cleaning. Clean the interior regularly with a solution of mild detergent and warm water. Wipe down the exterior with a damp cloth. Do not use abrasive cleaners or sharp objects.
- Defrosting: Over time, frost will accumulate inside the freezer. When the frost layer becomes about 5mm thick, defrost the appliance. To defrost, unplug the freezer, remove all food, and leave the door open. Place towels at the bottom to absorb melting ice. Do not use sharp objects to remove ice. Once defrosted, clean and dry the interior thoroughly before plugging it back in.
- Door Seal: Regularly check the door seal for any damage or gaps. A damaged seal can lead to inefficient operation. Clean the door seal with a damp cloth.
- Power Saving Tips: Keep the freezer in a cool, well-ventilated area. Avoid frequent door openings. Ensure the door seal is intact. Defrost when necessary.
7. Troubleshooting
Before contacting customer service, try these simple troubleshooting steps:
| Problem | Possible Cause | Solution |
|---|---|---|
| Freezer not cooling | No power; temperature setting too high; door not closed properly; excessive frost build-up. | Check power plug and outlet; adjust temperature setting; ensure door is fully closed; defrost the freezer. |
| Excessive noise | Freezer not level; objects touching the back of the unit; compressor noise (normal). | Adjust levelling feet; move objects away from the freezer; compressor noise is normal during operation. |
| Water on floor | Defrost water not properly drained; door left open. | Ensure drain plug (if applicable) is secure; close door properly. |
8. Specifications
Detailed specifications for the PowerPac PPFZ99 freezer:
- Model Name: PPFZ99
- Brand: PowerPac
- Capacity: 90 Liters
- Installation Type: Freestanding
- Product Dimensions (D x W x H): 50.5D x 52.5W x 85H centimetres
- Item Weight: 33 kg
- Wattage: 110 watts
- Door Material Type: Metal
- Door Orientation: Right
- Colour: Black (Note: Product title indicates White, but specifications list Black. Please verify product color upon purchase.)

Figure 6: High Quality Compressor. This image highlights the internal compressor unit, emphasizing its quality and the associated 10-year warranty.
9. Warranty and Support
Your PowerPac PPFZ99 freezer comes with a manufacturer's warranty. Please refer to the warranty card included with your purchase for specific terms and conditions.
- Compressor Warranty: The high-quality compressor is covered by a 10-year warranty.
- General Warranty: Other components are covered by a standard manufacturer's warranty, typically 1 year. Please check your warranty documentation for exact details.
- Customer Support: For technical assistance, warranty claims, or spare parts, please contact PowerPac customer service through their official website or the contact information provided in your warranty documentation.