1. Product Overview
The Waytronic WiFi Wireless Door Window Sensor is a smart home security device designed to detect the opening and closing status of doors, windows, cabinets, or drawers. It sends instant notifications to your smartphone, enhancing home security and providing peace of mind. This sensor operates on a 2.4GHz Wi-Fi network and is compatible with the Tuya Smart and Smart Life applications, as well as Alexa and Google Assistant for notifications.
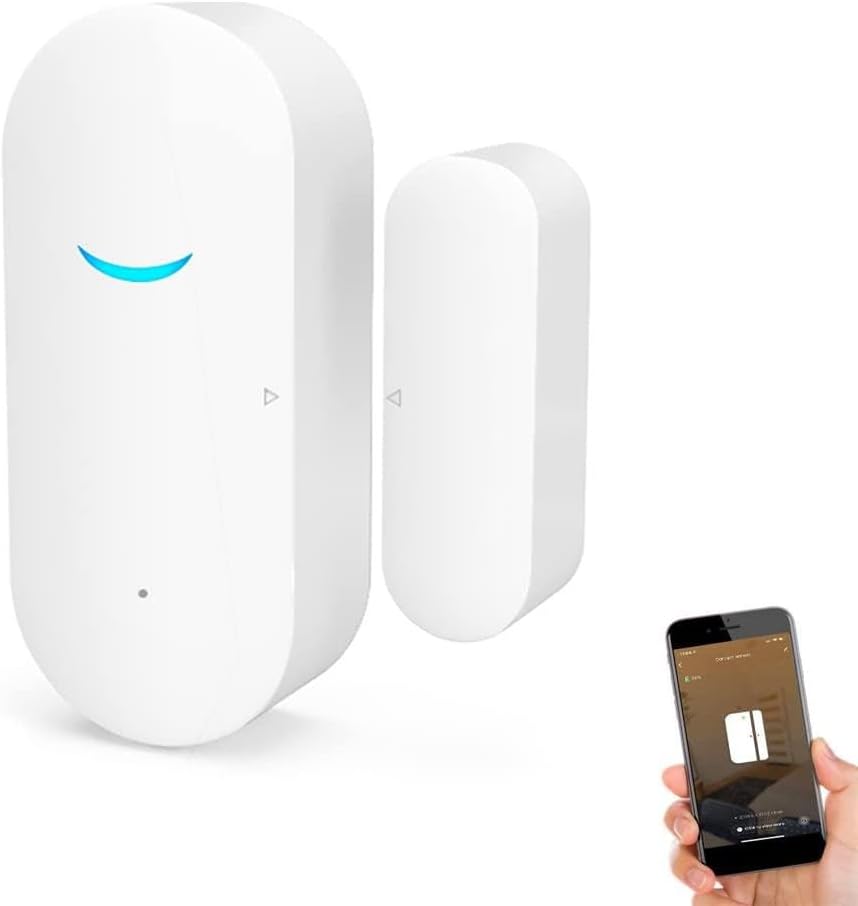
Figure 1: Waytronic WiFi Wireless Door Window Sensor. The main unit (left) and the magnetic strip (right) are shown alongside a smartphone displaying the sensor's status.
Components:
- Main Sensor Unit: Contains the electronics, LED indicator, and network key.
- Magnetic Strip: The smaller component that triggers the sensor when separated from the main unit.
- SIM Ejector Tool (or similar pin): Used for pressing the network key during setup.
- 3M Adhesive: For mounting the sensor components.

Figure 2: Sensor components with labels for LED lights, Network key, and Installation mark.
2. Setup
2.1 Battery Installation
- Gently slide open the back cover of the main sensor unit.
- Insert two AAA batteries into the designated slots, ensuring correct polarity (+/-).
- Close the back cover securely.
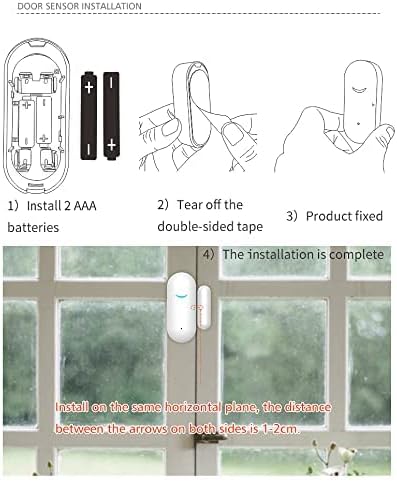
Figure 3: Step-by-step guide for installing AAA batteries into the sensor.
2.2 App Download
The sensor requires the Tuya Smart or Smart Life application for operation. Download the app using one of the following methods:
- Method 1: Scan the QR code provided in the product packaging or manual to download "Tuya Smart" or "Smart Life."
- Method 2: Search for "Tuya Smart" or "Smart Life" in your device's application store (Google Play for Android, App Store for iOS) and download.
2.3 Network Configuration (Wi-Fi Fast Connection)
Ensure your Wi-Fi network is 2.4GHz, as 5GHz networks are not supported. Place the sensor in an area with good Wi-Fi signal strength.
- Open the Tuya Smart or Smart Life app and tap "Add Device."
- Select "Contact Sensor (Wi-Fi)" from the sensor category.
- Enter your 2.4GHz Wi-Fi network name and password.
- Use the provided SIM ejector tool (or a similar pin) to short press the network key on the main sensor unit. The LED light will flash once.
- Long press the network key for 5 seconds until the LED light flashes quickly. If it does not flash quickly, press and hold for another 5 seconds.
- In the app, confirm that the indicator is blinking rapidly and proceed with adding the device.
- The app will search for and add the device. Once successful, you will receive a notification.
Video 1: Demonstrates the Wi-Fi fast connection method for pairing the Waytronic sensor with the mobile application. It shows opening the app, selecting the device type, entering Wi-Fi credentials, and initiating the pairing process by pressing the sensor's network key.
2.4 Network Configuration (Hotspot Distribution Network)
If the Wi-Fi fast connection method fails, use the hotspot distribution network method.
- In the app, when prompted to reset the device, select the "AP Mode" option (usually found in the top right corner or by switching modes).
- Short press the network key on the main sensor unit. The LED light will flash once.
- Long press the network key for 5 seconds until the LED light flashes slowly. If it is not flashing slowly, press and hold for another 5 seconds.
- In the app, confirm that the indicator is blinking slowly.
- The app will instruct you to connect your mobile phone to the device's hotspot, which typically starts with "SmartLife" or "SL."
- Go to your phone's Wi-Fi settings, find and connect to the sensor's hotspot.
- Return to the app, and it will proceed with adding the device. Once successful, you will receive a notification.
Video 2: Demonstrates the hotspot distribution network method for pairing the Waytronic sensor with the mobile application. It shows switching to AP mode, initiating the slow flash on the sensor, connecting to the sensor's Wi-Fi hotspot, and completing the device addition.
3. Installation
The Waytronic sensor is designed for easy installation using 3M adhesive, requiring no complicated tools.
- Clean the surface where you intend to install the sensor (door, window frame, cabinet, etc.). Ensure it is dry and free of dust or grease.
- Peel off the protective film from the 3M adhesive on the back of both the main sensor unit and the magnetic strip.
- Attach the main sensor unit to the fixed part of the door/window frame.
- Attach the magnetic strip to the moving part of the door/window, aligning it with the main sensor unit. The two arrows on the components should be opposite each other.
- Ensure the distance between the two components is as close as possible, ideally within 1-2 cm, and does not impede the opening or closing of the door or window.

Figure 4: Examples of sensor installation on doors and windows, demonstrating its application in various home settings.

Video 3: Illustrates the installation process, emphasizing the correct alignment and distance between the sensor's main unit and magnetic strip on a door.
4. Operating Instructions
4.1 Real-time Alarms and Notifications
Once installed and connected, the sensor will push instant notifications to your smartphone when a door or window is opened or closed. This allows you to monitor access to your home, shop, or office remotely.

Figure 5: Remote alarm notification received on a smartphone when the sensor detects an opening.
4.2 Smart Home Integration
The Waytronic sensor is compatible with Alexa and Google Assistant. It supports push notifications when opening and closing, but does not support voice control for the sensor itself.

Figure 6: Sensor compatibility with Alexa and Google Assistant for notification purposes.
4.3 Intelligent Linkage
Through the Tuya Smart or Smart Life app, you can set up intelligent linkages with other smart devices. For example, you can configure a smart light to automatically turn on when the door sensor detects an opening.

Figure 7: Example of intelligent linkage where opening a door triggers a smart light.
5. Maintenance
5.1 Battery Replacement
The sensor requires two AAA batteries (not included). When the battery level is low, the application will automatically push messages to remind you to change the batteries. The estimated standby time for batteries is approximately 300 days.

Figure 8: Battery compartment and estimated battery life.
6. Troubleshooting
6.1 Wi-Fi Connection Issues
- Incorrect Wi-Fi Band: Ensure your Wi-Fi network is 2.4GHz. The sensor does not support 5GHz networks. Confirm your router settings.
- Weak Wi-Fi Signal: Make sure the door sensor is in a location with a strong Wi-Fi signal. Poor signal strength can prevent connection.
- Incorrect Pairing Procedure: Follow the network configuration steps carefully. For Wi-Fi Quick Connect, ensure the green light flashes continuously after pressing the network key for 3-5 seconds. If the first method fails, try the Hotspot Distribution Network method.
- App Account/Password Mismatch: Ensure the Wi-Fi account and password entered in the app are consistent with your home Wi-Fi network.
6.2 Notification Issues
- Installation Distance: The installation distance between the main sensor unit and the magnetic strip should be within 1-2 cm. If the gap is too wide, the sensor may not register open/close events correctly.
- App Settings: Enter "My Device" in the app, then go to "Settings" and ensure "sound and light alarms" (if applicable) and other notification options are enabled.
- Mobile Software Management: Check your phone's operating system settings to ensure the Tuya Smart or Smart Life app has permission to send notifications.
- App Not Running: It is recommended to keep the app open or running in the background to receive alarm messages promptly.
7. Specifications
| Feature | Specification |
|---|---|
| Model Number | WIFI Alarm |
| Product Dimensions | 2.83 x 0.75 x 1.18 inches |
| Item Weight | 1.41 ounces |
| Power Source | Battery Powered |
| Batteries Required | 2 AAA batteries |
| Battery Cell Type | Alkaline |
| Control Method | App (Tuya Smart / Smart Life) |
| Mounting Type | Door Mount, Window Mount (Adhesive) |
| Sensor Technology | Contact Sensor |
| Wireless Type | Wi-Fi 2.4GHz (5GHz not supported) |
| Compatible Devices | Home Security System, Smartphone, Alexa, Google Assistant |
| Usage | Door/Window Alarm, Home Security, Indoor Use |
8. Warranty and Support
For warranty information and technical support, please refer to the official Waytronic website or contact their customer service directly. Specific warranty terms may vary by region and retailer.


