1. Introduction
This manual provides detailed instructions for the installation, operation, and maintenance of your VLAND Projector LED Headlights. These headlights are designed to enhance the appearance and functionality of your vehicle with advanced lighting features.
2. Compatibility
These VLAND Projector LED Headlights are compatible with the following vehicle models:
- Chevy Camaro 2016-2018 (LT, SS, RS, ZL, LS trims)
Designed as a direct OEM replacement for vehicles equipped with factory halogen or xenon front lamps. No vehicle modifications are required for installation.
3. Key Features
- OEM Direct Fitment: Plug-n-Play operation, direct bolt-on OE fitment.
- Amber Sequential Turn Signal: Features a row of amber LEDs that can function as switchback signals.
- Dynamic Animation & Breath Light: A choreographed light sequence activates upon vehicle unlock, providing a modern aesthetic.
- Durable Construction: IP67 Waterproof, Dust-proof, and Shock-proof design.
4. Safety Information
- Always disconnect the vehicle's battery before beginning any electrical work.
- Ensure all connections are secure to prevent electrical shorts or malfunctions.
- If you are unsure about any installation step, consult a professional automotive technician.
- Do not install damaged products. Inspect the package and product upon receipt.
5. Installation Guide
The VLAND Projector LED Headlights are designed for direct replacement and plug-and-play installation. Follow these general steps:
- Preparation: Park your vehicle on a level surface and engage the parking brake. Disconnect the negative terminal of your vehicle's battery.
- Remove Old Headlights: Carefully remove the front bumper (if necessary) and unbolt the existing headlight assemblies. Disconnect all wiring harnesses.
- Install New Headlights: Position the new VLAND headlight assemblies into place. Ensure they fit securely.
- Connect Wiring: Connect the main wiring harness to the vehicle's factory connector. For the Daytime Running Light (DRL) function, connect the ACC plug to the fuse box. Refer to the diagram below for fuse box connection points for HID and Halogen editions.

Figure 5.1: Rear view of the headlight assembly showing wiring connections and adjustment screws. The dynamic animation can be disabled by unplugging a specific connector. Left/Right and Up/Down adjusting screws are indicated.

Figure 5.2: ACC plug connection for DRL function. Connect to the fuse box as shown for either HID or Halogen editions.
- Test Functionality: Reconnect the battery. Turn on your vehicle's lights to verify all functions (low beam, high beam, DRL, turn signals, dynamic animation) are working correctly.
- Adjust Headlights: Use the adjusting screws on the back of the headlight assembly to properly aim the light beam. Adjustments for both left/right and up/down are available.
- Reassemble: Reinstall the front bumper and any other components removed during installation.
6. Operation
Your VLAND Projector LED Headlights offer several advanced lighting modes:
- Daytime Running Lights (DRL): These lights activate automatically when the vehicle is on, providing enhanced visibility during the day.
- Dynamic Animation: A unique light sequence that activates when the vehicle is unlocked, creating a welcoming effect. This feature can be disabled by unplugging the designated connector on the back of the headlight (refer to Figure 5.1).
- Breathing Light: A subtle pulsating light effect that adds to the modern aesthetic.
- Amber Sequential Turn Signals: When the turn signal is activated, the amber LEDs illuminate in a sequential pattern, clearly indicating your turning intention.
- LED Low Beam & High Beam: Provides powerful and clear illumination for night driving.
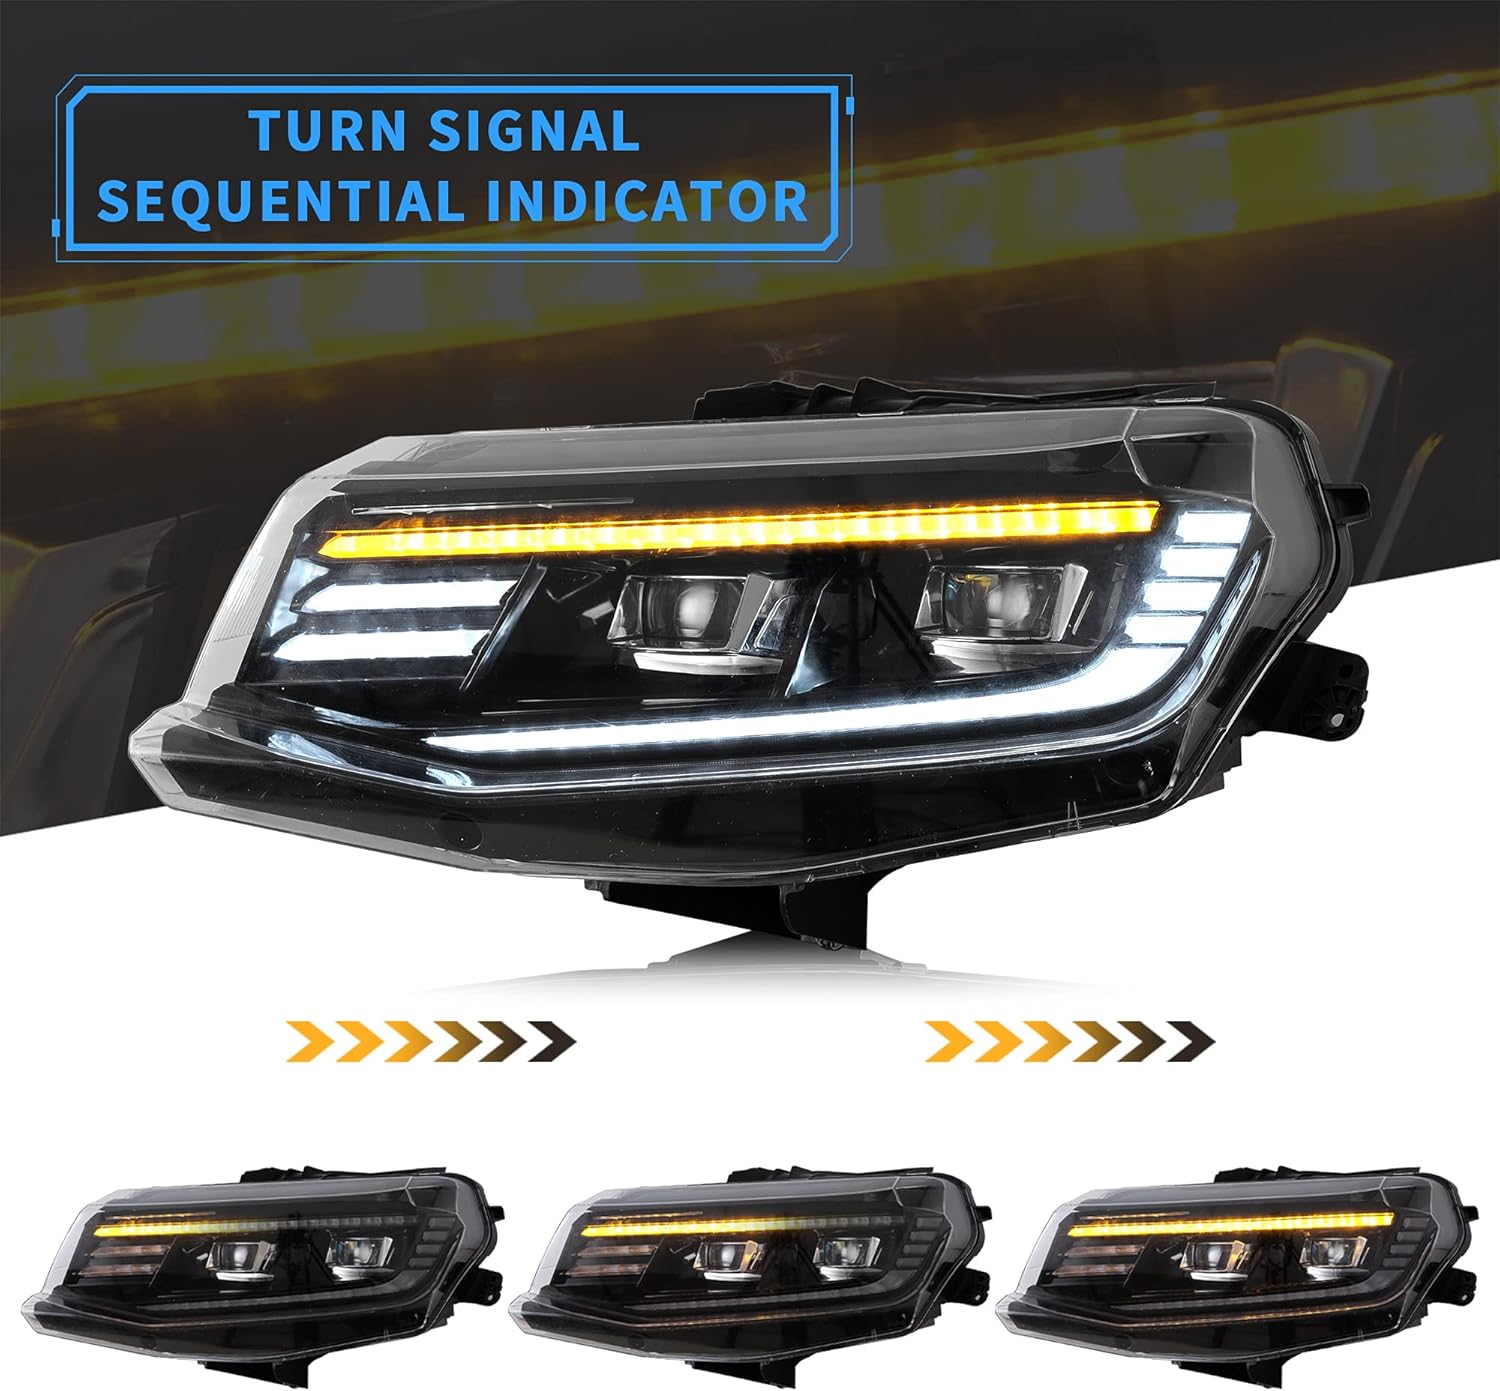
Figure 6.1: The amber sequential turn signal indicator provides clear signaling.

Figure 6.2: Dynamic animation comes to life when the vehicle is unlocked or DRL is activated.

Figure 6.3: Various lighting modes including DRL, low beam, high beam, and sequential turn signal.
7. Maintenance
Proper maintenance ensures the longevity and optimal performance of your headlights.
- Cleaning: Clean the headlight lenses regularly with a soft cloth and mild automotive cleaning solution. Avoid abrasive cleaners that can scratch the polycarbonate lens material.
- Condensation: While the headlights are IP67 weatherproof, condensation can occasionally occur due to temperature changes.
How to Clear Foggy Headlights/Taillights:
- Heat Application: You can apply heat to the assemblies using a hairdryer or heat gun to dry out the condensation.
- Sunlight Exposure: If a heating element is unavailable, remove the headlight bulbs and dust caps, then park the vehicle in direct sunlight to achieve a similar drying effect.
- Preventative Measures: To combat condensation in areas with limited sunlight or natural heat, keep the vehicle away from water sources. Allow headlights/taillights to dry naturally after rain or car washes.

Figure 7.1: The headlights feature IP67 weatherproof construction for durability against elements.

Figure 7.2: Instructions for clearing condensation from headlights.
8. Troubleshooting
- Lights Not Working: Check all wiring connections to ensure they are secure. Verify that the vehicle's fuses are intact.
- Dynamic Animation Not Activating: Ensure the ACC plug for the DRL function is correctly connected to the fuse box. Check if the specific connector for dynamic animation (refer to Figure 5.1) is plugged in.
- Condensation Inside Lens: Refer to the 'Maintenance' section for steps on how to clear foggy headlights.
- Product Damaged or Defective: If the merchandise is damaged upon receipt or becomes defective, please contact customer support immediately. Provide the product label, video, and picture proof clearly showing the defect.
9. Specifications
| Feature | Detail |
|---|---|
| Brand | VLAND |
| Color | Projector |
| Specific Uses | Head Lights |
| Light Source Type | LED |
| Vehicle Service Type | 16-18 Camaro LT, SS, RS, ZL, LS |
| Voltage | 12 Volts (DC) |
| Wattage | 39 watts |
| Auto Part Position | Front |
| Lens Material | Polycarbonate |
| Lens Color | Clear |
| Unit Count | 2.0 Count (Pair) |
10. Warranty and Support
- Warranty Period: All VLAND products found to be defective are covered for a period of One Year following the original purchase date.
- Return & Replace Policy: For any issues, please retain all boxes, labels, and user manuals received with the package.
- Customer Support: In the event merchandise is damaged, becomes defective, or needs to be returned, please message us. Provide the product label, video, and picture proof, ensuring the images and video clearly show the defect.