1. Introduction
Thank you for choosing the Living Needs Wireless HD Video Doorbell. This manual provides detailed instructions for the installation, operation, and maintenance of your new video doorbell. Please read this manual thoroughly before use to ensure proper functionality and safety.
2. Product Overview
2.1 Package Contents
The package typically includes:
- Living Needs Wireless HD Video Doorbell
- Indoor Chime (if included in specific package)
- Mounting Bracket and Screws
- USB Charging Cable (for battery charging)
- User Manual
2.2 Key Features
- HD Video Resolution (720p)
- Wireless Wi-Fi Connectivity
- Motion Detection with Push Notifications
- Two-Way Audio Communication
- Night Vision Capability
- Battery Powered (rechargeable)
- Free Cloud Service
- Compatible with Android & iOS App
- Supports SD Card for local storage
- Wall Mount Installation
2.3 Product Components
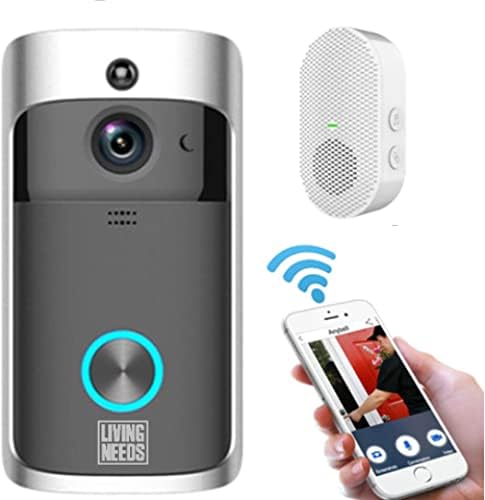
Image 2.3.1: The Living Needs Wireless HD Video Doorbell unit, an accompanying wireless chime, and a smartphone displaying the doorbell's live view and control options. This image illustrates the complete system setup.

Image 2.3.2: A close-up of the doorbell unit and a smartphone screen showing a live feed from the doorbell camera. The text overlay indicates the ability to monitor your home at all times.

Image 2.3.3: This image highlights the doorbell's features like Wi-Fi, HD, app control, sensor, live viewing, SD card support, 166-degree angle, 2-way audio, standby, and night vision. It also shows three blue batteries and a crucial instruction: "Remove green stickers from batteries" before use.
3. Setup and Installation
3.1 Charging the Batteries
- Open the battery compartment of the doorbell unit.
- Insert the provided rechargeable batteries. Ensure to remove any protective stickers (e.g., green stickers) from the battery terminals before insertion.
- Connect the doorbell to a power source using the USB charging cable. A full charge is recommended before initial use.
- The doorbell can also be charged via a transformer for wired power connection.
3.2 App Installation and Device Pairing
- Download the official Living Needs app from the App Store (iOS) or Google Play Store (Android).
- Register for a new account or log in if you already have one.
- Follow the in-app instructions to add your new video doorbell. This typically involves scanning a QR code on the device or manually entering its ID.
- Ensure your smartphone is connected to a 2.4GHz Wi-Fi network during the pairing process.
- Pair the indoor chime with the doorbell according to its specific instructions (usually a button press sequence).
3.3 Mounting the Doorbell

Image 3.3.1: An illustration showing the video doorbell mounted next to a front door on a house, with Wi-Fi signals indicating connectivity. This image emphasizes the doorbell's function in monitoring visitors and providing security.
- Choose a suitable location next to your front door, ensuring a clear view and good Wi-Fi signal strength.
- Use the provided mounting bracket as a template to mark drill holes on the wall.
- Drill the holes and insert wall anchors if necessary.
- Secure the mounting bracket to the wall with the screws.
- Attach the doorbell unit to the mounting bracket, ensuring it clicks securely into place.
4. Operating Instructions
4.1 Live View and Two-Way Audio
- Open the Living Needs app on your smartphone or tablet.
- Select your doorbell from the device list to access the live video feed.
- To speak with a visitor, tap the microphone icon in the app. To hear them, ensure the speaker icon is enabled.
4.2 Motion Detection and Notifications
- The doorbell is equipped with a motion sensor. When motion is detected, you will receive a push notification on your paired device.
- Adjust motion detection sensitivity and zones within the app settings to minimize false alerts.
- Recorded motion events are stored in the cloud or on the SD card (if installed).
4.3 Night Vision
- The doorbell automatically switches to night vision mode in low-light conditions, providing clear black-and-white video.
- Infrared LEDs enable visibility up to a certain distance in the dark.
4.4 Multiple User Access
- You can share access to your doorbell's live feed and features with family members or trusted individuals through the app.
- Refer to the app's sharing settings for detailed instructions.

Image 4.4.1: This image demonstrates the global usability of the Living Needs video doorbell, showing individuals monitoring their front door via smartphone while on vacation, at work, on a business trip, or in a restaurant. It highlights the remote access feature and push notifications.
5. Maintenance
- Cleaning: Gently wipe the camera lens and doorbell surface with a soft, damp cloth. Avoid abrasive cleaners.
- Battery Life: Monitor battery levels via the app. Recharge the batteries when prompted to ensure continuous operation.
- Firmware Updates: Regularly check the app for available firmware updates to ensure optimal performance and security.
- Wi-Fi Connection: Ensure a stable Wi-Fi connection for uninterrupted service.
6. Troubleshooting
6.1 Common Issues and Solutions
- Doorbell not connecting to Wi-Fi:
- Ensure your Wi-Fi network is 2.4GHz.
- Check Wi-Fi signal strength at the doorbell's location.
- Restart your router and the doorbell.
- Re-attempt the pairing process in the app.
- No push notifications:
- Verify app notification settings on your smartphone.
- Check motion detection settings in the doorbell app.
- Ensure the doorbell has a stable internet connection.
- Poor video quality:
- Clean the camera lens.
- Ensure adequate Wi-Fi signal strength.
- Check app settings for video quality options.
- Short battery life:
- Reduce motion detection sensitivity or frequency of recordings.
- Ensure the doorbell is fully charged.
- Consider a wired power connection if frequent recharging is inconvenient.
- Chime not ringing:
- Ensure the chime is powered on and within range of the doorbell.
- Re-pair the chime with the doorbell.
7. Specifications
| Feature | Detail |
|---|---|
| Brand | Living Needs |
| Model | B09FR19KTY |
| Connectivity Technology | Wireless (Wi-Fi), Wired (for power) |
| Wireless Communication Technology | Wi-Fi |
| Power Source | Battery Powered (rechargeable), Transformer compatible |
| Batteries Included | Yes |
| Video Recording Resolution | 720p |
| Special Features | Motion Sensor, Night Vision (Infrared) |
| Compatible Devices | Smartphone, Tablet (Android & iOS) |
| Mounting Type | Wall Mount |
| Material | Plastic |
| Color | Grey |
| Recommended Uses | Motion Detection, Home Security |
8. Warranty and Support
For warranty information and technical support, please refer to the documentation included with your product or visit the official Living Needs website. If you encounter any issues not covered in this manual, please contact Living Needs customer service for assistance.
Return Policy: The product typically comes with a 31-day return/replacement policy. Please check your purchase details for specific terms.