1. Introduction
Thank you for choosing the jely Wireless Indoor Outdoor Weather Station, Model QY-WSDJ. This device provides real-time monitoring of indoor and outdoor temperature and humidity, along with weather forecasts, a DCF radio-controlled clock, moon phase display, and an alarm function. Please read this manual carefully to ensure proper setup and operation.

Image 1.1: Main display unit and wireless outdoor sensor.
2. Package Contents
- 1 x jely Weather Station Main Unit
- 1 x Wireless Outdoor Sensor
- 1 x AC Power Adapter
- 1 x Instruction Manual
3. Product Overview and Features
The jely Weather Station is designed for comprehensive environmental monitoring and convenience. Key features include:
- Real-time Weather Monitoring: Displays 6 types of weather forecasts (sunny, cloudy, overcast, light rain, heavy rain, snow) based on atmospheric pressure changes. Includes temperature alert functions.
- Multifunction Color LCD Display: Features a clear digital color screen with adjustable brightness for easy reading. Monitors temperature, humidity, and atmospheric pressure.
- DCF Radio Clock and Alarm: Automatically receives and sets current time and date. Includes an alarm clock with a 5-minute snooze function.
- Multi-Channel Support: Capable of displaying data from up to 3 wireless sensors (one sensor included). The wireless range for the remote sensor is up to 30 meters (80 meters in open areas).
- Dual Power Modes: Can be powered by the included AC adapter or 3 AAA batteries (not included). Screen backlight behavior differs based on power source.

Image 3.1: Multifunction display and dimensions of the main unit and sensor.

Image 3.2: Enhanced VA-LCD screen technology for better visibility.
4. Setup
4.1 Powering the Main Unit
- Using AC Adapter (Recommended): Connect the included AC adapter to the power port on the back of the main unit and plug it into a wall outlet. The display will remain continuously lit.
- Using Batteries: Open the battery compartment on the back of the main unit. Insert 3 AAA batteries (not included), observing polarity (+/-). When powered by batteries, the screen backlight will automatically turn off after 10-15 seconds to conserve energy. Press the "SNZ/LIGHT" button to temporarily illuminate the screen.
4.2 Powering the Wireless Sensor
- Open the battery compartment on the back of the wireless sensor.
- Insert 2 AAA batteries (not included), observing polarity (+/-).
- Close the battery compartment securely.
4.3 Pairing the Wireless Sensor
After powering both units, the main unit will automatically search for the wireless sensor. The outdoor temperature and humidity should appear on the display within a few minutes. If the sensor does not connect:
- Ensure both units are within range and have fresh batteries.
- Press and hold the "CHANNEL" button on the main unit to initiate a manual search for the sensor.
- On the outdoor sensor, there may be a small "TX" button. Press it to send a signal manually.

Image 4.1: Powering options for the main unit.

Image 4.2: Example of multi-channel sensor placement.
5. Operating Instructions
5.1 Time and Date Setting (DCF Synchronization)
The weather station will attempt to synchronize with the DCF radio signal automatically after startup. This may take several minutes or hours depending on signal strength. If manual adjustment is needed:
- Press and hold the "MODE" button to enter time setting mode.
- Use the "UP" or "DOWN" buttons to adjust values.
- Press "MODE" again to confirm and move to the next setting (e.g., hour, minute, year, month, day).
5.2 Alarm Clock Function
- Press the "ALARM" button to view the alarm time.
- Press and hold "ALARM" to enter alarm setting mode.
- Use "UP" or "DOWN" to adjust the hour and minute.
- Press "ALARM" to confirm.
- When the alarm sounds, press the "SNZ/LIGHT" button for a 5-minute snooze. To turn off the alarm, press any other button.

Image 5.1: Alarm clock feature.
5.3 Weather Forecast Display
The weather station predicts the weather for the next 12-24 hours based on changes in atmospheric pressure. The display shows one of six icons:
- Sunny
- Partly Cloudy
- Cloudy
- Light Rain
- Heavy Rain / Stormy
- Snow

Image 5.2: Weather forecast icons.
5.4 Temperature and Humidity Display
The main unit displays indoor temperature and humidity, while the connected wireless sensor provides outdoor readings. A comfort level indicator may also be shown.

Image 5.3: Remote and indoor temperature/humidity display.
5.5 Temperature Alert
You can set high and low temperature alerts for outdoor readings. When the outdoor temperature exceeds or falls below the set range, an audible alarm will sound.
- Refer to the specific button on your device (often labeled "ALERT" or similar) and follow the on-screen prompts to set the desired temperature thresholds.
5.6 Display Brightness
When powered by the AC adapter, the display brightness can be adjusted. Look for a dedicated button (e.g., "SNZ/LIGHT" or "BRIGHTNESS") to cycle through different brightness levels (e.g., 100%, 50%, 0%).
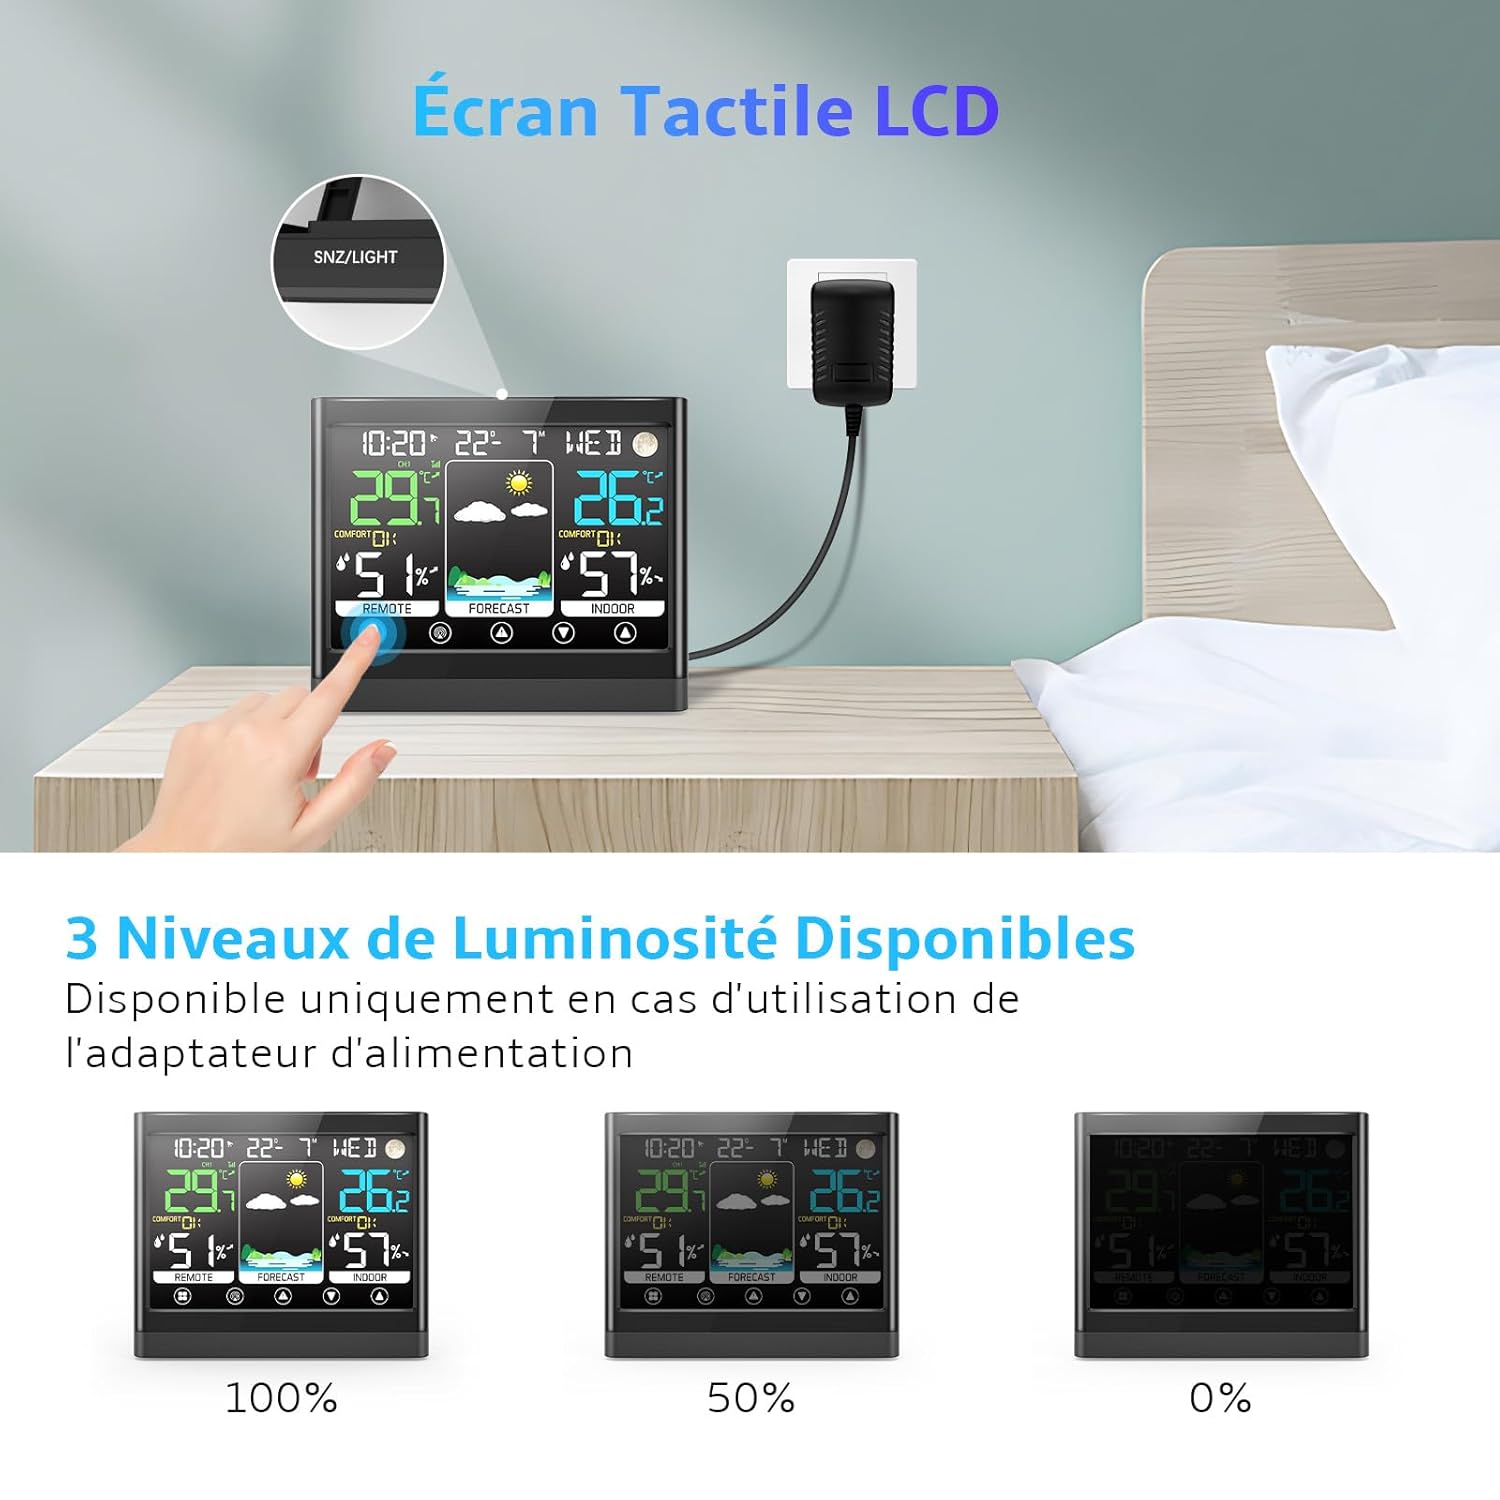
Image 5.4: Adjustable display brightness levels.
5.7 Moon Phase Display
The weather station displays the current moon phase, providing an additional informational feature.

Image 5.5: Moon phase display.
6. Placement and Mounting
6.1 Main Unit Placement
The main unit can be placed on a desk or table using its integrated stand, or mounted on a wall using the hanging hole on the back.
6.2 Wireless Sensor Placement
For accurate outdoor readings, place the wireless sensor in a shaded, dry location, protected from direct sunlight and rain. Ensure it is within the effective transmission range of the main unit (up to 80 meters in open areas, less with obstructions).

Image 6.1: Mounting options for the main unit and sensor.
7. Maintenance
7.1 Battery Replacement
Replace batteries in both the main unit and the wireless sensor when the low battery indicator appears on the display. Always replace all batteries in a unit at the same time with new ones of the same type.
7.2 Cleaning
Clean the display and unit casings with a soft, damp cloth. Do not use abrasive cleaners or solvents, as these may damage the surfaces. Ensure no moisture enters the device.
8. Troubleshooting
- No Display / Blank Screen: Check if the AC adapter is properly connected or if batteries are correctly inserted and not depleted.
- Outdoor Sensor Not Connecting / Inaccurate Readings:
- Ensure the sensor batteries are fresh and correctly installed.
- Verify the sensor is within range of the main unit.
- Relocate the sensor to avoid direct sunlight, rain, or strong electromagnetic interference.
- Initiate a manual sensor search on the main unit (refer to Section 4.3).
- DCF Time Synchronization Failure:
- Ensure the main unit is placed away from electronic devices that might cause interference.
- Try repositioning the unit, ideally near a window, to improve signal reception.
- Allow several hours for the unit to attempt synchronization.
- Inaccurate Weather Forecast: The weather forecast is based on atmospheric pressure changes and is an estimation for the next 12-24 hours. It may not always perfectly match local weather conditions.
9. Specifications
| Feature | Specification |
|---|---|
| Model Number | QY-WSDJ |
| Main Unit Dimensions (L x W x H) | 2.4 x 11.5 x 2.4 cm |
| Main Unit Weight | 440 grams |
| Main Unit Power Source | AC Adapter (included) or 3 x AAA batteries (not included) |
| Wireless Sensor Power Source | 2 x AAA batteries (not included) |
| Material | Acrylonitrile Butadiene Styrene (ABS) |
| Connectivity Technology | Wireless (RF for sensor), DCF Radio (time sync) |
| Wireless Sensor Range | Up to 30m (indoor), 80m (open area) |
| Special Features | Color LCD, Temperature Alert, Moon Phase, Snooze Alarm |
10. Warranty and Support
For warranty information or technical support, please refer to the documentation provided with your purchase or contact jely customer service through your retailer. Keep your purchase receipt for warranty claims.