1. Introduction
This manual provides instructions for the setup, operation, maintenance, and troubleshooting of your KUMK 15-inch FHD HDR IPS Portable Monitor. This monitor is designed for portability and offers Full High Definition (FHD) resolution, High Dynamic Range (HDR) support, and In-Plane Switching (IPS) technology for wide viewing angles. It features USB-C and HDMI connectivity, integrated dual speakers, and eye-care functions, making it suitable for various applications including gaming and extended desktop use.
2. Setup
2.1 Unpacking and Components
Carefully remove all components from the packaging. Ensure the following items are present:
- KUMK 15-inch Portable Monitor
- USB-C to USB-C Cable
- Mini HDMI to HDMI Cable
- USB-A to USB-C Power Cable
- Power Adapter (if included)
- Protective Cover/Stand
2.2 Connecting to Devices
The monitor supports various devices via USB-C and HDMI connections. Ensure your device supports video output over the chosen port.

Image: This diagram illustrates the wide compatibility of the monitor, showing connections for Mini HDMI (data transmission) and USB Type-C (data & power supply). Devices such as laptops, PCs, gaming consoles, cameras, Raspberry Pi, phones, and Macbooks are shown as compatible.
- Power Connection: Connect the monitor to a power source using the provided USB-A to USB-C power cable and power adapter. Some devices may provide sufficient power via a single USB-C cable.
- USB-C Connection (Full-Featured): If your device has a full-featured USB-C port (supporting DisplayPort Alternate Mode and power delivery), connect it directly to the monitor's USB-C port using the USB-C to USB-C cable. This single cable can provide both video signal and power.
- HDMI Connection: Connect your device's HDMI output to the monitor's Mini HDMI input using the provided Mini HDMI to HDMI cable. When using HDMI, ensure the monitor is also connected to a power source via the USB-C power input.

Image: This image displays the portable monitor connected to a variety of devices, including gaming consoles (PlayStation, Xbox, Nintendo Switch), a laptop, and a smartphone, demonstrating its broad compatibility.
2.3 Display Modes
Once connected, you can configure the display mode on your primary device (laptop, PC, etc.):
- Duplicate Mode: The portable monitor displays the same content as your primary screen.
- Extend Mode: The portable monitor acts as an extension of your primary screen, providing more desktop space.
- Second Screen Mode: The portable monitor is used as the sole display, with the primary screen turned off.

Image: This diagram visually explains the three primary display modes: Duplicate Mode (mirroring the main screen), Extend Mode (extending the desktop), and Second Screen Mode (using only the portable monitor).
2.4 Touchscreen Functionality
For touchscreen functionality, ensure your device supports touch input over the USB-C connection. Not all devices, particularly certain smartphones or older operating systems, may support this feature without additional drivers or specific hardware compatibility. Connect the USB-C cable from your device to the monitor's USB-C port for touch data transmission.
3. Operating Instructions
3.1 Power On/Off
Press the power button located on the side of the monitor to turn it on or off. The power indicator light will illuminate when the monitor is active.
3.2 On-Screen Display (OSD) Menu
Use the control buttons on the side of the monitor to navigate the OSD menu. This menu allows you to adjust various display settings.
- Brightness/Contrast: Adjust the display's luminance and contrast levels.
- Color Settings: Modify color temperature, hue, and saturation.
- Input Source: Manually select between USB-C and HDMI input sources.
- Volume: Control the output volume of the integrated dual speakers.
- Eye-Care Mode: Activate modes designed to reduce blue light emission for comfortable viewing during prolonged use.

Image: This image highlights the display quality of the monitor, featuring a colorful screen and specifications such as 1080P resolution, 16.7 million colors, 100% sRGB color gamut, and 178-degree viewing angles.
3.3 Touchscreen Operation
The monitor features 10-point capacitive touch for interactive control. When connected to a compatible device, you can use standard touch gestures:
- Drag/Scroll: Swipe a single finger across the screen.
- Zoom In/Out: Pinch with two fingers.
- Multi-Touch: Utilize multiple fingers for supported applications.
- 10 Points Touch: The screen can register up to 10 simultaneous touch points.

Image: This image illustrates the 10-point capacitive touch feature of the monitor, with hands interacting with a graphical interface, demonstrating smooth and sensitive touch experience including drag/scroll, zoom, and multi-touch.
4. Maintenance
4.1 Cleaning the Monitor
To clean the monitor, first ensure it is powered off and disconnected from all power sources. Use a soft, lint-free cloth lightly dampened with water or a non-abrasive screen cleaner. Avoid using harsh chemicals, alcohol, or ammonia-based cleaners, as these can damage the screen surface.
4.2 Storage
When not in use, store the monitor in a cool, dry place. Utilize the protective cover to prevent scratches and dust accumulation. Avoid placing heavy objects on the monitor.
5. Troubleshooting
If you encounter issues with your monitor, refer to the following common problems and solutions:
- No Display / No Power:
- Ensure the power cable is securely connected to both the monitor and a working power outlet.
- If using USB-C for power, verify your device's USB-C port supports power delivery or connect an external power adapter.
- Press the power button firmly to ensure it is turned on.
- No Signal:
- Check that the video cable (USB-C or HDMI) is securely connected to both the monitor and your source device.
- Verify that your source device is powered on and configured to output video to an external display.
- Manually select the correct input source in the monitor's OSD menu.
- Ensure your device's USB-C port supports DisplayPort Alternate Mode for video output.
- Touchscreen Not Working:
- Confirm that your source device (e.g., smartphone, laptop) is compatible with external touch displays via USB-C. Not all devices support this feature.
- Ensure the USB-C cable used supports both video and touch data transmission.
- Some devices may require specific drivers or software for touchscreen functionality. Consult your device's manufacturer for compatibility information.
- Sound Issues:
- Check the volume settings on both the monitor (via OSD menu) and your source device.
- Ensure the audio output is directed to the portable monitor in your device's sound settings.
6. Specifications
| Brand | KUMK |
| Model Number | B09FP6FN59 |
| Screen Size | 15 Inches |
| Connectivity Technology | HDMI, USB |
| Hardware Connectivity | HDMI, USB, USB Type C, mini HDMI |
| Specific Uses For Product | Gaming |
| Image Brightness | 300 cd/m² |
| Brightness | 300 cd/m² |
| Item Weight | 1.7 Pounds |
| UPC | 735279856019 |
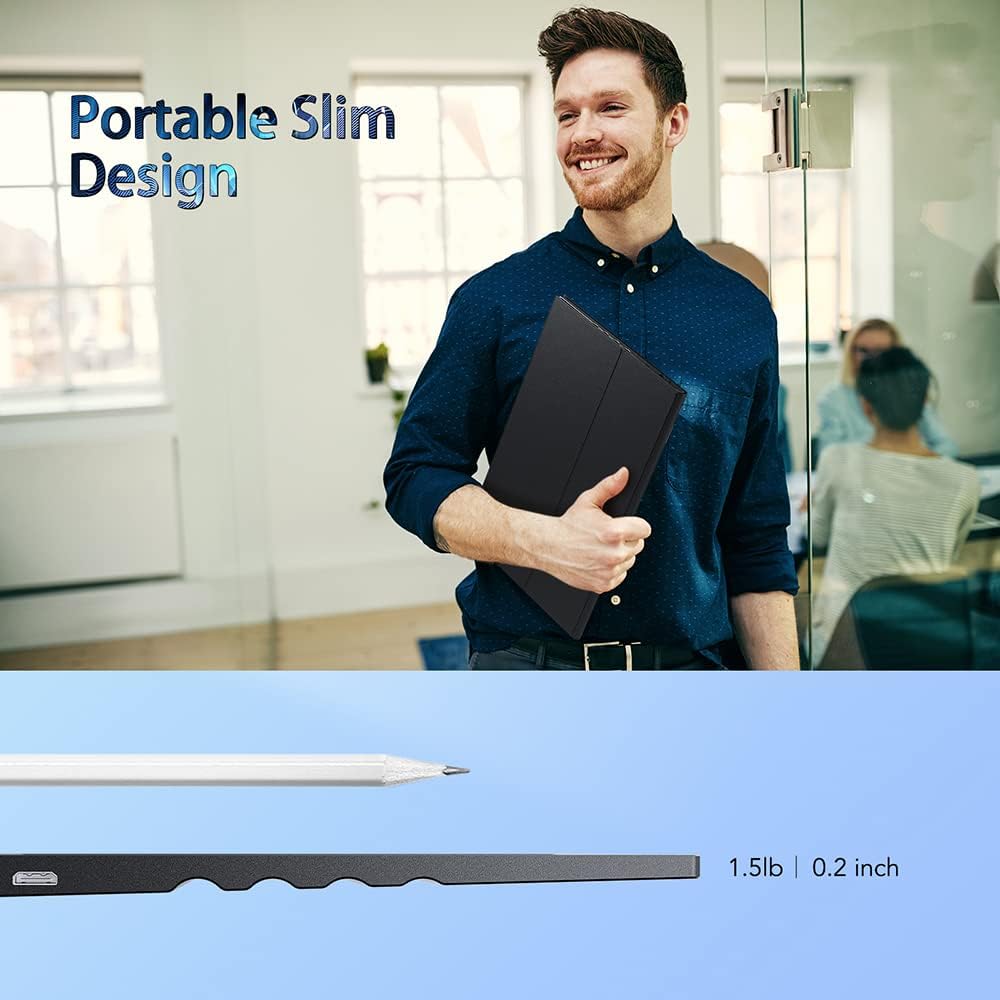
Image: This image highlights the portable and slim design of the monitor, showing its profile next to a pencil and indicating a weight of 1.5 lbs and a thickness of 0.2 inches.
7. Warranty and Support
For warranty information or technical support, please refer to the documentation included with your purchase or contact KUMK customer service through their official channels. Keep your purchase receipt for warranty claims.