1. Introduction
This manual provides detailed instructions for the installation, operation, and troubleshooting of the avedio Links 1X4 HDMI Extender Splitter. This device allows you to extend a single HDMI video source to four HDMI displays simultaneously over long distances using CAT5e/6/7 Ethernet cables.
The extender supports resolutions up to 1080P@60Hz and features Power Over Cable (POC) technology, requiring power only at the transmitter unit. It also includes EDID management for enhanced compatibility with various display devices.
2. Safety Information
- Ensure all cables are connected securely before powering on the device.
- Do not expose the device to water, moisture, or extreme temperatures.
- Use only the provided power adapter.
- Do not attempt to open or repair the device. Refer all servicing to qualified personnel.
- Keep the device away from sources of strong electromagnetic interference.
3. Package Contents
Verify that all items are present in your package:
- 1x HDMI Extender 1x4 Transmitter Unit
- 4x HDMI Extender Receiver Units
- 1x DC 12V Power Adapter
- 1x User Manual
- 2x Fixed Hangers

Image: Contents of the avedio Links 1X4 HDMI Extender Splitter package.
4. Product Overview
4.1 Transmitter Panel (TX)
The transmitter unit connects to your HDMI source and distributes the signal to the receiver units.
- ON/OFF Switch: Power control for the transmitter.
- Power Indicator: Lights up when the unit is powered on.
- Signal Indicator (TX): Indicates HDMI signal input.
- RJ45 Output (CAT1-CAT4): Connects to receiver units via CAT5e/6/7 cables.
- EDID Switch (1-2-3): Dip switches for EDID mode selection.
- HDMI Input: Connects to your HDMI source device.
- DC 12V Power Input: Connects to the provided 12V power adapter.
4.2 Receiver Panel (RX)
The receiver units connect to your HDMI displays and receive the extended signal from the transmitter.
- RJ45 Input: Connects to the transmitter unit via a CAT5e/6/7 cable.
- HDMI Output: Connects to your HDMI display device.
- DC 5V Power Input: Not required for operation due to POC technology.

Image: Front and back panels of the Transmitter and Receiver units.
5. Setup Instructions
Follow these steps to set up your HDMI Extender Splitter:
- Connect HDMI Source: Connect your HDMI source device (e.g., Blu-ray player, TV box, PC) to the HDMI Input port on the Transmitter (TX) unit using a high-quality HDMI cable (up to 5 meters / 16 feet).
- Connect Receiver Units: Connect each of the four Receiver (RX) units to the RJ45 Output ports (CAT1-CAT4) on the Transmitter (TX) unit using individual CAT5e/6/7 Ethernet cables. Each cable can be up to 50 meters (165 feet) long.
- Connect Displays: Connect each Receiver (RX) unit to an HDMI display (e.g., TV, monitor) using a high-quality HDMI cable.
- Power On: Connect the provided DC 12V power adapter to the DC 12V Power Input on the Transmitter (TX) unit. Flip the ON/OFF switch to the ON position. The Power Indicator light on the TX unit should illuminate.
- POC Technology: Due to Power Over Cable (POC) technology, the Receiver (RX) units do not require separate power adapters. Power is supplied through the Ethernet cables from the Transmitter unit.
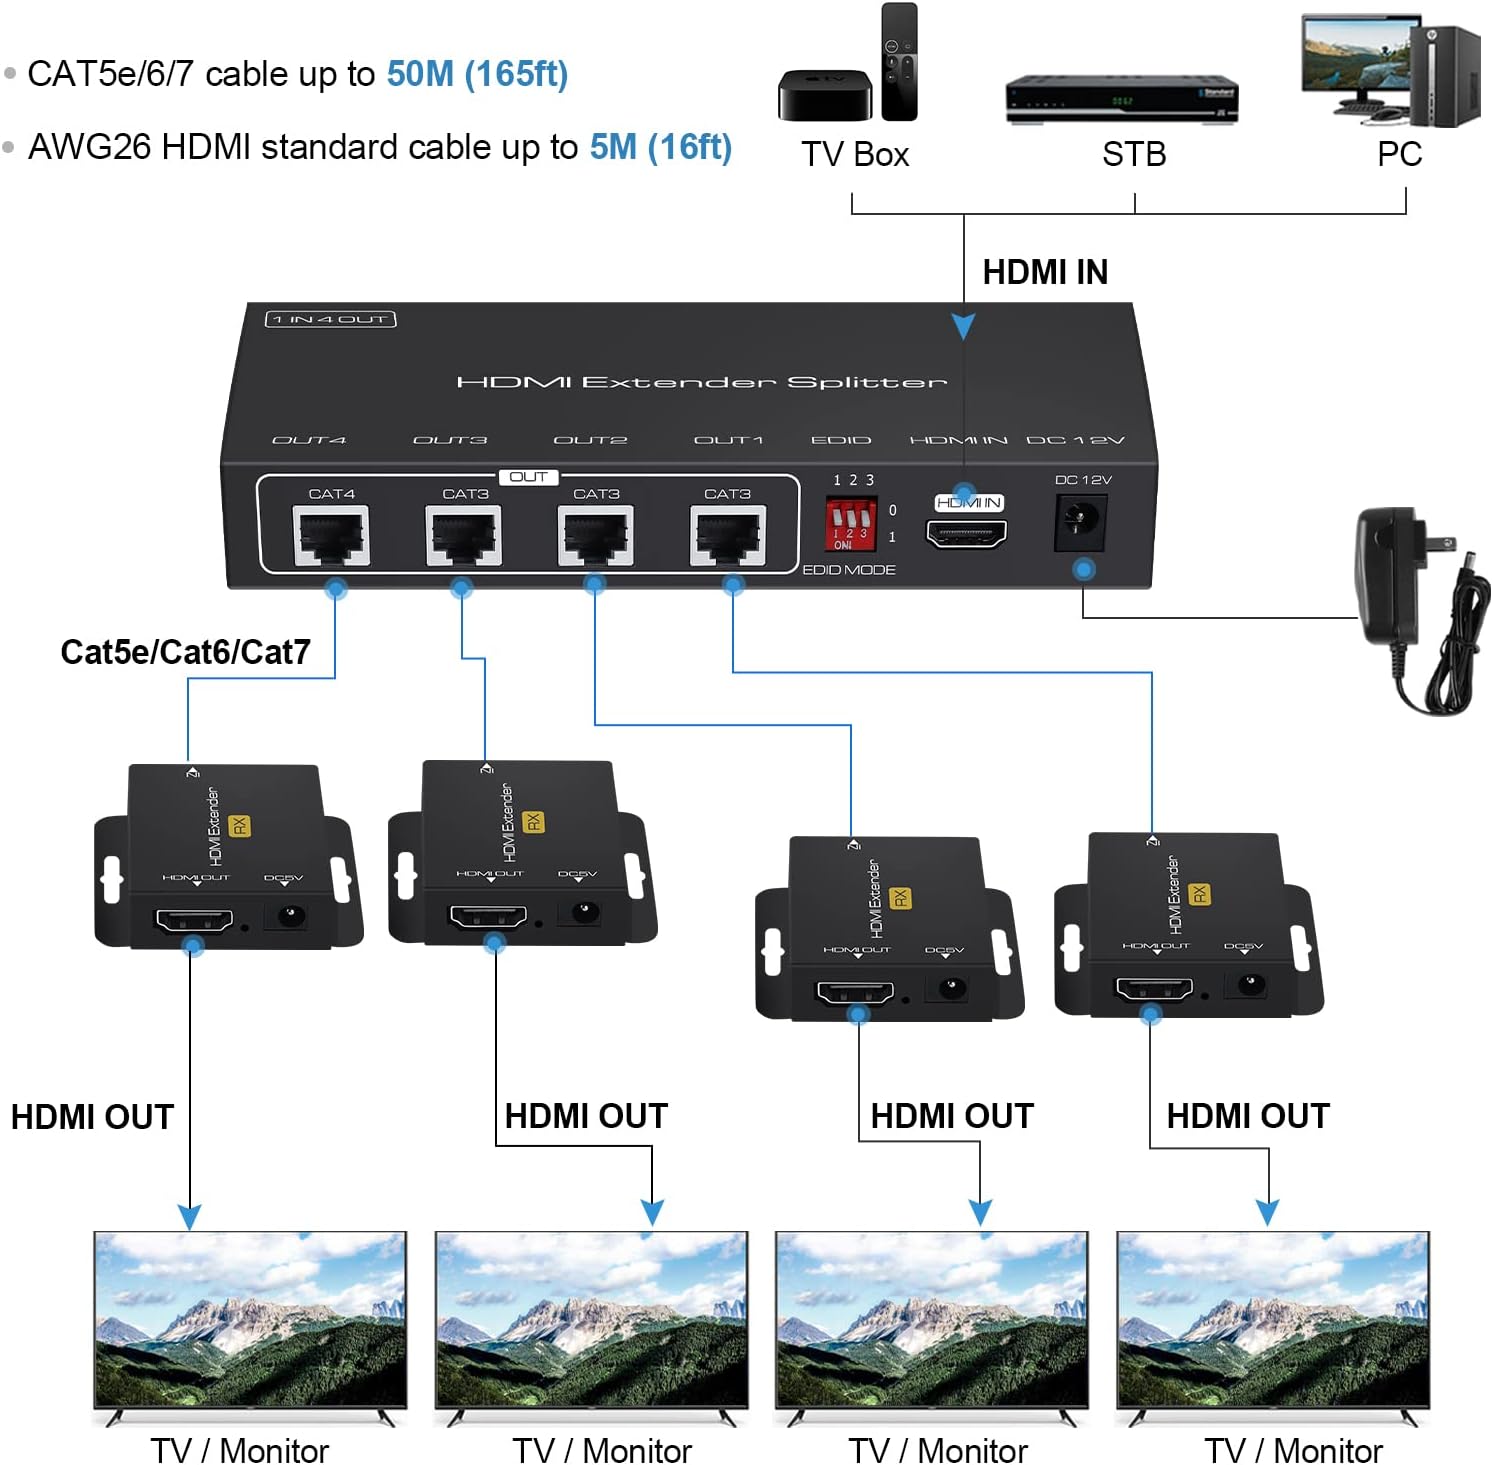
Image: Typical connection diagram for the HDMI Extender Splitter.

Image: The transmitter unit, illustrating the POC power supply feature.
6. Operating Instructions
6.1 EDID Management
The EDID (Extended Display Identification Data) switch on the transmitter unit allows you to select the optimal audio and video format for compatibility with your connected displays. Adjust the dip switches (1, 2, 3) according to the desired EDID specification.

Image: EDID switch and corresponding settings table.
EDID Switch Settings:
| Position 1 | Position 2 | Position 3 | EDID Specification |
|---|---|---|---|
| 0 | 0 | 0 | 1080P 2CH |
| 0 | 0 | 1 | 1080P 5.1CH |
| 0 | 1 | 0 | 1080P 7.1CH |
| 0 | 1 | 1 | 1080P 3D 2CH |
| 1 | 0 | 0 | 1080P 3D 5.1CH |
| 1 | 0 | 1 | 1080P 3D 7.1CH |
| 1 | 1 | 0 | 1920x1200 2CH |
Note: After changing EDID settings, it is recommended to power cycle the transmitter unit for the new settings to take effect.
7. Maintenance
- Clean the device with a soft, dry cloth. Do not use liquid or aerosol cleaners.
- Ensure proper ventilation around the units to prevent overheating.
- Store the device in a cool, dry place when not in use.
8. Troubleshooting
If you encounter issues, refer to the following troubleshooting steps:
8.1 No Power
- Check if the power adapter is securely plugged into both the wall socket and the DC 12V input on the Transmitter unit.
- Ensure the ON/OFF switch on the Transmitter unit is in the ON position.
- Verify the power outlet is functional by plugging in another device.
8.2 No Picture / Signal
- Confirm that all connected devices (HDMI source, displays) are powered on and functioning correctly.
- Check all HDMI and CAT5e/6/7 cable connections. Ensure they are firmly seated.
- Test with different HDMI cables if possible, as faulty cables can cause signal loss.
- Ensure the CAT5e/6/7 cables are of good quality and meet the specified length requirements (up to 50m/165ft).
- Adjust the EDID switch settings on the Transmitter unit to match the capabilities of your displays. Power cycle the transmitter after changing EDID settings.
8.3 Obscure / Poor Picture Quality
- Reconnect all cables to ensure a good connection.
- Verify the quality of your HDMI and CAT5e/6/7 cables. Low-quality or damaged cables can degrade signal quality.
- Ensure the total cable length (HDMI input + CAT + HDMI output) does not exceed recommended limits.
- Check for any sources of electromagnetic interference near the cables or units.
9. Specifications
| Feature | Description |
|---|---|
| HDMI Resolution | 3D / 1080P / 1080i / 720P / 576P / 576i / 480P / 480i @60Hz |
| Audio Format | DTS-HD / Dolby-trueHD / LPCM7.1 / DTS / Dolby-AC3 / DSD |
| Max Baud Rate | 4.95Gbps |
| Input Cable Distance | ≤5m AWG26 HDMI standard cable |
| Output Cable Distance | ≤50m CAT5e/6/7 cable |
| Power Supply | POC (Power Over Cable) - TX unit requires DC 12V, RX units are powered via CAT cable. |
| Number of Ports | 1 HDMI Input, 4 RJ45 Outputs (TX); 1 RJ45 Input, 1 HDMI Output (RX) |
| Color | Black |
| Brand | avedio links |
10. Official Product Video
Watch this video for a visual guide on the avedio Links 1X4 HDMI Extender Splitter's features and setup.
Video: An official product video demonstrating the avedio Links 1X4 HDMI Extender Splitter, its components, and connection process.
11. Warranty Information
This product comes with a standard manufacturer's warranty. Please refer to the warranty card included in your package or contact customer support for specific details regarding warranty coverage and terms.
12. Customer Support
For technical assistance, troubleshooting, or any questions regarding your avedio Links 1X4 HDMI Extender Splitter, please contact avedio links customer support. Contact information can typically be found on the product packaging, the official avedio links website, or through your retailer.