Introduction
This manual provides detailed instructions for the Bisofice Electronic Time Clock, designed for accurate employee attendance tracking in offices, factories, and workplaces. It covers setup, operation, maintenance, and troubleshooting to ensure optimal performance of your device.
Package Contents
Before beginning, please verify that all items are present in the package:
- Bisofice Electronic Time Clock
- Power Adapter
- Time Cards (50 pieces)
- Keys for lockable access
- Instruction Manual

Image: Contents of the Bisofice Electronic Time Clock package, showing the time clock unit, power adapter, a stack of time cards, two keys, and the instruction manual.
Product Overview
Familiarize yourself with the components of your Bisofice Electronic Time Clock.
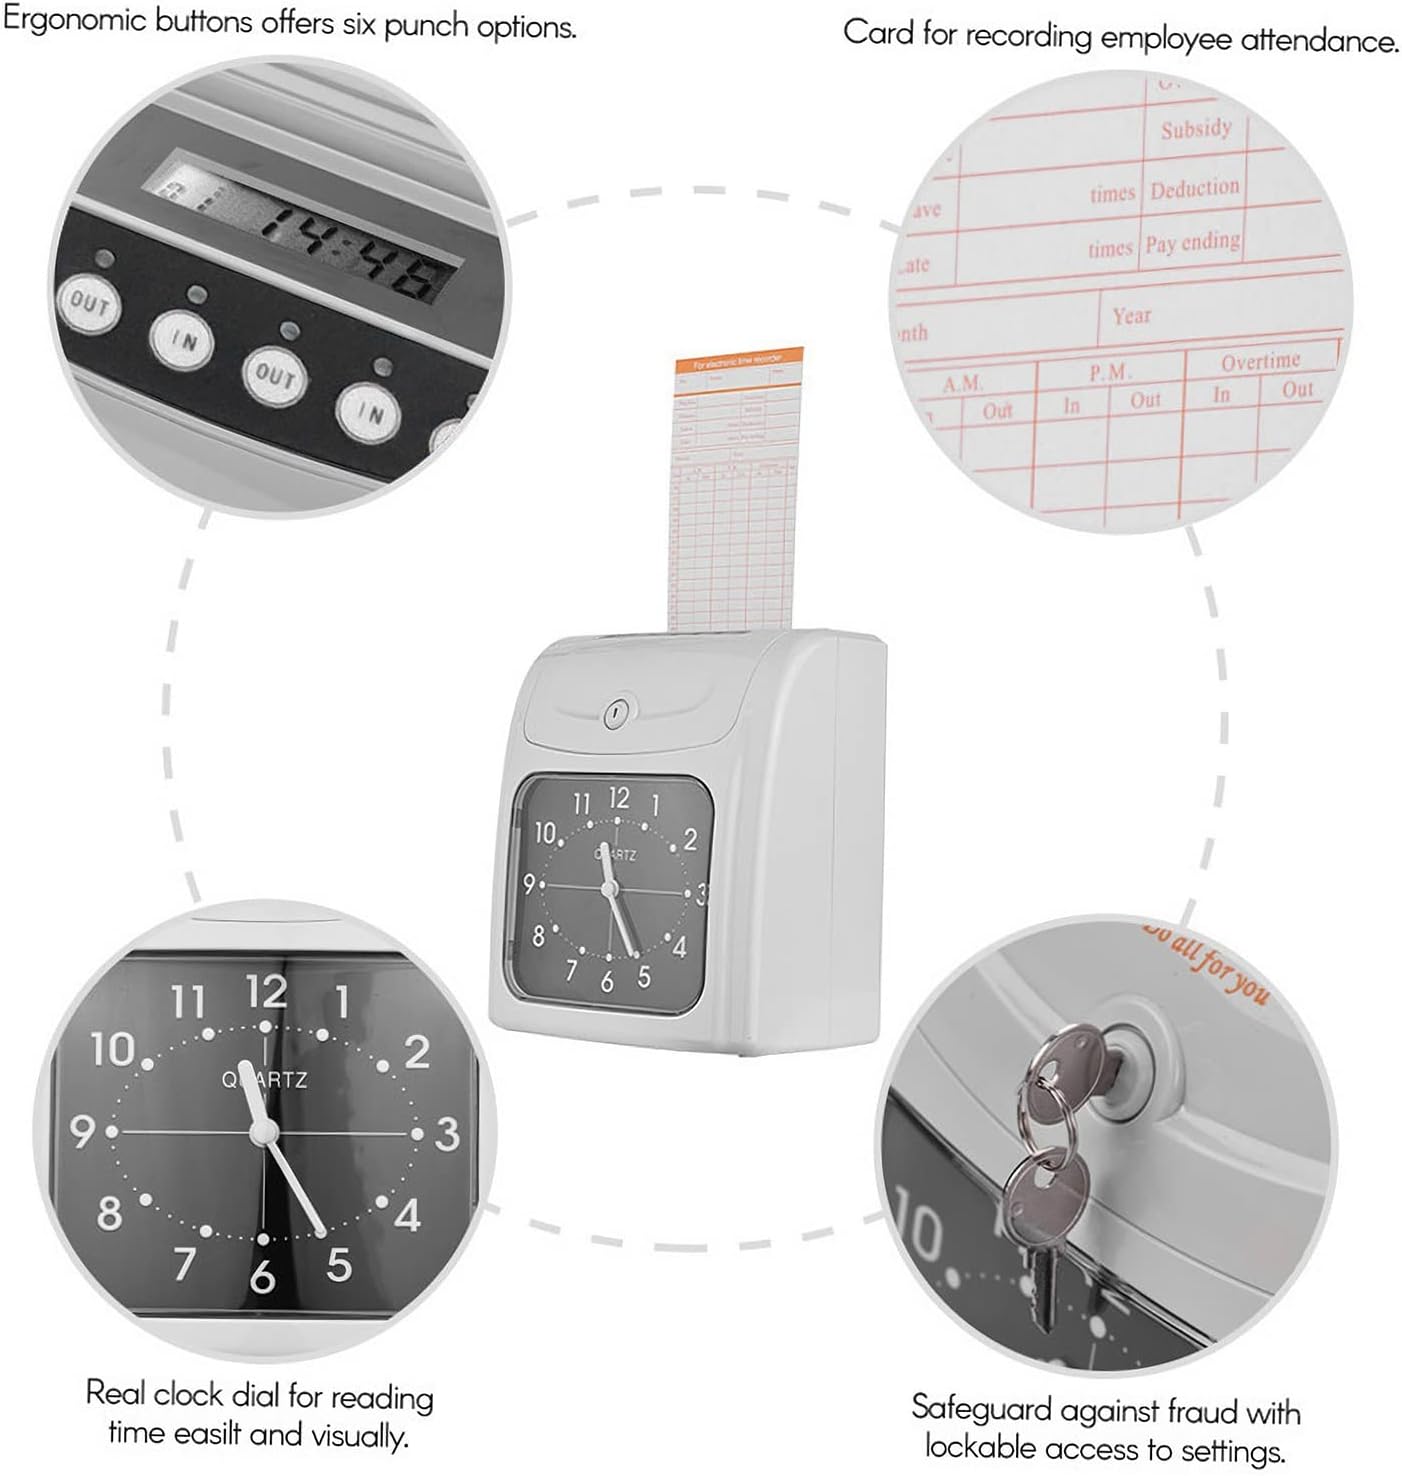
Image: A diagram highlighting key features of the time clock: ergonomic buttons for punch options, the time card slot, the analog clock dial for visual time reading, and the key lock for secure access to settings.
- LED Display: Shows current time and operational status.
- Punch Buttons: Ergonomic buttons for various punch options (IN/OUT).
- Time Card Slot: For inserting employee time cards.
- Analog Clock Dial: Provides an easy-to-read visual time display.
- Key Lock: Secures access to internal settings and controls.
Setup
1. Power Connection
Connect the provided power adapter to the DC input port located on the back of the time clock. Plug the adapter into a standard electrical outlet.
2. Wall Mounting (Optional)
The time clock can be mounted on a wall for convenience. Use the two designated holes on the back of the unit for secure installation.

Image: The rear of the time clock, indicating the DC input port for power and two holes for wall mounting.
3. Initial Settings
Unlock the top cover using the provided key to access the internal settings panel. Refer to the detailed instructions in the manual for setting the correct time, date, and other parameters.

Image: An open view of the time clock's top section, revealing the internal control panel with buttons for menu navigation and a backup battery switch. A key is shown next to the open cover.
4. Backup Battery Activation
The device is equipped with a rechargeable storage battery for power outages. Ensure the backup battery switch (located inside the settings panel) is in the "ON" position to enable this feature. This also supports data memory backup.
Operating Instructions
1. Inserting a Time Card
Gently insert an employee time card into the designated slot at the top of the time clock. The device will automatically detect the card and position it correctly for printing.

Image: A time card partially inserted into the top slot of the electronic time clock, ready for punching.
2. Punching In/Out
Once the time card is inserted, press the appropriate "IN" or "OUT" button on the control panel. The time clock will print the current time onto the card. The device automatically handles in and out settings and verifies the card's correctness.
3. Two-Color Printing
The time clock uses two ink colors to indicate attendance status:
- Black Ink: Indicates regular attendance.
- Red Ink: Indicates abnormal attendance (e.g., late arrival, early departure), providing a clear visual alert.
4. Tracking Employee Attendance
The time clock is designed to accurately track employee start times, pause times, lunch breaks, and end times. Deductions for lunches and breaks can be managed directly on the time cards.
Maintenance
1. Cleaning
Regularly wipe the exterior of the time clock with a soft, dry cloth. Avoid using abrasive cleaners or solvents. Ensure the time card slot is free from dust and debris to prevent jamming.
2. Ink Ribbon Replacement
When the print quality deteriorates, the ink ribbon may need replacement. Refer to the internal settings panel access (using the key) for instructions on how to safely replace the ink ribbon cartridge.
3. Backup Battery Check
Periodically check the functionality of the backup battery. Ensure it is charged and the switch is in the "ON" position to maintain operation during power interruptions and protect data integrity.
Troubleshooting
- Device Not Powering On:
- Ensure the power adapter is securely connected to both the device and a working electrical outlet.
- Check if the backup battery switch is in the "ON" position.
- Time Card Not Printing:
- Verify that the time card is inserted correctly and fully into the slot.
- Check if the ink ribbon needs replacement.
- Incorrect Time/Date Display:
- Access the internal settings panel using the key and adjust the time and date settings as per the setup instructions.
- Red Ink Printing Unexpectedly:
- The red ink indicates abnormal attendance. Review the time settings and employee punch times to ensure they align with expected schedules.
Specifications
| Feature | Detail |
|---|---|
| Brand | Bisofice |
| Model Number | QQF4752295739421HK |
| Product Dimensions | 12.5D x 18.6W x 21.2H cm (4.9D x 7.3W x 8.3H inches) |
| Item Weight | 1584.8 Grams (approximately 1.58 kg) |
| Display Type | Two-color LED display with analog clock dial |
| Power Source | DC 5V (via power adapter) |
| Backup Battery | Built-in rechargeable storage battery for power outages and data memory backup. |
| Card Capacity | Supports 50 time cards (included) |
| Printing | Two-color printing (black for normal, red for abnormal attendance) |

Image: A perspective view of the time clock with its dimensions clearly marked: 18.6 cm (7.3 in) width, 12.5 cm (4.9 in) depth, and 21.2 cm (8.3 in) height.
Warranty and Support
Specific warranty details are not provided in this manual. For warranty information, please refer to the product packaging or contact your retailer. For technical support or further assistance, please contact Bisofice customer service through their official website or the contact information provided with your purchase.


