1. Introduction
This manual provides essential information for the safe and efficient operation of your BAGGA ENGINEERING WORKS Jack F4 Sewing Machine. Please read these instructions carefully before using the machine to ensure proper setup, operation, and maintenance. The Jack F4 is designed for reliable and high-quality performance in various sewing applications.
Key Features:
- Material: Metal construction for durability.
- Color: White & Blue design.
- Reliable and easy to use operation.
2. Safety Instructions
Always observe basic safety precautions when using electrical appliances to reduce the risk of fire, electric shock, or injury to persons.
- Ensure the machine is unplugged before cleaning, servicing, or when not in use.
- Keep fingers away from all moving parts, especially the needle and handwheel.
- Use only the recommended accessories and attachments.
- Do not operate the machine if the power cord is damaged or if the machine is not working properly.
- Keep the work area well-lit and clear of obstructions.
3. Setup
Proper setup is crucial for optimal performance of your sewing machine.
3.1 Unpacking and Placement
Carefully remove the machine from its packaging. Place the machine on a stable, level surface. Ensure there is adequate space around the machine for comfortable operation and material handling.

Figure 3.1: Overall view of the Jack F4 Sewing Machine.
3.2 Power Connection
Connect the power cord to the machine and then to a suitable electrical outlet. Ensure the voltage matches the machine's requirements.
3.3 Threading the Machine
Follow the numbered threading guides on the machine. Start by placing the thread spool on the spool pin. Guide the thread through the tension discs, take-up lever, and finally through the needle eye. Ensure the bobbin is correctly wound and inserted into the bobbin case.

Figure 3.2: Close-up view of the needle, presser foot, and thread path for threading guidance.
4. Operating Instructions
Familiarize yourself with the controls before beginning to sew.
4.1 Power On/Off
Locate the power switch, typically on the side or front of the machine, and turn it to the 'ON' position. The machine's display will illuminate.
4.2 Adjusting Speed
The Jack F4 features an adjustable speed control. Use the dial and digital display to set your desired sewing speed. Rotate the dial to increase or decrease the speed, or use the '+' and '-' buttons if available.
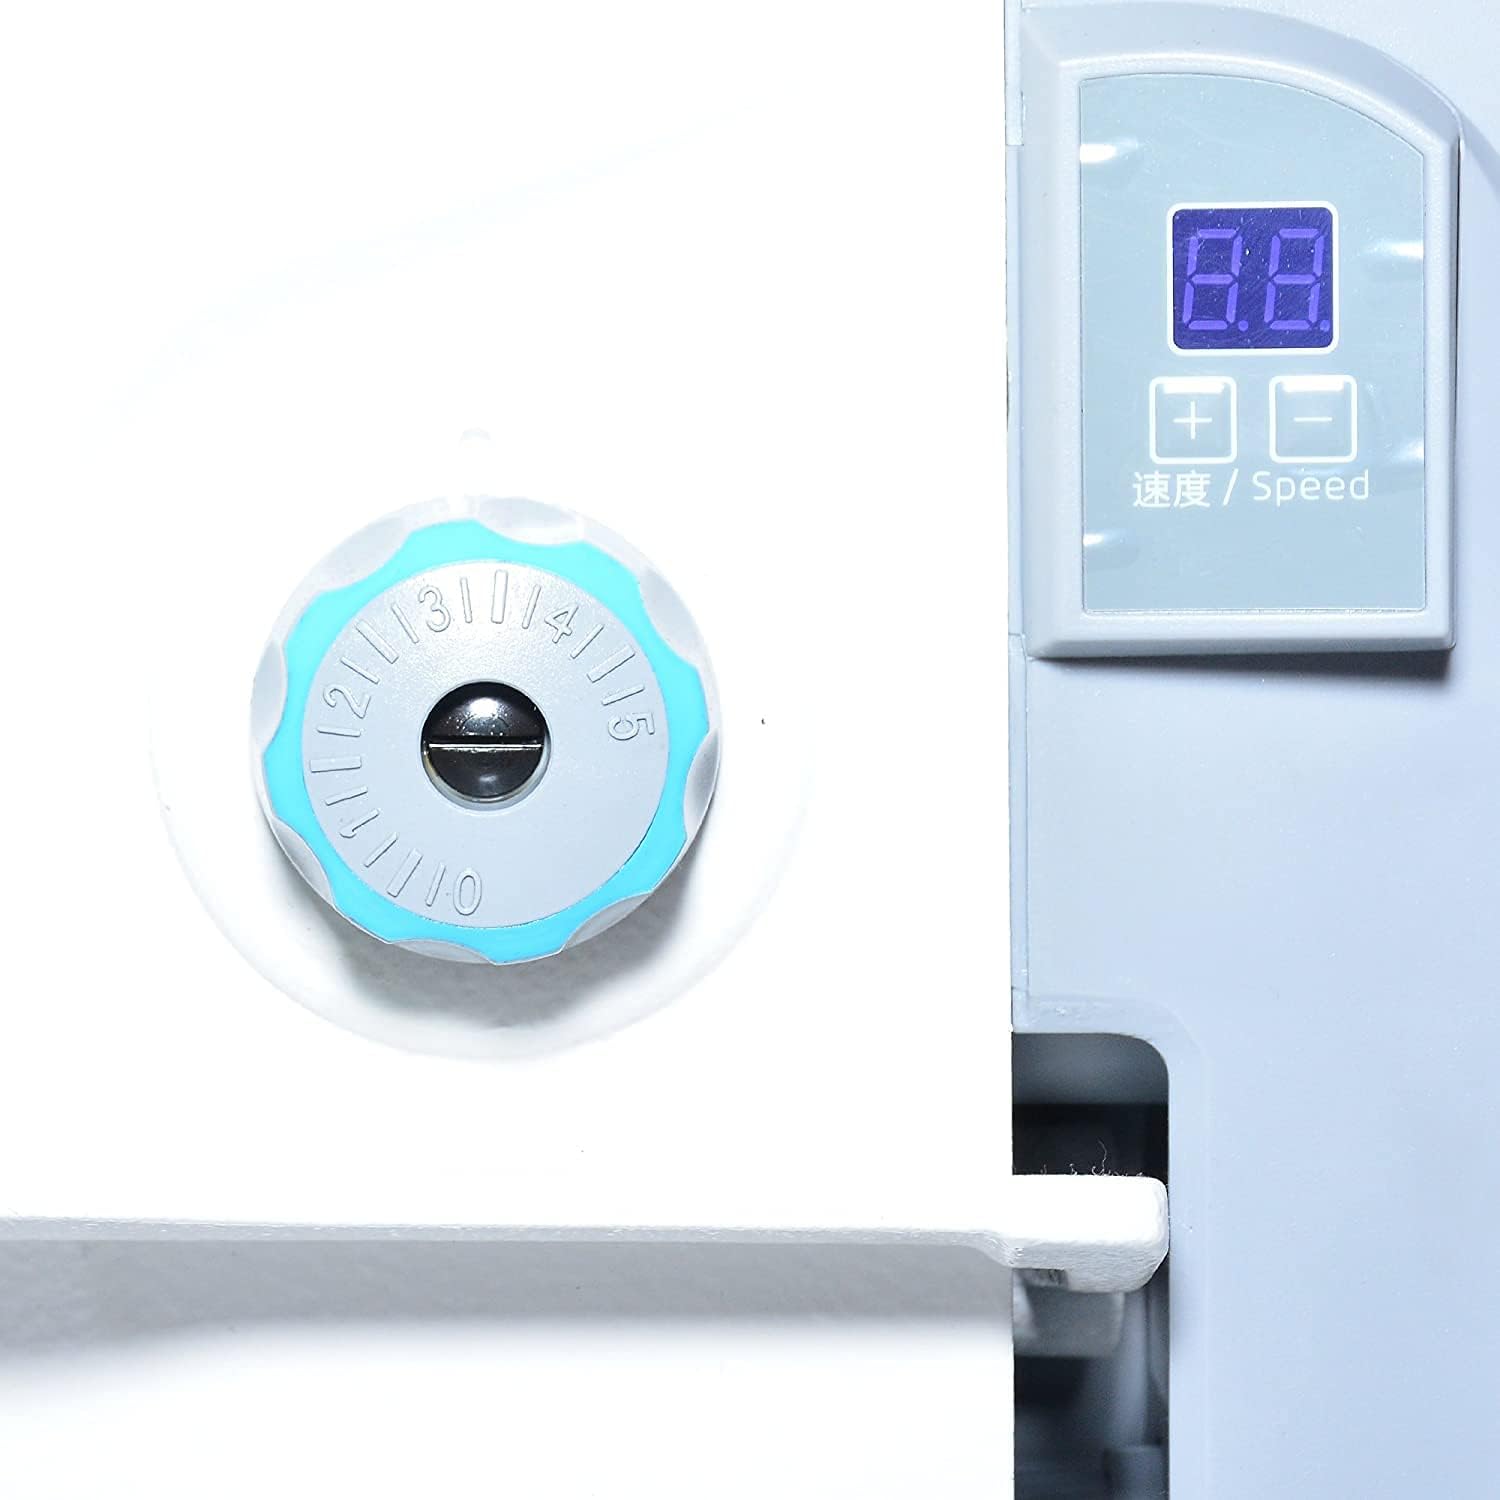
Figure 4.1: Speed control dial and digital display for adjusting sewing speed.
4.3 Stitch Selection and Length
Refer to the machine's markings or separate stitch guide for selecting the appropriate stitch type and adjusting stitch length. Typically, a lever or dial controls stitch length.
4.4 Sewing
Place your fabric under the presser foot. Lower the presser foot using the lever. Gently press the foot pedal to begin sewing. Guide the fabric smoothly without forcing it.
5. Maintenance
Regular maintenance ensures the longevity and smooth operation of your sewing machine.
- Cleaning: Regularly clean lint and dust from the bobbin area, feed dogs, and tension discs using a small brush or vacuum cleaner.
- Oiling: Refer to the machine's specific oiling points and frequency. Use only high-quality sewing machine oil.
- Needle Replacement: Replace the needle frequently, especially when sewing different fabric types or if it becomes dull or bent.
- Storage: When not in use, cover the machine to protect it from dust and debris.
6. Troubleshooting
This section addresses common issues you might encounter.
6.1 Skipped Stitches
- Check if the needle is inserted correctly and is not bent or dull.
- Ensure the correct needle type is used for the fabric.
- Verify that the machine is threaded correctly.
6.2 Thread Breakage
- Check thread tension; it might be too tight.
- Inspect the thread path for any snags or burrs.
- Ensure the needle is not damaged.
6.3 Machine Not Starting
- Verify the power cord is securely plugged in.
- Check the power switch is in the 'ON' position.
- Ensure the foot pedal is connected properly.
7. Specifications
| Feature | Detail |
|---|---|
| Product Dimensions | 25.39 x 9.76 x 21.65 inches |
| Item Model Number | F4 |
| Brand | BAGGA ENGINEERING WORKS |
| Color | WHITE & BLUE |
| Material | Metal |
| Power Source | Corded Electric |
| Is Electric | Yes |
| Manufacturer | BAGGA ENGINEERING WORKS |
8. Warranty and Support
For assistance with training, installation, warranty registration, or to claim warranty, please contact BAGGA ENGINEERING WORKS directly.

Figure 8.1: BAGGA ENGINEERING WORKS customer care information for support and warranty.
Customer Care Number: 9855075505
You can also find more information and support through their social media channels: