1. Product Overview
The J.ZAO LM-300 is an advanced auto focimeter lensmeter designed for precise and efficient measurement of various optical lenses. It features a high-speed processing system, a user-friendly touch screen interface, and supports measurement of ultra-low transmittance and low dispersion lenses. This manual provides essential information for the proper setup, operation, and maintenance of your LM-300 device.
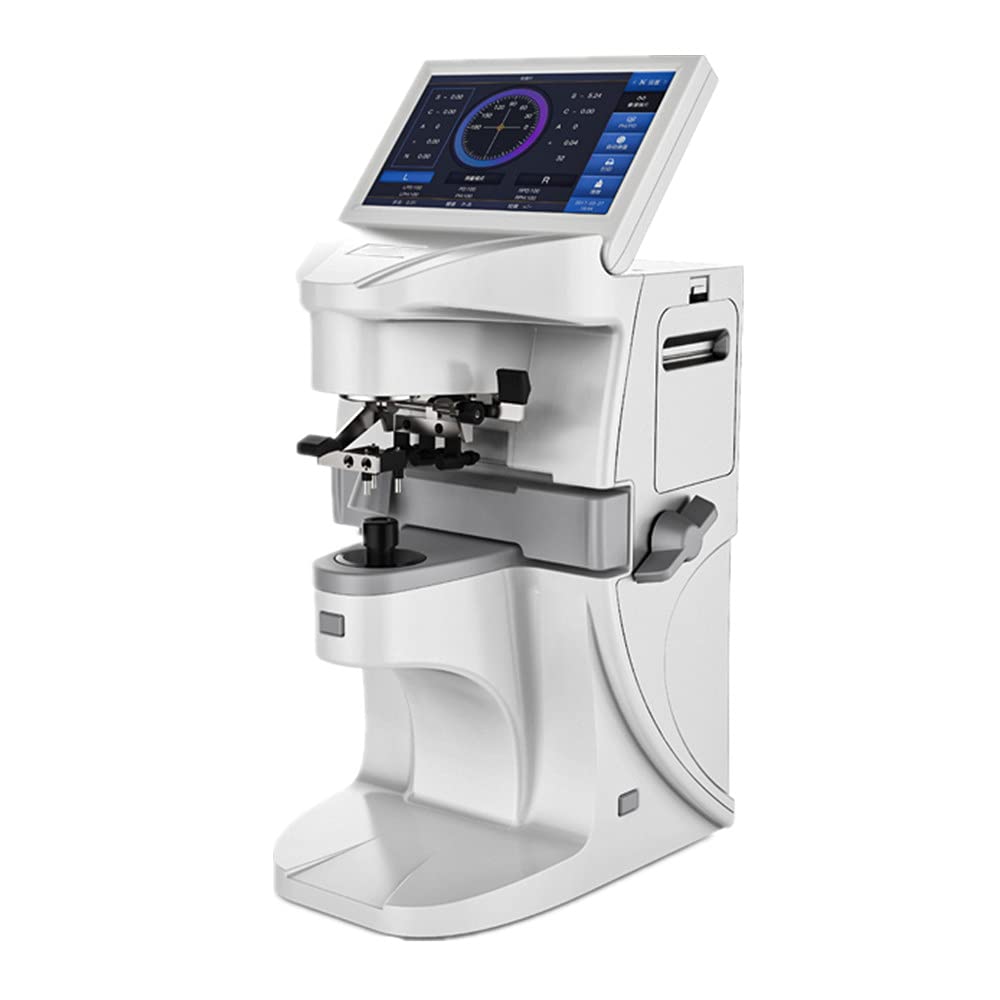
Figure 1.1: The J.ZAO LM-300 Auto Focimeter Lensmeter, showcasing its sleek design and integrated display.

Figure 1.2: Various perspectives of the LM-300, including front, back, and side views, illustrating its compact and functional design.
2. Key Features
- Advanced Measurement Algorithm: Utilizes over 80 spot data points for calculation, ensuring highly accurate measurements for progressive multi-focal lenses.
- Green LED Light Source: Employs a green LED light source, eliminating the need for Abbe constant compensation, which simplifies operation and enhances data accuracy.
- High-Speed Processing System: Equipped with a new extensible integrated high-speed processing system capable of up to 4000 DMIPS, allowing for rapid image processing and data collection.
- Versatile Lens Compatibility: Supports measurement of ultra-low transmittance and low dispersion lenses.
- Extended Prism Measurement: The upper limit of prism measurement is as high as 20 delta.
- Automatic Lens Type Identification: Automatically identifies the type of lens being measured, streamlining the process.
- Comprehensive Data Output: Supports printout of PD (Pupillary Distance), PH (Pupillary Height), and UV (Ultraviolet) measurement results.
- 7-inch Full Screen Touchable Display: Features a large, rotatable touch screen for intuitive operation and clear visual feedback.

Figure 2.1: A visual representation of the LM-300's key product characteristics, highlighting its advanced features and capabilities.
3. Product Components and Controls
Familiarize yourself with the various components and controls of the LM-300 to ensure proper operation.
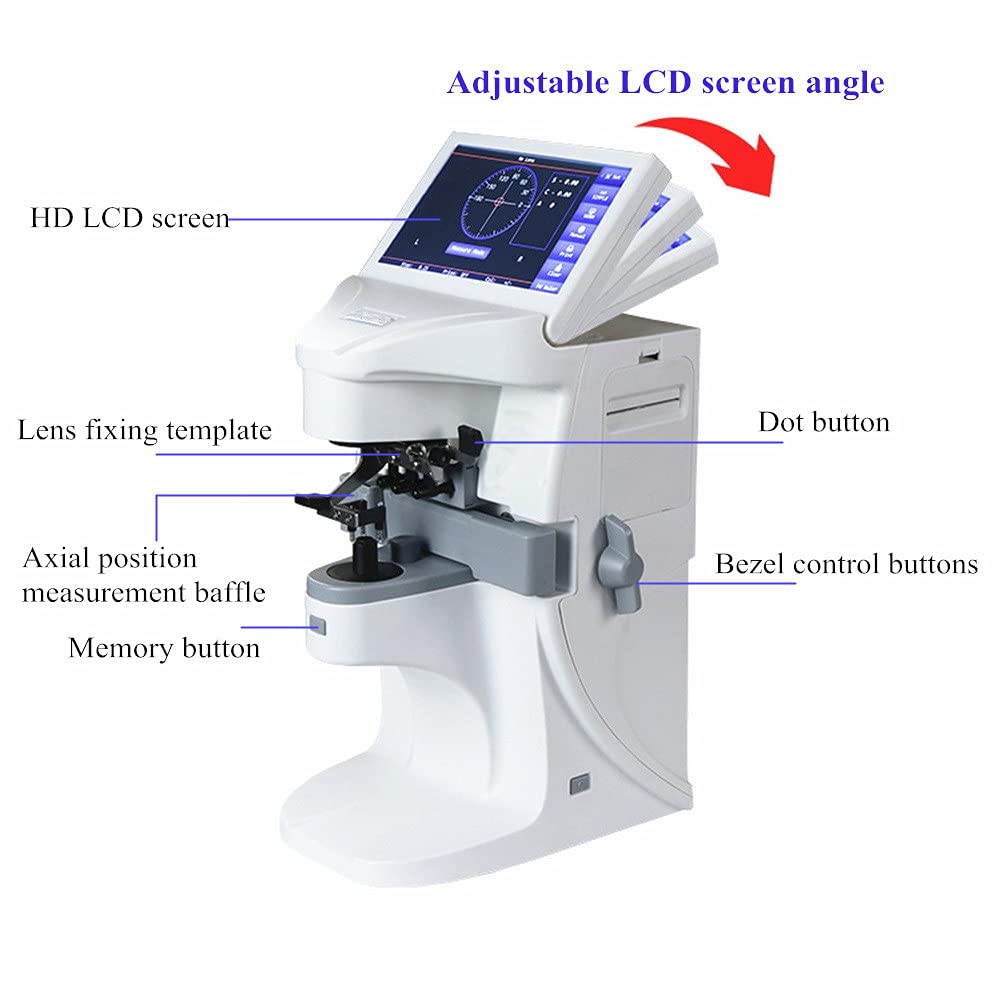
Figure 3.1: A detailed diagram labeling the key components of the LM-300, including the adjustable LCD screen, lens fixing template, axial position measurement baffle, dot button, bezel control buttons, and memory button.
- Adjustable LCD Screen: The 7-inch full-screen touchable display can be adjusted for optimal viewing angles.
- Lens Fixing Template: Used to securely hold the lens in place during measurement.
- Axial Position Measurement Baffle: Assists in accurately positioning the lens for measurement.
- Dot Button: For specific measurement functions or data input.
- Bezel Control Buttons: Used for navigation and selection within the interface.
- Memory Button: To save or recall measurement data.
- Three-point Fixed Lens Pressure Handle: Ensures stable and secure lens placement.
- Miniature Cone Measuring Port: Designed to protect the lens during measurement.

Figure 3.2: Close-up views illustrating the three-point fixed lens pressure handle, the miniature cone measuring port for lens protection, and the adjustable screen angle for user convenience.
4. Setup
- Unpacking: Carefully remove the LM-300 from its packaging. Retain all packaging materials for future transport or storage.
- Placement: Place the device on a stable, level surface free from vibrations and direct sunlight. Ensure adequate space around the unit for ventilation and operation.
- Power Connection: Connect the provided power adapter to the DC 12V input port on the rear of the LM-300. Plug the adapter into a suitable power outlet.
- Initial Power On: Press the power button to turn on the device. The system will initiate and display the main measurement interface.
- Screen Adjustment: Adjust the angle of the LCD screen for comfortable viewing. The screen can rotate approximately 90 degrees from horizontal to vertical.
5. Operating Instructions
The LM-300 features an intuitive touch screen interface for all operations.

Figure 5.1: The imported LCD HD screen of the LM-300, displaying the measurement interface. This screen utilizes advanced calculation methods for quick and accurate progressive lens measurements.

Figure 5.2: Illustration of the LM-300's 7.0-inch rotatable color touch screen, which can be adjusted approximately 90 degrees for flexible operation perspective.

Figure 5.3: Examples of the LM-300's operation interface, showcasing its simple design, folded shortcut tabs for a more scientific layout, and a user-centered interface for convenient operation.
5.1 Basic Measurement Procedure
- Power On: Ensure the device is connected to power and press the power button. The system will boot up and display the main measurement screen.
- Place the Lens: Carefully place the lens to be measured onto the lens fixing template. Use the three-point fixed lens pressure handle to secure it. Ensure the miniature cone measuring port is properly aligned to protect the lens.
- Automatic Identification: The LM-300 will automatically identify the type of lens (e.g., single vision, bifocal, progressive).
- Measurement: The device will automatically perform the measurement. The results for spherical power, cylindrical power, axis angle, and prism will be displayed on the screen.
- Progressive Lens Measurement: For progressive lenses, the LM-300 uses an advanced multi-point area measurement method to ensure high accuracy.
- PD/PH/UV Measurement: If required, follow the on-screen prompts to measure Pupillary Distance (PD), Pupillary Height (PH), and UV transmittance rate.
- Print Results: Use the print function on the touch screen to print out the measurement results via the built-in thermal printer.
5.2 Navigating the Interface
- Touch Screen: All functions and settings are accessible via the 7-inch touch screen.
- Main Screen: Displays real-time measurement data and primary function buttons (e.g., Measure Mode, Print, Clear).
- Settings Menu: Access system settings, display options, user profiles, and product information through the dedicated menu icon.
- Shortcut Tabs: The interface includes folded shortcut tabs for quick access to frequently used functions and a more organized layout.
6. Maintenance
Proper maintenance ensures the longevity and accuracy of your LM-300.
- Cleaning: Regularly clean the exterior of the device with a soft, dry cloth. For the screen, use a screen-specific cleaning solution and a microfiber cloth. Avoid abrasive cleaners or solvents.
- Lens Holder Cleaning: Keep the lens fixing template and measuring port clean from dust and debris to ensure accurate readings. Use a soft brush or air blower if necessary.
- Printer Maintenance: Replace the thermal paper roll when it runs out. Refer to the printer compartment for instructions on loading new paper (width 57mm).
- Storage: When not in use for extended periods, store the LM-300 in a clean, dry environment, away from extreme temperatures and humidity.
- Calibration: The LM-300 is factory calibrated. If you suspect calibration issues or experience consistent inaccuracies, contact authorized service personnel. Do not attempt to self-calibrate.
7. Troubleshooting
This section addresses common issues you might encounter with your LM-300.
| Problem | Possible Cause | Solution |
|---|---|---|
| Device does not power on. | Power cable not connected; power outlet issue; device fault. | Check power cable connection. Try a different power outlet. If problem persists, contact support. |
| Inaccurate measurement readings. | Lens not properly seated; dirty lens holder; calibration needed. | Ensure lens is securely placed. Clean lens holder. If issue persists, contact service for calibration. |
| Printer not printing. | No thermal paper; paper incorrectly loaded; printer error. | Check and replace thermal paper. Ensure paper is loaded correctly. Restart the device. |
| Touch screen unresponsive. | Temporary software glitch; screen damage. | Restart the device. If still unresponsive, contact support. |
8. Technical Specifications
| Parameter | Specification |
|---|---|
| Spherical Power (Spectacle Lens) | -25 m-1 ~ +25 m-1 |
| Cylindrical Power | -9.99 m-1 ~ +9.99 m-1 |
| Progressive ADD Power | -9.99 m-1 ~ +9.99 m-1 |
| Spherical Power (Contact Lens) | -20 m-1 ~ +20 m-1 |
| Vertex Power Step Measurement | 0.01 m-1, 0.06 m-1, 0.12 m-1, 0.25 m-1 |
| Cylindrical Lens Astigmatism Axis Angle | 0° ~ 180°, step 1° |
| Prism Base Angle Measurement Scope | 0° ~ 360°, step 1° |
| Prism Degree Measurement Scope | Horizontal 0 ~ 20, step 0.01; Vertical 0 ~ 20, step 0.01 |
| Measurable Lens Diameter | φ10mm ~ φ100mm |
| Measurable Lens Center Thickness | ≤20mm |
| Lens PD Measurement Scope | 40mm ~ 82mm, step 0.25mm |
| Lens PH Difference Measurement Scope | 0mm ~ 50mm, step 0.25mm |
| Measurable Lens Frame Leg Length | 0mm ~ 160mm |
| Measurable Anti-UV Transmittance Rate | 0 ~ 100%, step 1% |
| Main Engine Power Supply | DC 12V, 45W |
| Screen | 7'', full screen touchable |
| Printer | Thermal printing, paper width 57mm |
| ASIN | B09FDWS5BT |
| Manufacturer | Alff |
| Date First Available | September 3, 2021 |
9. Warranty and Support
For detailed information regarding warranty coverage, technical support, and service, please refer to the official warranty card included with your product or contact the manufacturer/seller directly. Keep your purchase receipt as proof of purchase for warranty claims.