1. Introduction
Welcome to the FLIEEP Wireless Pro Controller user manual. This guide provides detailed instructions for setting up, operating, and maintaining your new controller, designed for use with Nintendo Switch, Switch Lite, and Switch OLED consoles. Enjoy an enhanced gaming experience with features like Turbo function, adjustable vibration, and six-axis motion control.
2. Package Contents
- FLIEEP Wireless Pro Controller
- USB-C Charging Cable
- User Manual
3. Controller Layout
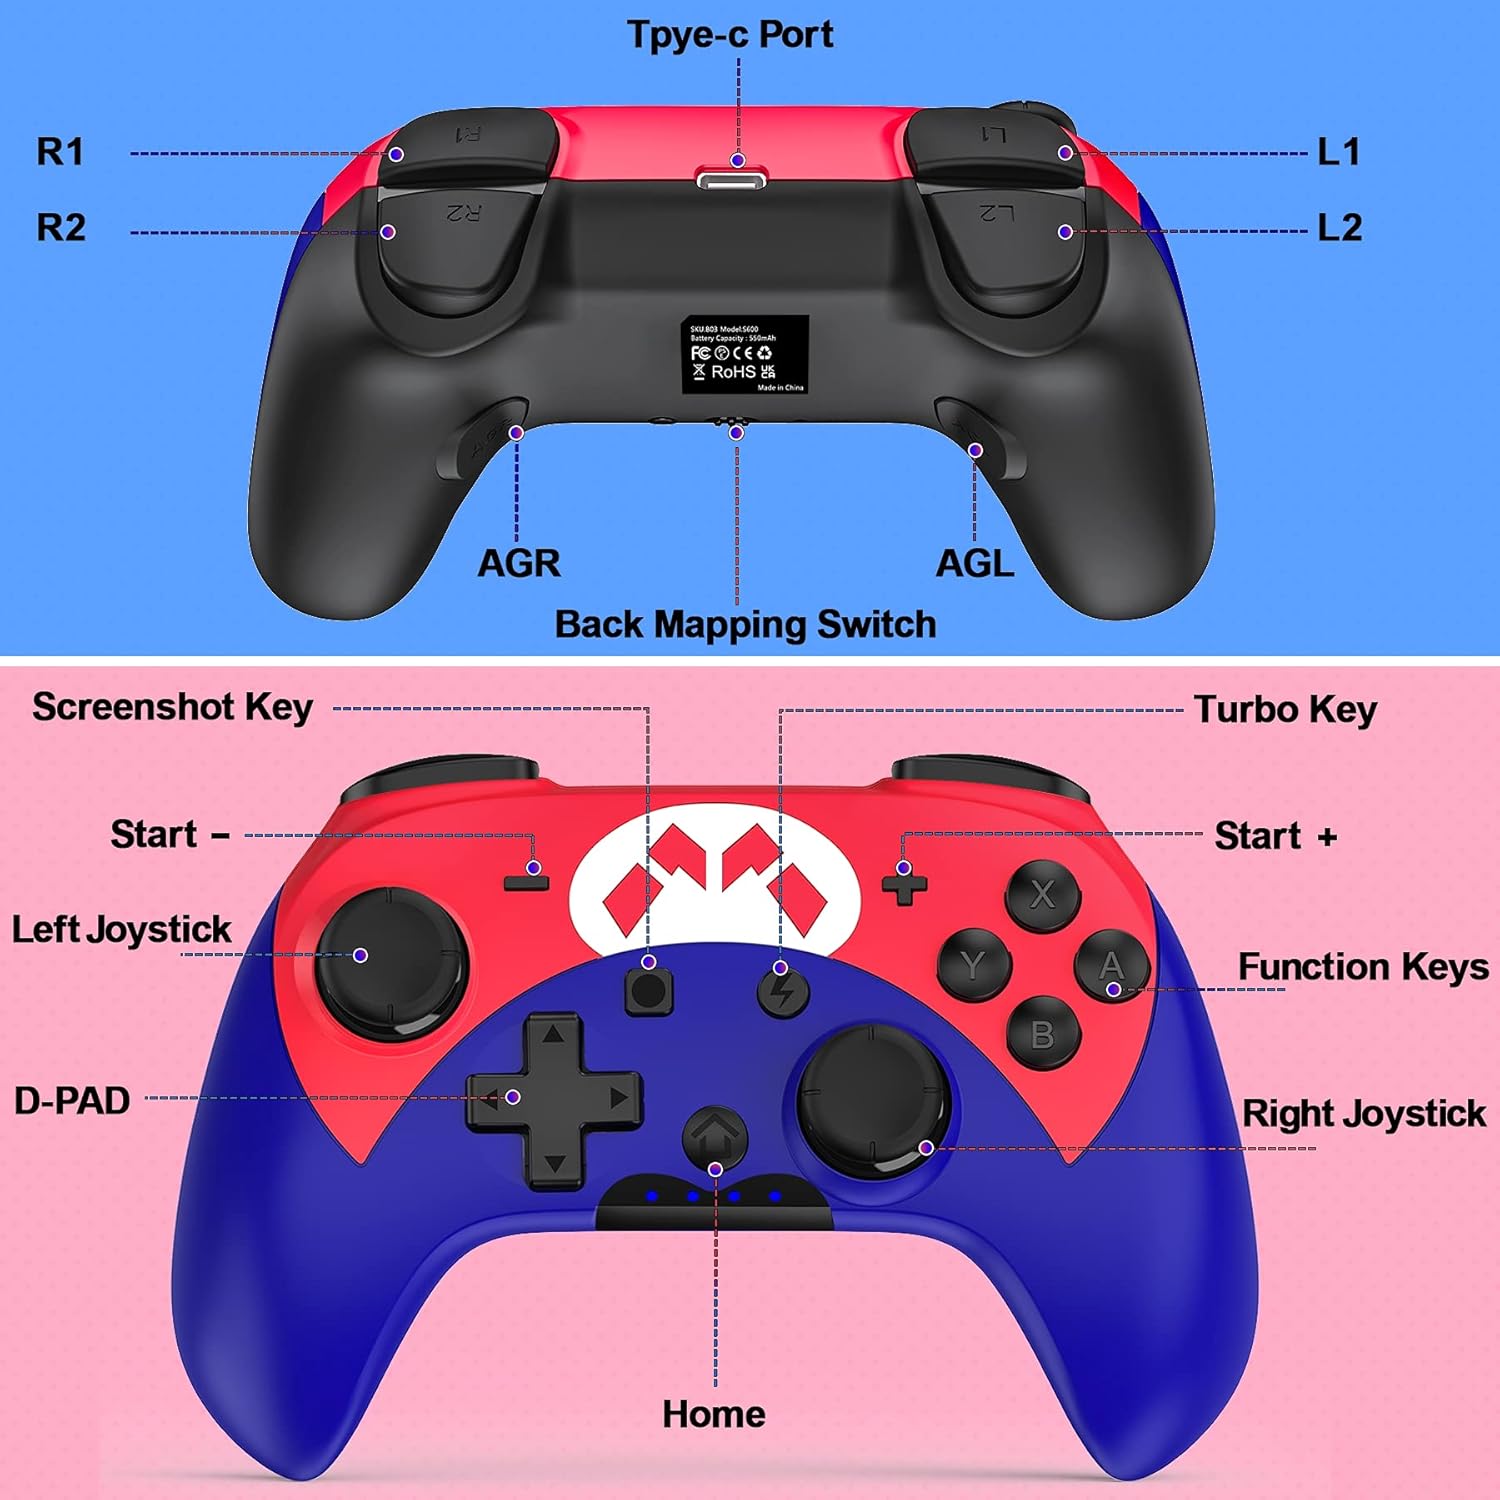
Figure 3.1: Front and rear view of the FLIEEP Wireless Pro Controller with key components labeled.
| Component | Description |
|---|---|
| Left Joystick | Directional input for movement. |
| D-PAD | Directional input for menu navigation and specific game actions. |
| Screenshot Key | Captures in-game screenshots. |
| Start - / Start + | Menu navigation and in-game options. |
| Home Button | Returns to the Switch Home menu, also used for one-key wake-up. |
| Function Keys (A, B, X, Y) | Primary action buttons. |
| Right Joystick | Directional input for camera control or other actions. |
| Turbo Key | Activates/deactivates and adjusts Turbo function. |
| L1/R1 Buttons | Shoulder buttons for various in-game actions. |
| L2/R2 Buttons | Trigger buttons for various in-game actions. |
| AGR/AGL Buttons | Programmable back buttons for custom mapping. |
| Type-C Port | Charging port for the controller. |
4. Setup
4.1 Initial Pairing with Nintendo Switch
- Ensure your Nintendo Switch console is powered on and updated to the latest system version.
- From the HOME Menu, select 'Controllers' > 'Change Grip/Order'.
- On the FLIEEP controller, press and hold the 'Home' button for 3-5 seconds until the LED indicators start flashing rapidly.
- Once the controller is successfully paired, the corresponding player LED(s) on the controller will remain lit.
4.2 Reconnecting the Controller
To reconnect a previously paired controller, simply press the 'Home' button. The controller will automatically attempt to connect to the last paired Switch console. The LED indicators will flash and then remain solid upon successful connection.
4.3 One-Key Wake Up
The FLIEEP controller supports one-key wake-up. When the Switch console is in sleep mode, press the 'Home' button on the controller to wake up the console and automatically reconnect.
Video 4.1: Official FLIEEP Wireless Switch Controller overview, demonstrating features and connectivity.
5. Operating Instructions
5.1 Turbo Function
The controller features an adjustable Turbo function with three speed levels: 5 shots/sec, 12 shots/sec, and 20 shots/sec. This function can be set to auto or semi-auto fire.
- To activate Turbo: Press and hold the 'Turbo' button, then press the action button (A/B/X/Y/L1/R1/L2/R2) you wish to apply Turbo to.
- To adjust Turbo speed: With Turbo active, press and hold the 'Turbo' button, then move the Right Joystick Up or Down to cycle through the speed settings.
- To deactivate Turbo: Repeat the activation step, or press and hold the 'Turbo' button for 5 seconds.

Figure 5.1: Visual representation of the three adjustable Turbo speeds for rapid firing in games.
5.2 Adjustable Vibration
The controller is equipped with dual motors offering four levels of adjustable vibration intensity: None, Weak, Standard, and Strong. This allows you to customize the haptic feedback to your preference for different games.
- To adjust vibration: Press and hold the 'Turbo' button, then press the D-PAD Up or Down to cycle through the vibration levels.

Figure 5.2: Diagram illustrating the four adjustable vibration levels for personalized gaming feedback.
5.3 Six-Axis Motion Control
The built-in six-axis gyroscope provides precise motion sensing, enhancing gameplay in titles that utilize motion controls for aiming, steering, or other interactive elements.
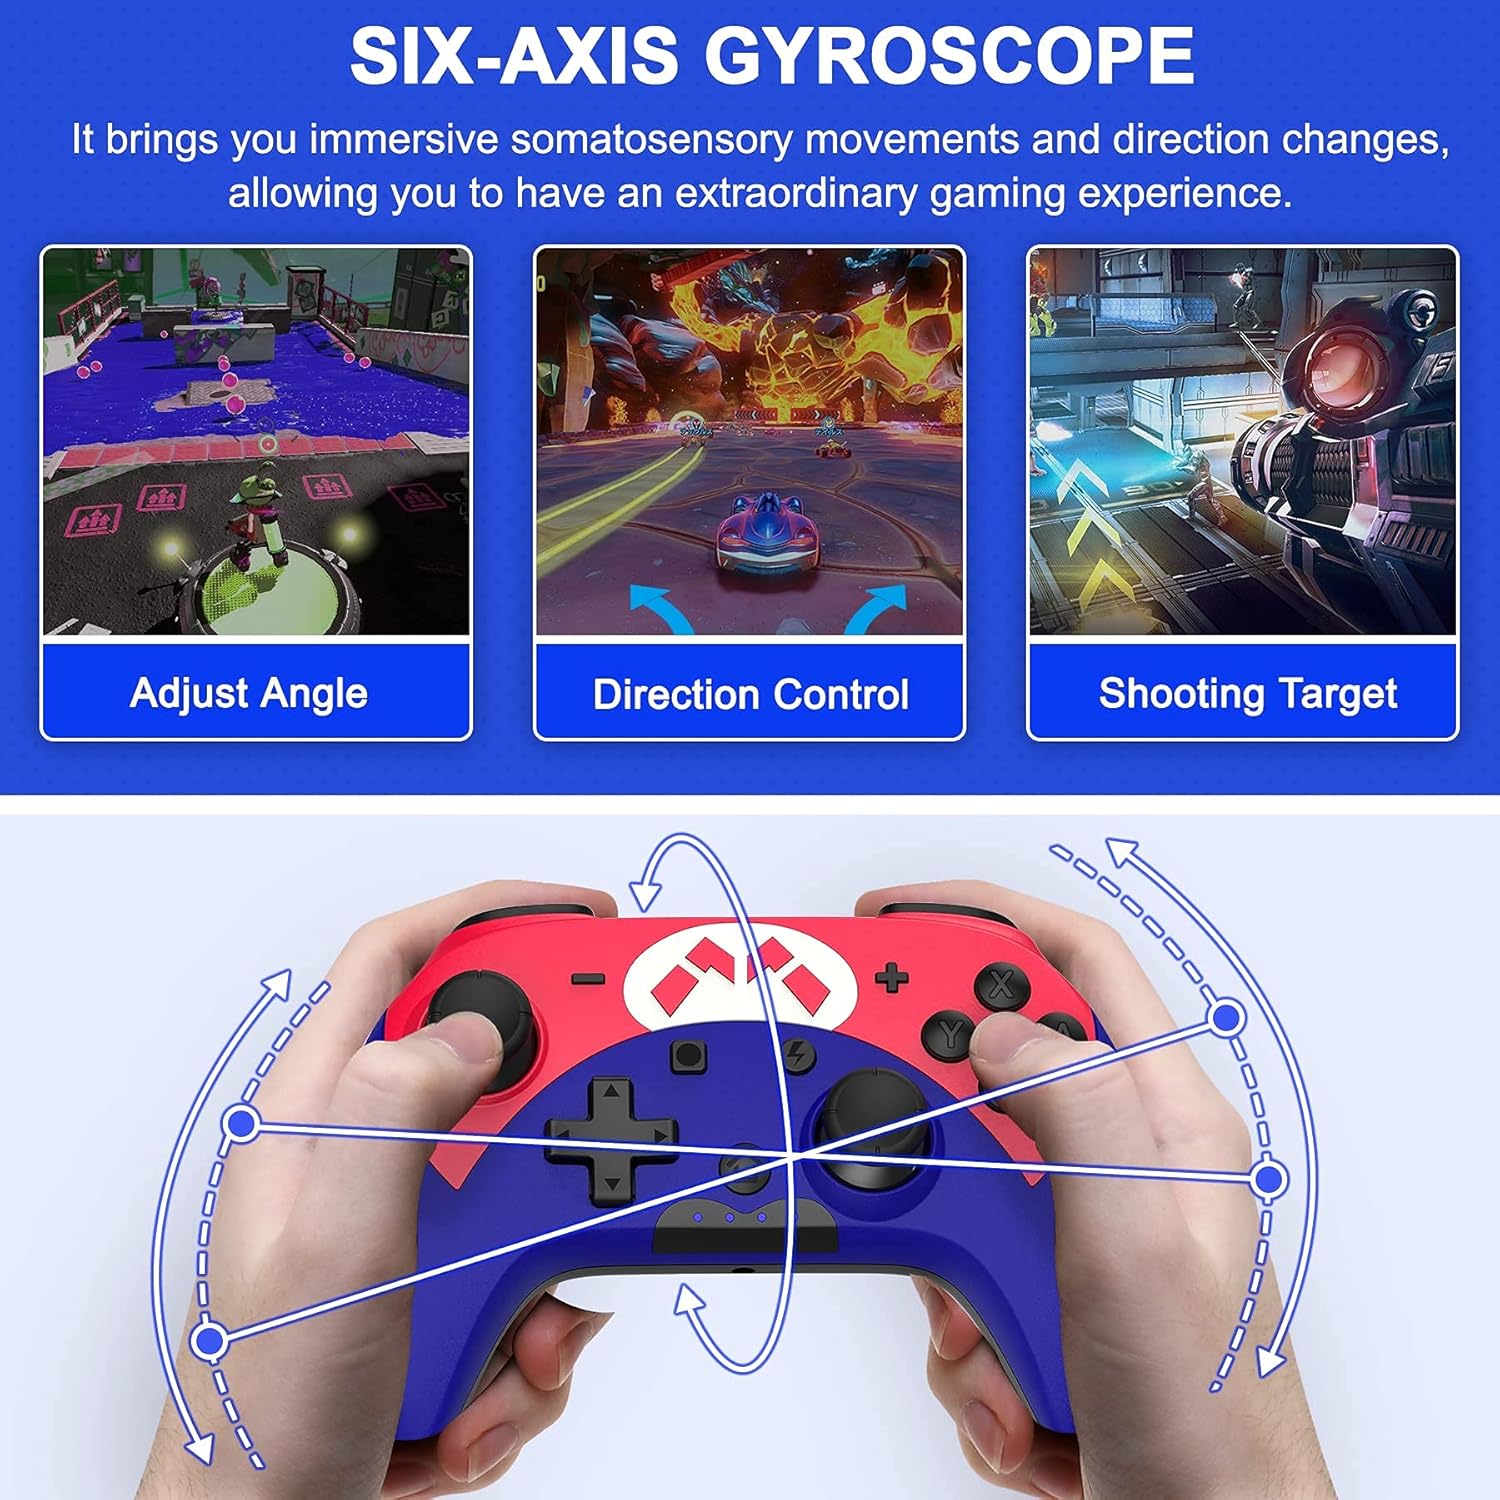
Figure 5.3: Visual explanation of how the six-axis gyroscope enables precise in-game movements and aiming.
5.4 Programmable Back Buttons (AGR/AGL)
The controller features two programmable back buttons (AGR and AGL) that can be mapped to other buttons for quick access to complex commands or frequently used actions.
- To program: Press and hold the 'M' button (usually located near the Home button) until the LED indicators flash slowly. Then press the AGR/AGL button you want to program, followed by the button you want to map it to. Press 'M' again to save.
- Refer to the detailed instructions in the included quick start guide for specific mapping procedures.
5.5 Screenshot Function
Press the dedicated 'Screenshot' button to capture your favorite in-game moments instantly. The captured images will be saved to your Nintendo Switch console's album.
6. Charging and Battery
The FLIEEP Wireless Pro Controller is equipped with a 550mAh rechargeable battery, providing extended gameplay sessions.

Figure 6.1: Illustration of the controller's internal battery and external USB-C charging port.
- Charging Time: Approximately 2-3 hours for a full charge.
- Playing Time: Up to 10-15 hours on a full charge, depending on vibration and other feature usage.
- Low Battery Indicator: The LED indicators will flash slowly to indicate a low battery level. Connect the USB-C charging cable to recharge.
- Use the provided USB-C cable to connect the controller to a USB power source (e.g., Switch dock, computer, USB wall adapter).
7. Maintenance
- Cleaning: Use a soft, dry cloth to clean the controller. Avoid using harsh chemicals or abrasive materials.
- Storage: Store the controller in a cool, dry place away from direct sunlight and extreme temperatures.
- Battery Care: To prolong battery life, avoid fully discharging the controller frequently. Charge it regularly, even if not in use for extended periods.
- Avoid Impact: Do not drop or subject the controller to strong impacts, as this may damage internal components.
8. Troubleshooting
- Controller not pairing:
- Ensure the Switch console is updated and in 'Change Grip/Order' mode.
- Make sure the controller is charged.
- Try resetting the controller by inserting a small pin into the reset hole on the back of the controller.
- Move closer to the Switch console to ensure a strong Bluetooth connection.
- Buttons unresponsive or drifting:
- Reset the controller using the reset button.
- Ensure the controller firmware is up to date (check the FLIEEP website for updates).
- Recalibrate joysticks and motion controls via the Switch system settings.
- Controller not charging:
- Verify the USB-C cable is securely connected to both the controller and the power source.
- Try a different USB-C cable or power adapter.
- Ensure the charging port on the controller is clean and free of debris.
9. Specifications
| Feature | Detail |
|---|---|
| Connectivity | Wireless (Bluetooth) |
| Compatible Devices | Nintendo Switch, Switch Lite, Switch OLED |
| Battery Capacity | 550mAh |
| Charging Time | Approx. 2-3 hours |
| Play Time | Approx. 10-15 hours |
| Charging Port | USB Type-C |
| Vibration | Dual Motor, 4 adjustable levels |
| Motion Control | Six-Axis Gyroscope |
| Turbo Function | 3 adjustable speeds (5/12/20 shots/sec) |
| Weight | 7.4 ounces (approx. 210g) |
| Dimensions | 6.03 x 4.33 x 2.36 inches (approx. 15.3 x 11 x 6 cm) |
10. Warranty and Support
FLIEEP products are designed for quality and reliability. For warranty information, technical support, or any inquiries regarding your FLIEEP Wireless Pro Controller, please refer to the contact details provided on the product packaging or visit the official FLIEEP website. Please retain your proof of purchase for warranty claims.