Introduction
The TechniSat HD-S 223 DVR is a compact digital satellite receiver designed for receiving unencrypted TV and radio channels via satellite. It offers high-definition television (HDTV) reception and includes a range of features to enhance your viewing experience. This manual provides essential information for setting up, operating, and maintaining your device.

The TechniSat HD-S 223 DVR in a typical home entertainment setup.
Key features include USB recording, Timeshift functionality for pausing live TV, a 7-day Electronic Program Guide (EPG) for program information, and a USB media player for playing various multimedia files. Its compact design makes it ideal for integration into various home entertainment setups with limited space.
Setup
Follow these steps to connect your TechniSat HD-S 223 DVR and prepare it for use.
1. Unpacking and Connections
Carefully remove all components from the packaging. Ensure you have the receiver, remote control, and power adapter.
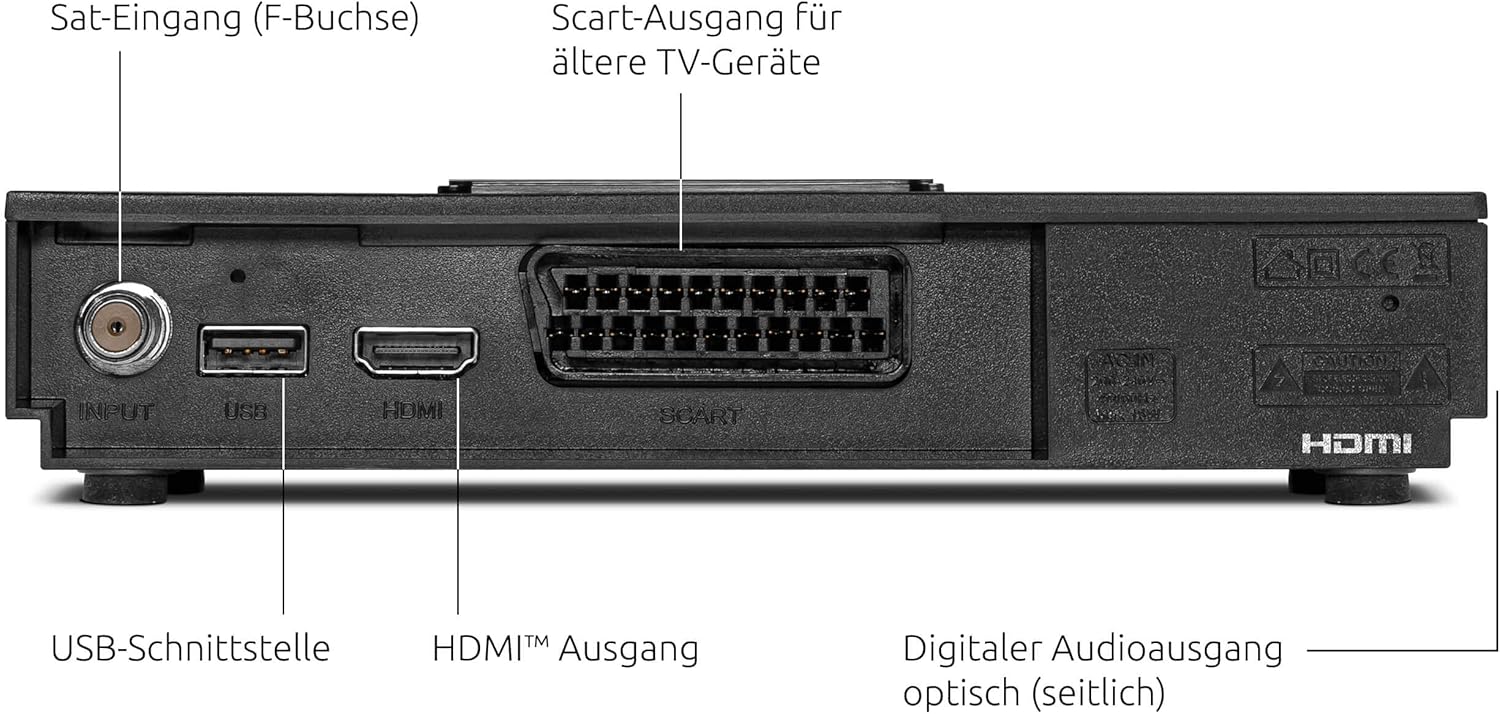
Rear panel connections of the HD-S 223 DVR.
- Satellite Connection: Connect your satellite cable to the Satellite Input (F-connector) on the rear of the receiver.
- Video/Audio Output: Connect an HDMI cable from the HDMI Output on the receiver to an available HDMI input on your television. For older TVs, use a Scart cable from the Scart Output.
- USB Storage (Optional): For recording and Timeshift functions, connect a USB storage device (e.g., USB hard drive or stick) to the USB Interface.
- Power Connection: Connect the power adapter to the receiver and then plug it into a power outlet.
2. Initial Setup Wizard
Once powered on, the receiver will guide you through the initial setup process. Follow the on-screen instructions to:
- Select your preferred language.
- Configure satellite settings (e.g., LNB type, DiSEqC settings). The device is compatible with single-cable solutions.
- Perform a channel scan to find available TV and radio programs. A pre-installed channel list for Astra 19.2° is available for quick setup.
Operating Instructions
This section covers the basic operation and advanced features of your HD-S 223 DVR.
Basic Navigation
- Use the CH+/CH- buttons on the remote control to change channels.
- Use the VOL+/VOL- buttons to adjust the volume.
- Press the OK button to display the channel list.
- Press the MENU button to access the main menu for settings and features.
Electronic Program Guide (EPG)
The integrated EPG provides a comprehensive overview of TV programs up to 7 days in advance.

The 7-day Electronic Program Guide (EPG) for easy program selection.
- Press the EPG button on your remote control to open the program guide.
- Navigate through channels and time slots using the arrow buttons.
- Select a program to view detailed information or to set a timer for recording.
USB Recording and Timeshift
With a connected USB storage device, you can record unencrypted programs and use the Timeshift function.

The Timeshift function allows you to pause and resume live television.
- Recording: While watching a program, press the REC button on the remote control to start recording. Press STOP to end the recording. You can also schedule recordings via the EPG.
- Timeshift: Press the PAUSE button during live TV to pause the broadcast. Press PLAY to resume from where you left off. You can also fast-forward or rewind within the buffered content.
USB Media Player
The integrated media player allows you to play videos, music, and images from your connected USB storage device.

Icons illustrating various features including the USB Media Player.
- Connect your USB device to the receiver.
- Access the Media Player function from the main menu.
- Browse your files and select the desired video, audio, or image file to play.
Maintenance
Proper care ensures the longevity and optimal performance of your TechniSat HD-S 223 DVR.
- Cleaning: Keep the device clean by wiping it with a soft, dry cloth. Do not use liquid or aerosol cleaners.
- Ventilation: Ensure the receiver has adequate ventilation. Do not block the ventilation openings. Avoid placing it in enclosed spaces or on soft surfaces that may obstruct airflow.
- Software Updates: Periodically check for available software updates through the device's menu. Keeping the software updated can improve performance and add new features.
- Environmental Conditions: Avoid exposing the device to extreme temperatures, humidity, or direct sunlight.
Troubleshooting
If you encounter issues with your receiver, refer to the following common problems and solutions.
- No Signal:
- Check that the satellite cable is securely connected to the Satellite Input.
- Ensure your satellite dish is correctly aligned and free from obstructions.
- Verify LNB settings in the receiver's menu.
- No Picture or Sound:
- Confirm that the HDMI or Scart cable is properly connected between the receiver and your TV.
- Check that your TV is set to the correct input source (e.g., HDMI 1, AV).
- Ensure the receiver's volume is not muted or set too low.
- Recording Issues:
- Verify that a compatible USB storage device is connected and has sufficient free space.
- Ensure the program you are trying to record is unencrypted.
- Check recording settings and timer schedules in the menu.
- Remote Control Not Working:
- Replace the batteries in the remote control.
- Ensure there are no obstructions between the remote control and the receiver's IR sensor.
Specifications
Below are the technical specifications for the TechniSat HD-S 223 DVR.
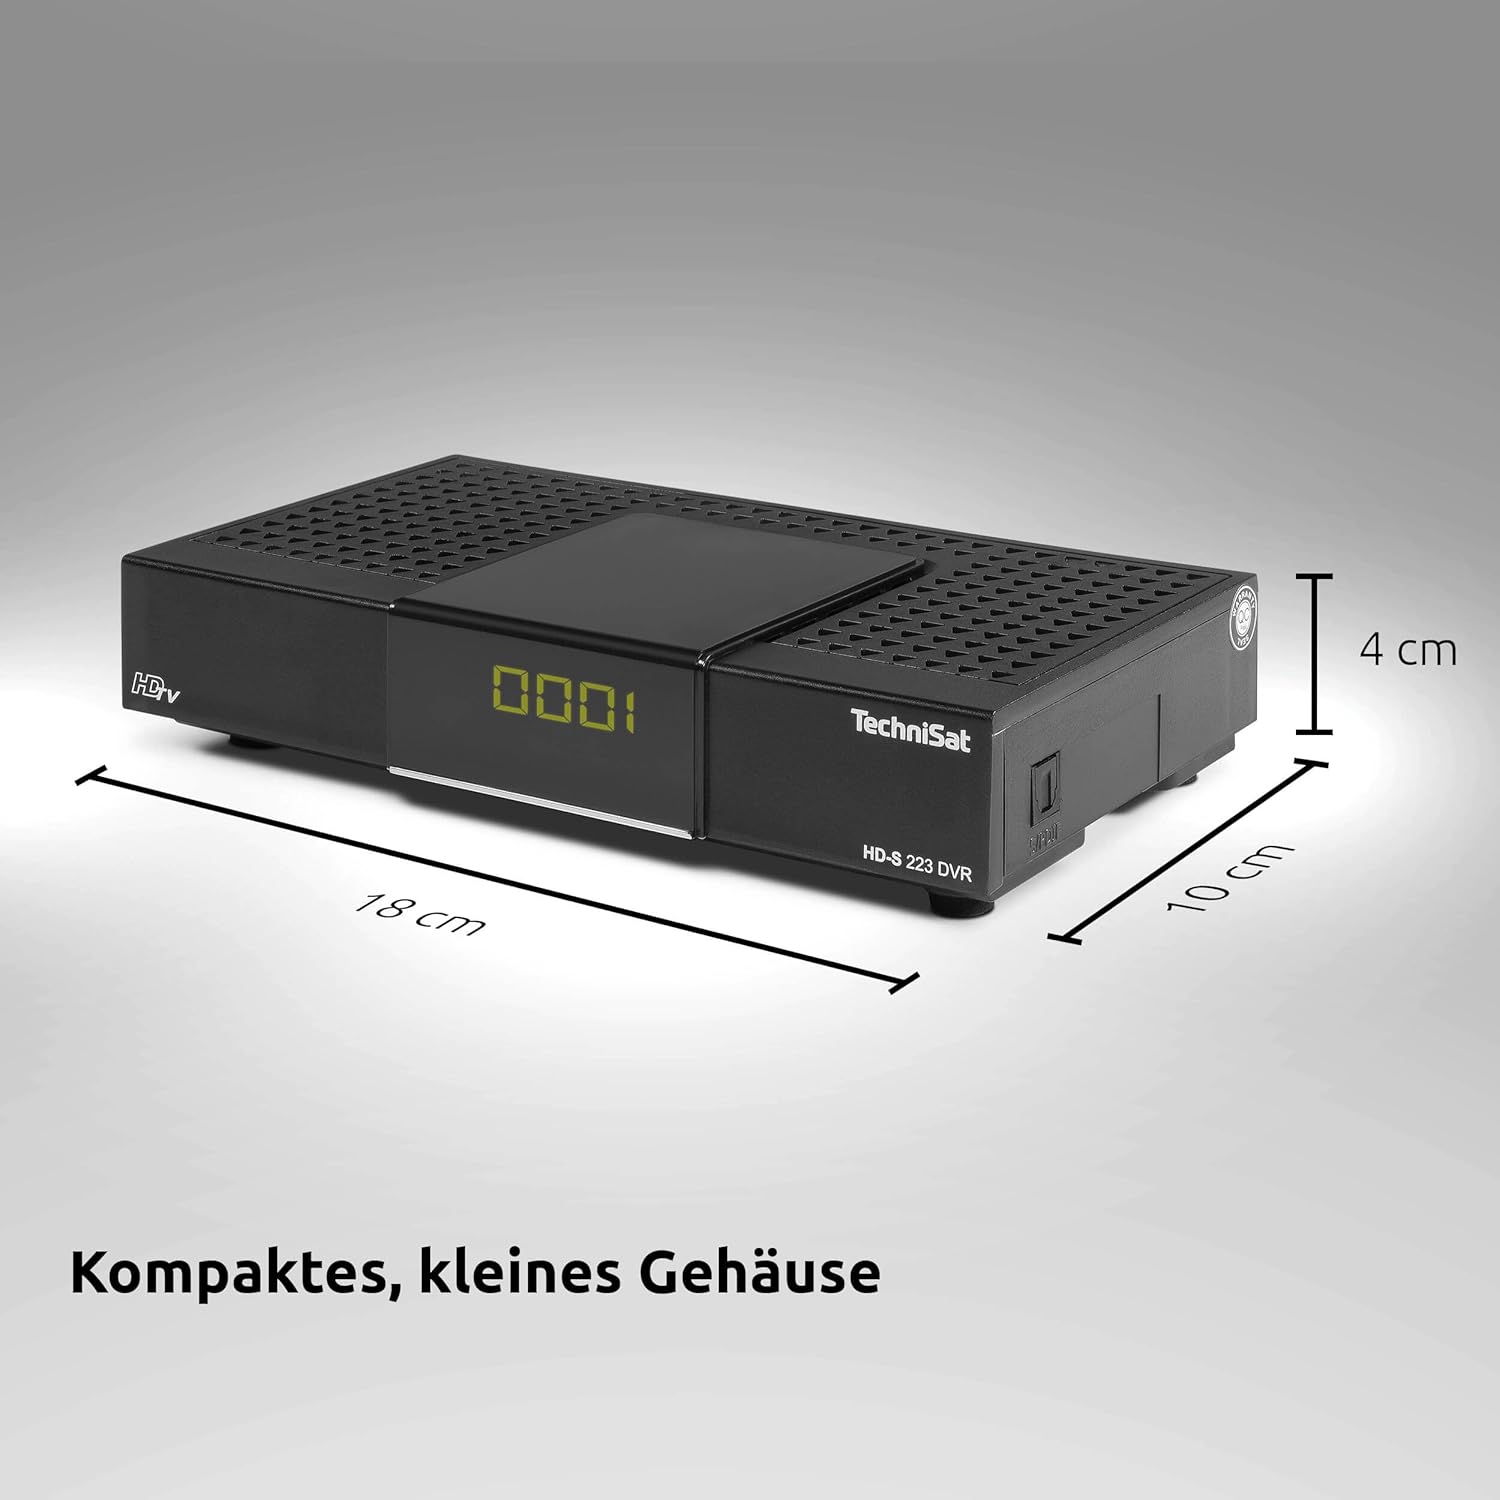
Compact dimensions of the HD-S 223 DVR.
| Brand | TechniSat |
| Model Number | 0000/4813 |
| Product Type Name | Compact HD Satellite Receiver with USB Recording Function |
| Color | Black |
| Product Dimensions (D x W x H) | 10 cm x 18 cm x 4 cm |
| Item Weight | 290 Grams |
| Connectivity Technology | HDMI |
| Total USB Ports | 1 |
| Total HDMI Ports | 1 |
| Audio Output Mode | Surround |
| Analog Video Output | RF |
| Video Output Resolution | 1080i |
| Supported Standards | DVB-S, DVB-S2, MPEG-2, MPEG-4, H.264, AAC, MP3, MP2, OGG, MKV, MP4, MOV, MPG, TS, TS4, VOB, M2TS, AVI |
| Aspect Ratio | 16:9 |
| Voltage | 230 Volts (AC) |
| Power Consumption | 10 Watt |
| Frequency Range | 950 to 2150 MHz |
| Satellite Services Description | Supports digital satellite transmission standard DVB-S/S2. |
| Compatible Devices | Television |
| Box Contents | HD-S 223 DVR Satellite Receiver, User Manual, DVR401 Remote Control |

DiSEqC compatibility for single-cable solutions.
Warranty
This TechniSat product comes with a standard manufacturer's warranty. For detailed warranty terms and conditions, including coverage period and claim procedures, please refer to the warranty documentation included with your purchase. You may also visit the official TechniSat website for the most up-to-date warranty information.
Support
Should you require technical assistance, have questions about your device, or need to report a problem, please contact TechniSat customer support. Contact information can typically be found in the documentation provided with your product or on the official TechniSat website. Please have your model number (HD-S 223 DVR) and serial number ready when contacting support.