1. Introduction
This manual provides comprehensive instructions for installing and operating your Kyglaring LED Lighting Kit, RC Sound Version, specifically designed for the Lego Volkswagen T2 Camper Van 10279 building set. Please read these instructions carefully before beginning the installation process to ensure proper setup and functionality.
Important Note: This product includes only the LED lighting kit. The Lego Volkswagen T2 Camper Van 10279 building set is not included and must be purchased separately.
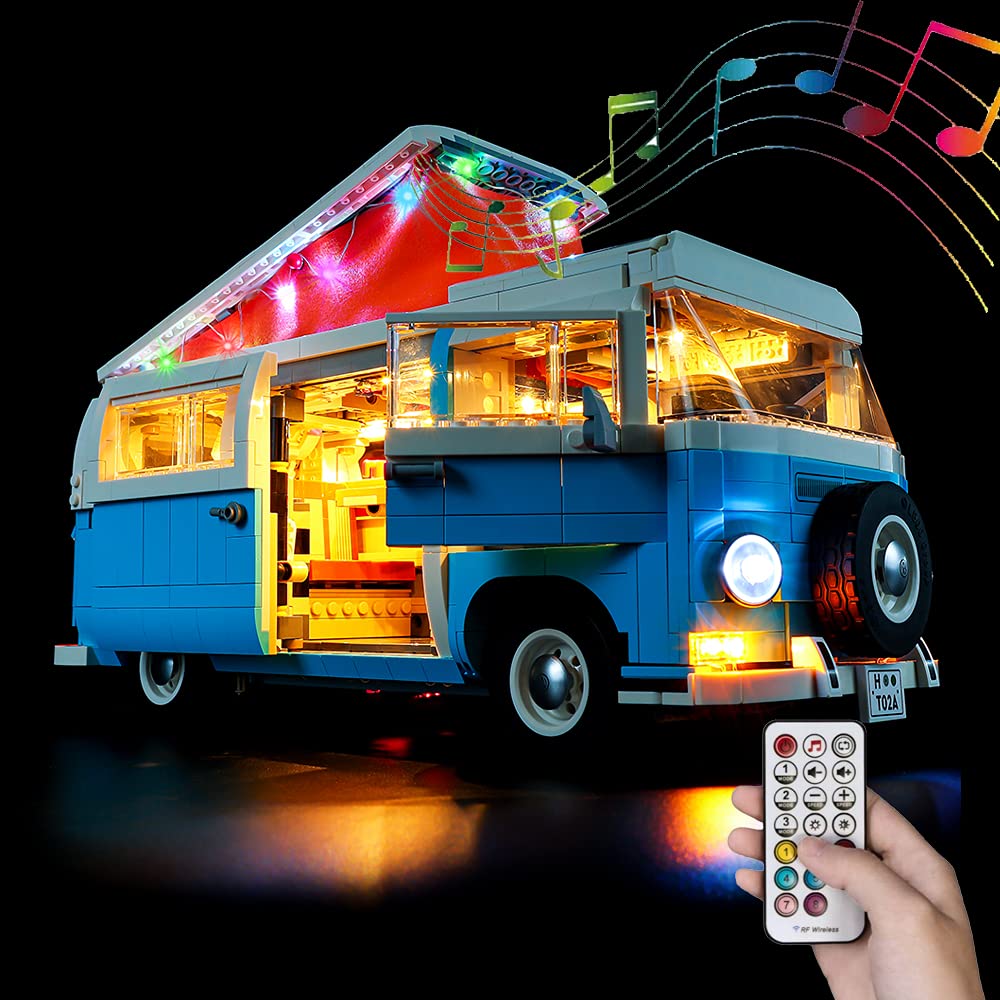
Image 1: The Kyglaring LED Lighting Kit installed on the Lego Volkswagen T2 Camper Van 10279 model.
2. Package Contents
Your Kyglaring LED Lighting Kit package should contain all necessary components for illuminating your Lego Volkswagen T2 Camper Van 10279. This includes various LED lights, connecting cables, a battery box, and an RF remote control for the RC Sound Version. A detailed component list is typically provided within the included pictorial instruction guide.
3. Key Features
- Custom Design: Specifically engineered for the Lego Volkswagen T2 Camper Van 10279 model, ensuring a perfect fit and enhanced visual appeal.
- RC Sound and Light Version: Features an RF remote control that allows for independent control of up to 5 separate lighting zones (headlights, taillights, left and right turn signals, interior lights, tent lights).
- Dynamic Lighting: Includes a variety of built-in light patterns and sound effects, which can be customized to your preference.
- Multiple Power Options: Can be powered via a power bank, battery box, wall charger, or any other device with a USB port (output voltage should be less than 6V).

Image 2: The illuminated Lego Volkswagen T2 Camper Van 10279 with exterior and interior lighting, showcasing the tent lights and additional accessories.
4. Setup and Installation
The installation of the Kyglaring LED Lighting Kit requires careful attention to detail. A comprehensive, step-by-step pictorial instruction guide is included with your kit to facilitate the process. Follow these instructions precisely to ensure correct assembly and avoid damage to the lighting components or your Lego model.
General Installation Steps:
- Preparation: Ensure your Lego Volkswagen T2 Camper Van 10279 model is fully assembled before beginning the lighting kit installation.
- Component Identification: Familiarize yourself with all lighting components and their intended placement by referring to the instruction guide.
- Wire Routing: Carefully route the thin connecting wires between Lego bricks and plates as indicated in the instructions. Avoid pinching or excessively bending wires.
- Light Placement: Attach the LED lights to the designated areas of the model, such as headlights, taillights, interior cabin, and pop-up roof tent.
- Connection: Connect the individual light units to the main control board and then to the power source (battery box or USB cable).

Image 3: Detailed view of the multi-colored LED lights installed within the pop-up roof tent of the camper van.

Image 4: Interior lighting detail of the cockpit area, highlighting the dashboard and steering wheel.
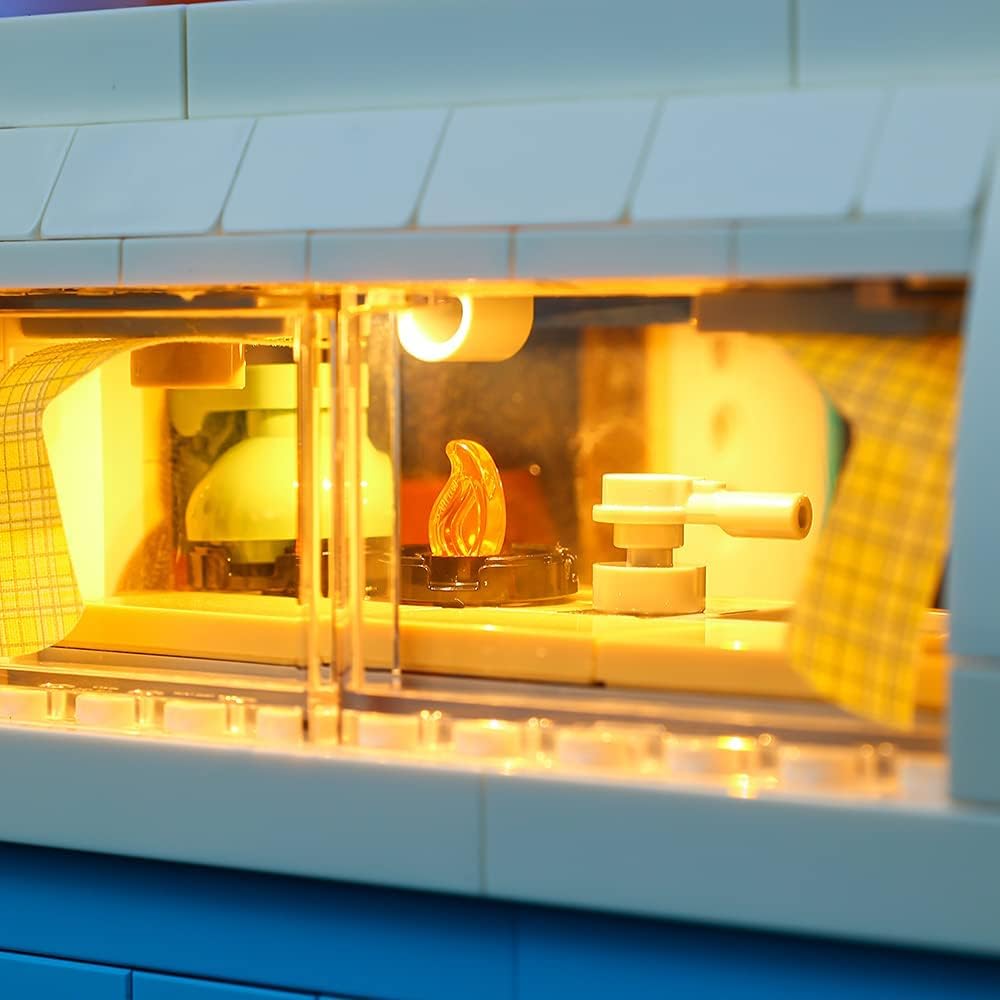
Image 5: Interior lighting detail of the kitchen and living area, showing the illuminated stove and seating.
5. Operating Instructions (RC Sound Version)
The RC Sound Version of your lighting kit offers advanced control over the lighting and sound effects. Use the provided RF remote control to manage the various functions.
Remote Control Functions:
- Power On/Off: Use the designated button to turn the entire lighting system on or off.
- Zone Control: The remote allows for independent control of up to 5 lighting zones: headlights, taillights, left turn signal, right turn signal, interior lights, and tent lights. Refer to the remote's button layout in your pictorial guide for specific controls.
- Light Patterns: Cycle through various pre-programmed light patterns for different effects.
- Sound Effects: Activate and change various built-in sound effects to complement your display.
- Customization: Some settings may be customizable. Consult your detailed instruction guide for advanced options.
Video 1: Demonstration of the RC Sound Version lighting kit for Lego 10279, showcasing various light and sound functions controlled by the remote.
Video 2: Comparison between the standard version and the RC Sound Version of the lighting kit, highlighting the differences in control and features.
6. Power Options
The lighting kit offers flexible power options:
- Power Bank: Connect the USB cable from the lighting kit to a standard power bank.
- Battery Box: Insert the required batteries (not included) into the battery box and connect it to the lighting kit.
- Wall Charger: Use a compatible USB wall charger (output voltage less than 6V) to power the kit.
- Other USB Devices: Any device with a USB port providing less than 6V output can be used.
Ensure the power source provides a stable output of less than 6V to prevent damage to the LED components.

Image 6: Rear view of the camper van, showing the illuminated taillights and license plate light.

Image 7: Front view of the camper van, showcasing the illuminated headlights and turn signals.
7. Maintenance
To ensure the longevity and optimal performance of your Kyglaring LED Lighting Kit, follow these maintenance guidelines:
- Cleaning: Gently dust the LED components and wires with a soft, dry cloth. Avoid using liquids or abrasive cleaners.
- Wire Care: Periodically inspect wires for any signs of wear, fraying, or damage. Ensure they are not pinched or under excessive tension.
- Storage: When not in use for extended periods, disconnect the power source. Store the model in a cool, dry place away from direct sunlight.
- Battery Replacement: If using a battery box, replace batteries as needed to maintain consistent light output.
8. Troubleshooting
If you encounter any issues with your lighting kit, refer to the following common troubleshooting steps:
- Lights Not Turning On:
- Check if the power source is properly connected and functional.
- Ensure batteries (if used) are correctly inserted and have sufficient charge.
- Verify all cable connections are secure and not loose.
- Individual Lights Not Working:
- Inspect the specific light unit and its connecting wire for any visible damage or disconnections.
- Ensure the wire is not pinched between Lego bricks.
- Remote Control Not Responding:
- Check the remote control's battery and replace if necessary.
- Ensure there are no obstructions between the remote and the lighting kit's receiver.
- Sound Issues:
- Verify sound settings on the remote control.
- Ensure the speaker (if separate) is properly connected.
For persistent issues, consult the detailed instruction guide provided with your kit or contact Kyglaring customer support.
9. Specifications
| Color | RC Sound Version |
| Material | Plastic |
| Light Source Type | Light Emitting Diode (LED) |
| Power Source | Battery Powered (via battery box) / USB Powered (via power bank, wall charger, etc.) |
| Brand | Kyglaring |
| Style | Modern |
| Manufacturer | Kyglaring |
| Recommended Age | 14 years and up |
10. Warranty and Support
For information regarding product warranty, returns, or technical support, please refer to the contact details provided in your product packaging or visit the official Kyglaring website. Keep your purchase receipt as proof of purchase for any warranty claims.