
Introduction
Welcome to your new COBIZI 10x20 Pop Up Canopy Tent. This manual provides essential information for the safe and correct assembly, operation, and maintenance of your canopy.
This canopy is designed for temporary shade and shelter during outdoor activities such as parties, camping, beach trips, and events. It is not intended for permanent installation or use in extreme weather conditions.
Safety Instructions
- Always secure the canopy with stakes and ropes to prevent wind damage.
- Do not use in strong winds, heavy rain, or snow. Disassemble and store the canopy during adverse weather.
- Keep all flame and heat sources away from the canopy fabric.
- Ensure all frame components are fully locked before use.
- Adult assembly is required. Keep children away during setup and takedown.
- Regularly inspect the canopy for any damage to the frame or fabric. Do not use if damaged.
Package Contents
Verify that all components listed below are present before beginning assembly.

Image showing all components included in the COBIZI 10x20 Pop Up Canopy Tent package: Canopy Top, Frame, 4 Sidewalls with windows, 2 Sidewalls with zippers, User Manual, 12 Stakes, and 6 Ropes.
- 1 x Canopy Top
- 1 x Pre-assembled Steel Frame
- 4 x Sidewalls with Windows
- 2 x Sidewalls with Zippers
- 1 x User Manual
- 12 x Stakes
- 6 x Ropes
- 1 x Carry Bag
Setup Instructions
Follow these steps for proper assembly of your COBIZI 10x20 Pop Up Canopy Tent.
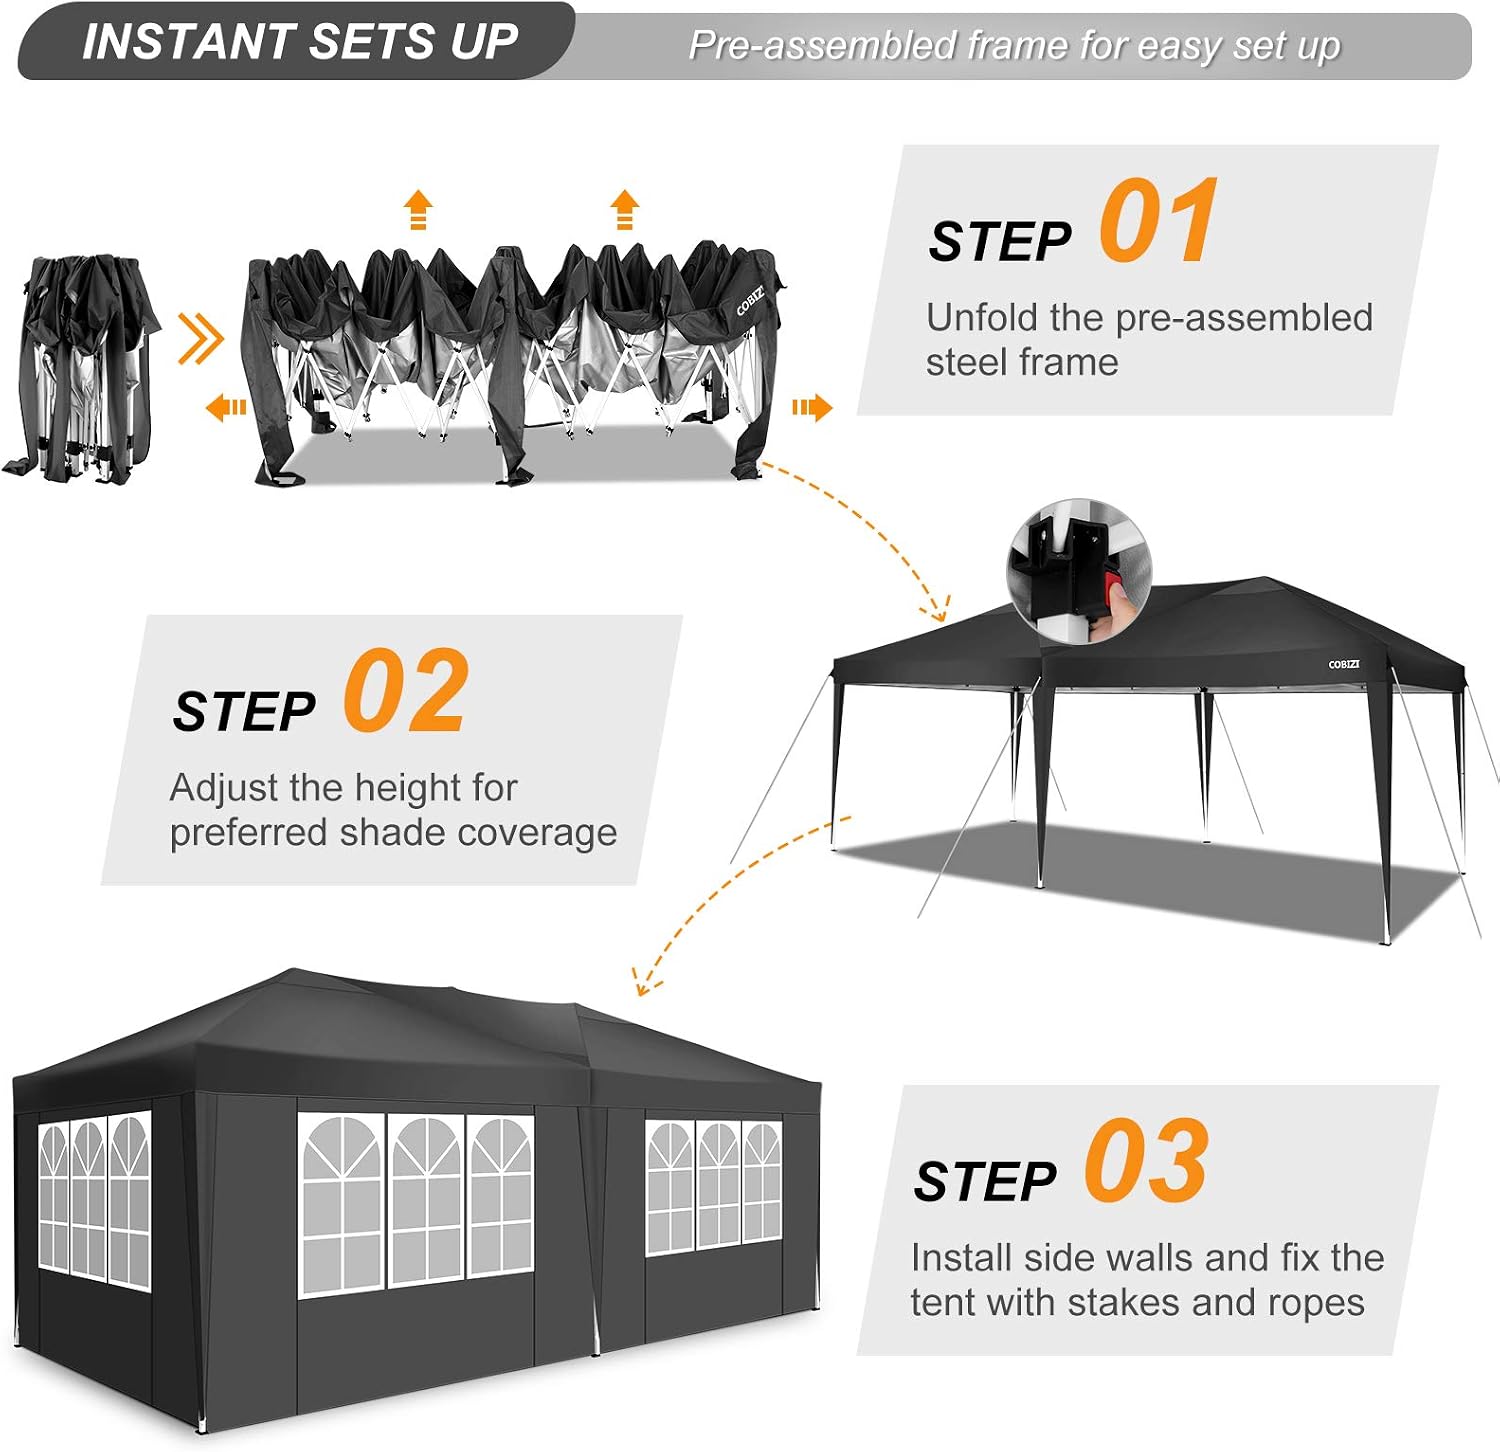
Diagram illustrating the three main steps for setting up the canopy: unfolding the frame, adjusting the height, and installing sidewalls.
- Step 1: Unfold the Frame
With two people, grasp opposite outer legs of the folded frame. Slowly pull the frame apart until it is partially open. Do not force it.
- Step 2: Attach Canopy Top and Partially Extend Legs
Place the canopy fabric over the partially opened frame. Secure the corners of the canopy top to the frame's corner posts using the attached Velcro straps or ties. Lift the frame from the center and push up on the lower truss bars until the frame locks into place. Ensure all four corners are securely locked.
- Step 3: Adjust Height
Locate the push-button sliders on each leg. Press the button and extend each leg to the desired height. Ensure each leg clicks into place at the same height setting for stability.

Close-up image showing the push-button mechanism for adjusting the canopy leg height.
- Step 4: Install Sidewalls (Optional)
Attach the sidewalls to the canopy frame using the Velcro straps located along the top edge of the sidewalls and the vertical edges of the frame legs. The sidewalls with windows and zippered sidewalls can be arranged as desired.

Close-up image of a zipper on a sidewall, demonstrating how sidewalls can be connected or opened.

Close-up image of a sidewall with a decorative arched window design.
- Step 5: Secure the Canopy
Use the provided stakes and ropes to anchor the canopy to the ground. Attach ropes to the canopy's D-rings or loops and secure them to the stakes. This is crucial for stability, especially in light breezes.

Close-up image of the canopy leg base, showing holes for securing stakes.
Operating Instructions
Height Adjustment
To adjust the height, press the push-button on each leg and slide the inner leg up or down to the desired position. Ensure all legs are set to the same height and click into place.
Sidewall Configuration
The included sidewalls can be attached or removed as needed. Use the zippered sidewalls for entry/exit points and the windowed sidewalls for light and visibility.
Weather Considerations
This canopy provides protection from sun and light rain. It is waterproof and offers UV protection (UPF 50+). However, it is not designed for use in strong winds, heavy rain, or snow. Disassemble and store the canopy during such conditions to prevent damage.

Image demonstrating the canopy's ability to block UV rays and its waterproof properties, showing water beading on the fabric surface.
Maintenance
Cleaning
- Clean the canopy fabric with mild soap and water. Do not use harsh detergents or abrasive cleaners. Allow the fabric to air dry completely before storage.
- Wipe down the steel frame with a damp cloth. Dry thoroughly to prevent rust.
Storage
- Ensure the canopy fabric and frame are completely dry before folding and storing in the carry bag. Store in a cool, dry place away from direct sunlight.
Inspection
- Periodically inspect all frame connections, fabric, and ropes for wear or damage. Replace any damaged parts immediately.
Troubleshooting
Canopy is unstable or wobbly
- Ensure all frame legs are fully extended and locked into place at the same height.
- Verify that the canopy is properly anchored with all stakes and ropes.
- Check for uneven ground. Relocate the canopy to a flatter surface if necessary.
Water pooling on canopy top
- This may indicate improper setup or insufficient tension. Ensure the frame is fully extended and the canopy top is taut.
- In heavy rain, water pooling can occur. It is recommended to take down the canopy in such conditions.
Difficulty extending/retracting frame
- Ensure no fabric is caught in the frame joints.
- Apply gentle, even pressure. Do not force the frame.
- Lubricate moving parts with a silicone spray if necessary.
Specifications

Image displaying the dimensions of the 10x20 canopy tent when set up and the packed dimensions of its carry bag.
| Feature | Detail |
|---|---|
| Model | COBIZI 10x20 Pop Up Canopy Tent |
| Dimensions (L x W x H) | 236.22" x 118.11" x 108.27" (20ft x 10ft x 9ft approx.) |
| Frame Material | Alloy Steel, Metal, Plastic |
| Canopy Material | 210D Silver Coated Oxford Cloth |
| Color | Black |
| Water Resistance Level | Waterproof |
| UV Protection | True (UPF 50+) |
| Sidewalls Included | 6 (4 with windows, 2 with zippers) |
| Closure Type | Fold, Velcro, Zipper |
| Recommended Uses | Camping, Outdoor Activities, Picnic, Social Gathering |
Warranty and Support
For warranty information or technical support, please refer to the contact details provided with your purchase or visit the official COBIZI website.
Keep your purchase receipt as proof of purchase for any warranty claims.